A Practical Guide to SharePoint 2013

A Practical Guide to SharePoint 2013
A Practical Guide to SharePoint 2013 - Book by Saifullah Shafiq

Tuesday, February 27, 2007

Installing WSUploadService manually

Update:
Originally posted: Tue, Feb 27, 2007
Reposted: Aug 25, 2007
Some of the links might not work as this version was retrieved from a web archive. If you find any dead links, kindly send an email to share.point@yahoo.com with the URL of this page. Thank you!
-------------------------
I published a WSUploadService in November last year This web service uploads documents from local file system to SharePoint. The web service comes with an installer and installing the web service on the server is a single-click process but recently, I received a complaint from a couple of users who use non-English SharePoint and the complaint is that installation ends prematurely without installing the service successfully. I am not sure as to why the installation fails on the SharePoint server that is not using English as the main language but here are the files required to complete the installation manually. Installing a web service manually is discussed in the following articles:
/ssa/archive/2007/02/23/19968.aspx
/ssa/archive/2006/12/19/17093.aspx
All you need are the files for the web service. You can download the files from here.
1. Download the files.
2. Unzip the downloaded file to a local folder on your machine (SharePoint server).
3. Copy the following files from the folder (where you unzipped the package) to the _vti_bin directory of the SharePoint server.
Files.asmx
Filesdisco.aspx
Fileswsdl.aspx
The _vti_bin virtual directory maps physically to the Local_Drive:Program FilesCommon FilesMicrosoft SharedWeb Server Extensions12ISAPI directory, which contains the default Web service files used in Windows SharePoint Services.
To include the Web service in the list of web services on the server
4. In Notepad, open the spsdisco.aspx file. spsdisco.aspx is located in the following directory (on the SharePoint server):
Local_Drive:Program FilesCommon FilesMicrosoft Sharedweb server extensions12ISAPI
5. Add the following lines to the end of the file within the discovery element (paste these lines just before the </discovery> element) and save the file:
Note: Please paste these lines to the notepad first to avoid copying the illegal characters or copy these lines from the replacement.txt file (included in the zip package).
<contractRef ref=<% SPEncode.WriteHtmlEncodeWithQuote(Response, spWeb.Url + "/_vti_bin/Files.asmx?wsdl",'"'); %> docRef=<% SPEncode.WriteHtmlEncodeWithQuote(Response, spWeb.Url + "/_vti_bin/Files.asmx", '"'); %> xmlns="http://schemas.xmlsoap.org/disco/scl/" />
<soap address=<% SPEncode.WriteHtmlEncodeWithQuote(Response, spWeb.Url + "/_vti_bin/Files.asmx", '"'); %> xmlns:q1="http://schemas.microsoft.com/sharepoint/soap/directory/" binding="q1:FilesSoap" xmlns="http://schemas.xmlsoap.org/disco/soap/" />
Copying the assembly to the Bin folder
6. Copy the UploadService.dll file to the bin folder of the default SharePoint web application. Following path contains the virtual directories of web applications that you have created on your SharePoint server.
Local_Drive:InetpubwwwrootwssVirtualDirectories
If your default web application is configured at port 80 then you should copy the techno.dll file to the following folder:
Local_Drive:InetpubwwwrootwssVirtualDirectories80 in
It is up to you, you may want to install the web service in some other application. For example, if you want to install it in an application configured at port 81, then copy the techno.dll to the following folder:
Local_Drive:InetpubwwwrootwssVirtualDirectories81 in
Adding web service to the GAC
7. Go to following folder:
LocalDrive:Program FilesMicrosoft Visual Studio 8SDKv2.0Bin
and run the following command:
gacutil.exe -i "<Full file system path to UploadService.DLL>".
Hope this will help the users who could not install the WSUploadService with an installer successfully. If someone still has any problem, please feel free to contact me and I will make sure your problem is solved well within time.
Good luck

-SSA

Searching PHP Sites With SharePoint

Update:
Originally posted: Tue, Feb 27, 2007
Reposted: Aug 25, 2007
Some of the links might not work as this version was retrieved from a web archive. If you find any dead links, kindly send an email to share.point@yahoo.com with the URL of this page. Thank you!
-------------------------
Searching PHP Sites With SharePoint
In this walk through, I will setup search that will return data from the PHP site configured on an Apache server.
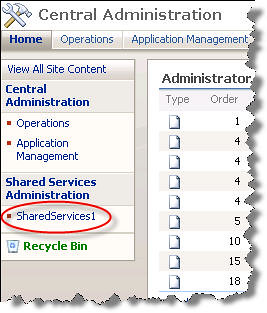
1. Go to "SharePoint 3.0 Central Administration" and select the Shared Service Provider that you have set up for your sites.
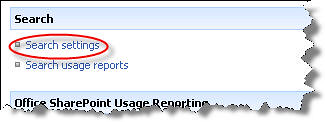
2. Click Search settings.
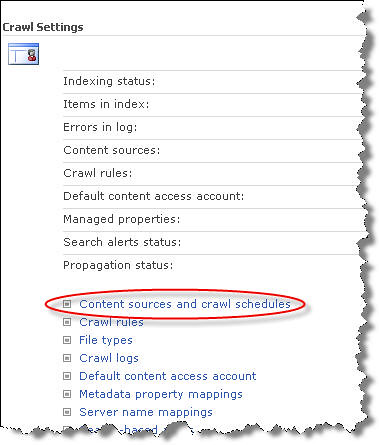
3. Click Content sources and crawl schedules under "Crawl Settings".
4. Click New Content Source.
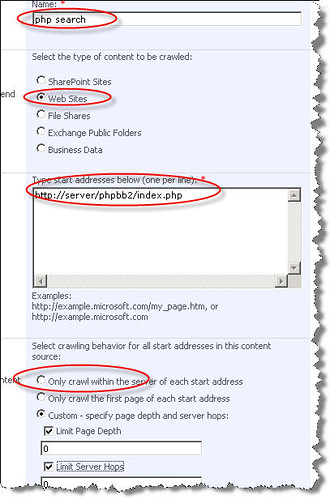
5. Enter a name for your search. Select Web Sites in the "Content Source Type". Enter a URL in the "Start Addresses". This should be the complete URL including the page name. You can customize the crawl settings according to your own needs. For this demo, I selected the first option (Only crawl within the server...) but if you have a fairly large site, you may want to select the custom settings. You can enter a value for "Limit Page Depth". If unchecked, it will search unlimited pages which may not be a good idea if you intend to keep the server hops limit set to "unlimited". Check "Start full crawl of this content source" check box and click the OK button.
6. Now go back to the Search Service Provider page and click Search Settings. On "Configure Search Settings" page, click Crawl rules.
7. Click New Crawl Rule link.
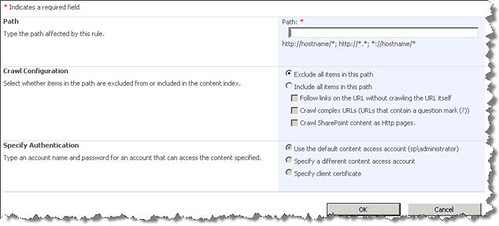
8. Enter a path to the PHP site in the Path, for example, to include all pages in the site, you can enter http://server/phpbb2/*. This will include all site pages or to include only a single page in the search, you can enter a page path like http://server/phpbb2/index.php. This will search only the index.php page. You can also use this interface to exclude items from the search. In fact, you can create multiple rules to manage your search results. To continue with this walk through, we will select Include all items in this path in "Crawl Configuration". You can also specify the authentication type in "Specify Authentication". Note, this is not the web site login credentials, this is the web site access settings, configured in the HTTP server. Click OK to save the changes. You will have to re-crawl the site because you have just created a new rule and new content must be indexed before it appears in the results.
9. Go back to "Configure Search Settings" page and click File types. Make sure PHP is included in the extensions list. If it's not included, click the New File Type button and enter PHP in the box and click the OK button.
10. To create a new scope for the PHP search, go to "Configure Search Settings" page and click View scopes link in the Scopes section
11. Click New Scope.
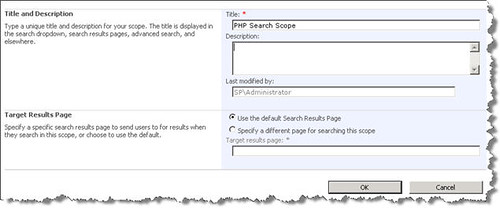
12. Enter title and description for the new scope. For this demo, we will select Use the default Search Results Page option in the "Target Results Page" but for real application, I would select the second option, that is, Specify a different page for searching this scope. To see how to create new search page and scopes, see following articles:
Click OK to save the changes.
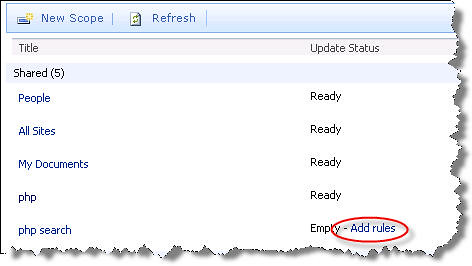
13. New scope will have been added to the scopes page. Click Add rules link to add rules for this new scope.
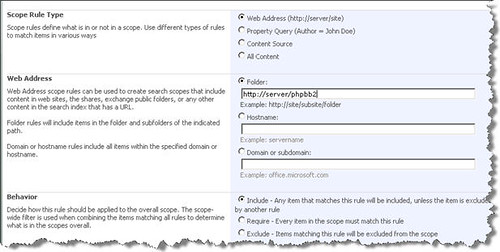
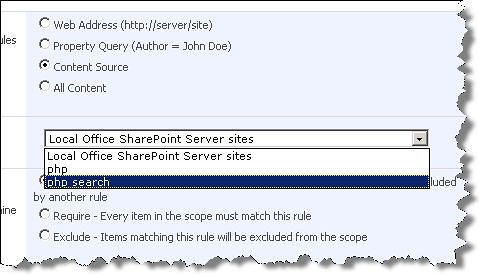
14. This is the most important page. You can define rules here. For demo, I selected the first option and in the "Web Address" section, I entered the web application URL without the page name. Select Include in the "Behavior" section and click OK to save the settings.
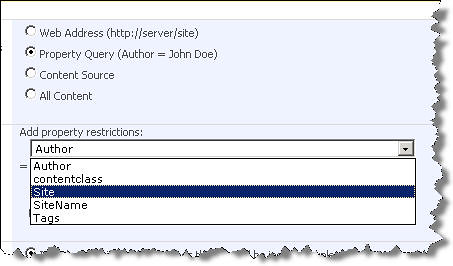
The other option is to select a Property query in "Scope Rule Type".
You can select a property from the drop down box containing available properties and enter a value for that property.
You can also search the content types and include the content type that you just created for your PHP search.
and the most simplest option is to select All Content, that will search all content available to the search.
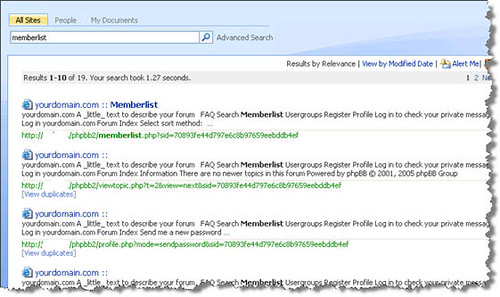
15. Open a SharePoint site in a new browser and go to the Search page. Enter a keyword to test the PHP search and click the search icon. Here are the results that I got:
Notice that I am using the All Sites search to search the PHP pages. Ideally, I would add a new tab for the PHP search and connect that tab with the scope that I created for the PHP search. To see how to add a new tab and connect it with a new search scope, see following articles:

Friday, February 23, 2007

Showing web service data in a Data View web part

Update:
Originally posted: Sat, Feb 24, 2007
Reposted: Aug 26, 2007
Some of the links might not work as this version was retrieved from a web archive. If you find any dead links, kindly send an email to share.point@yahoo.com with the URL of this page. Thank you!
-------------------------
We can use a data view web part to show information retrieved through a web service. All you need is a web service link. Showing web service data in SharePoint sites is very easy if you use SharePoint Designer. I have already published all this information in another post but because this is a totally different topic, I thought I should publish it as a separate post.
For this walk through, I have used a TechnoService web service. You can use any other web service.
1. Open a SharePoint site (Where you want to deploy the web service) in SharePoint designer.
2. Select Manage Data Sources... from  the "Data View" menu. This will open the "Data Source Library" pane on the right side.
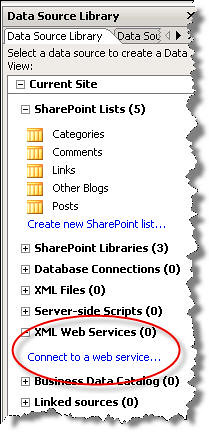
3. Expand the "XML Web Services" node and click Connect to a web service.
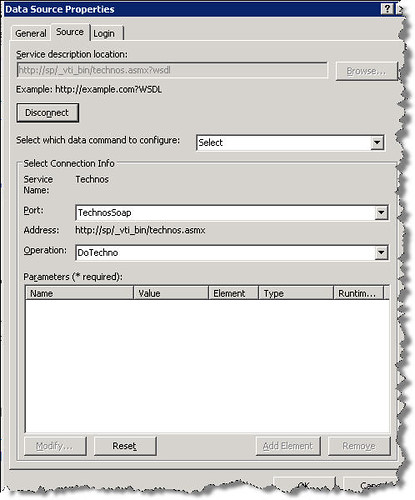
4. Enter the web service reference in the Service description location. If you installed the web service in the root application then the path will look like this:
http://localhost/_vti_bin/technos.asmx?wsdl
Leave all other options as they are and click the OK button.
5. Select Insert Data View... from the "Data View" menu. This will add a data view web part to the page.
6. Click the link shown in the data view web part. This will open the Data Sources Library if it's not already open.
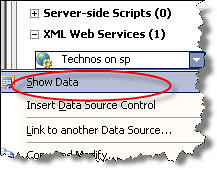
7. Right click the web service that you added to the "XML Web Services" node in the "Data Sources Library" and click Show Data.
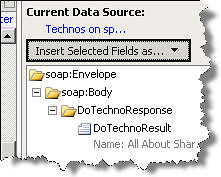
Data returned from your web service will be displayed.
8. Click the Insert Selected Fields as... drop down and select Single Item View.
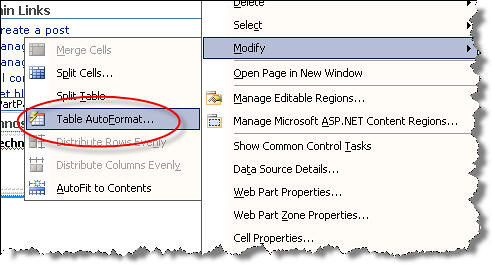
9. That's it. Save the page and if you want to add some style to the data view web part, right click the data view web part and select Modify > Table AutoFormat. It will show you several options. Select the option of your choice and your data view web part is ready.
You can apply formatting to the output returned by the web service manually as well. Anyway, here is how the data view web part looked in my SharePoint site after applying some styles:
I changed the title and applied auto formatting.

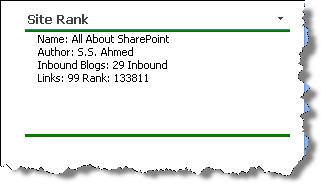
TechnoService: Web service that retrieves blog information from Technorati.com

TechnoService is a web service that gets your site or blog information from Technorati using the Technorati API. This web service was written for MOSS 2007 and WSS 3.0.
This functionality is also available in the form of a web part.
The service returns a string that has following information:
1. Blog/Site Name
2. Author Name
3. Number of Inbound Blogs
4. Number of Inbound Links
5. Blog/Site Rank
I thought I would create an installer for this web service but unfortunately I couldn't find the time. I created an installer for the WSUploadService and it was so easy to install the web service on the server. May be, if I got some time during the next week, I will try to create an installer for this service as well but for now, you will have to deploy it manually.
You may want to read a comprehensive article that shows how to create and deploy web services for MOSS 2007 and WSS 3.0. Click here to read the article.
Installation
2. Unzip the downloaded file to a local folder on your machine (SharePoint server).
3. Copy the following files from the folder (where you unzipped the package) to the _vti_bin directory of the SharePoint server.

Techos.asmx
Technosdisco.aspx
Technoswsdl.aspx

The _vti_bin virtual directory maps physically to the Local_Drive:Program FilesCommon FilesMicrosoft SharedWeb Server Extensions12ISAPI directory, which contains the default Web service files used in Windows SharePoint Services.

To include the Web service in the list of web services on the server
4. In Notepad, open the spsdisco.aspx file. spsdisco.aspx is located in the following directory (on the SharePoint server):

Local_Drive:Program FilesCommon FilesMicrosoft Sharedweb server extensions12ISAPI
5. Add the following lines to the end of the file within the discovery element (paste these lines just before the </discovery> element) and save the file:
Note: Please paste these lines to the notepad first to avoid copying the illegal characters or copy these lines from the spsdisco.aspx file (compressed as a zip file).
<contractRef ref=<% SPHttpUtility.AddQuote(SPHttpUtility.HtmlEncode(spWeb.Url +
"/_vti_bin/Technos.asmx?wsdl"), Response.Output); %> docRef=<%
SPHttpUtility.AddQuote(SPHttpUtility.HtmlEncode(spWeb.Url + "/_vti_bin/Technos.asmx"),
Response.Output); %> xmlns="http://schemas.xmlsoap.org/disco/scl/" />
<soap address=<% SPHttpUtility.AddQuote(SPHttpUtility.HtmlEncode(spWeb.Url +
"/_vti_bin/Technos.asmx"), Response.Output); %>
xmlns:q1="http://schemas.microsoft.com/sharepoint/soap/directory/" binding="q1:TechnosSoap"
xmlns="http://schemas.xmlsoap.org/disco/soap/" />
Copying the assembly to the Bin folder
6. Copy the techno.dll file to the bin folder of the default SharePoint web application. Following path contains the virtual directories of web applications that you have created on your SharePoint server.

Local_Drive:InetpubwwwrootwssVirtualDirectories
If your default web application is configured at port 80 then you should copy the techno.dll file to the following folder:
Local_Drive:InetpubwwwrootwssVirtualDirectories80 in
It is up to you, you may want to install the web service in some other application. For example, if you want to install it in an application configured at port 81, then copy the techno.dll to the following folder:
Local_Drive:InetpubwwwrootwssVirtualDirectories81 in
Adding web service to the GAC
7. Go to following folder:
LocalDrive:Program FilesMicrosoft Visual Studio 8SDKv2.0Bin
and run the following command:
gacutil.exe -i "<Full file system path to Techno.DLL>".
Testing the Service
You can test the service in a windows application. Create a C# Windows application. Add a web reference to the web service that you just installed and use following code to test the service:
private void Form1_Load(object sender, EventArgs e)
{
try
{
localhost.Technos o = new localhost.Technos();

MessageBox.Show(o.DoTechno(@"/ssa", "ec789b5b3ad9a6d0acd5e4a0d52591ee"));
}
catch (Exception ex)
{
MessageBox.Show(ex.Source + " - " + ex.Message + " - " + ex.InnerException + " - " + ex.StackTrace);
}

}
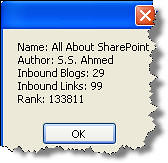
DoTechno() method takes two arguments: url and key. Url is the url of the site or blog for which you want to retrieve the information and key is the key that is required to use the Technorati API. You can get the key by visiting the Technorati site. The code shown above will return following information:
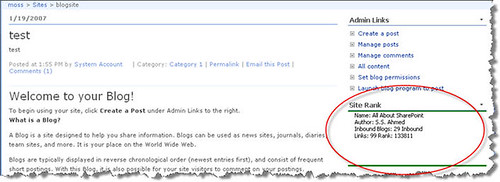
I deployed this web service on my SharePoint blog site using the SharePoint designer. You can create a web part of your own to consume this web service, format the output by adding some style and display it anywhere in your SharePoint sites. The other method, as I said earlier, is to use the SharePoint designer.
Deploying the web service using SharePoint designer
1. Open a SharePoint site (Where you want to deploy the web service) in SharePoint designer.
2. Select Manage Data Sources... from  the "Data View" menu. This will open the "Data Source Library" pane on the right side.
3. Expand the "XML Web Services" node and click Connect to a web service.
4. Enter the web service reference in the Service description location. If you installed the web service in the root application then the path will look like this:
http://localhost/_vti_bin/technos.asmx?wsdl
Leave all other options as they are and click the OK button.
5. Select Insert Data View... from the "Data View" menu. This will add a data view web part to the page.
6. Click the link shown in the data view web part. This will open the Data Sources Library if it's not already open.
7. Right click the web service that you added to the "XML Web Services" node in the "Data Sources Library" and click Show Data.
Data returned from your web service will be displayed.
8. Click the Insert Selected Fields as... drop down and select Single Item View.
9. That's it. Save the page and if you want to add some style to the data view web part, right click the data view web part and select Modify > Table AutoFormat. It will show you several options. Select the option of your choice and your data view web part is ready.
You can apply formatting to the output returned by the web service manually as well. Anyway, here is how the data view web part looked in my SharePoint site after applying some styles:
I changed the title and applied auto formatting.
--------------------------------------- 
Update:
Originally posted: Tue, Feb 27, 2007
Reposted: Aug 26, 2007
Some of the links might not work as this version was retrieved from a web archive. If you find any dead links, kindly send an email to share.point@yahoo.com with the URL of this page. Thank you!
-------------------------

r.a.d.editor for MOSS - review with screenshots

telerik r.a.d.editor for MOSS
r.a.d.editor is a cross-browser rich text editor. Read more ...
Editor comes with a complete help manual (chm file). Help contains detailed installation and configuration instructions (with screenshots). Installation is very easy. Following screenshot shows how the editor looks when added to the page. Click the arrow and select "Modify Shared Web Part".
Click anywhere in the editor to view it in "edit" mode. Edit mode shows all buttons. I don't know why but some buttons are missing in my editor.
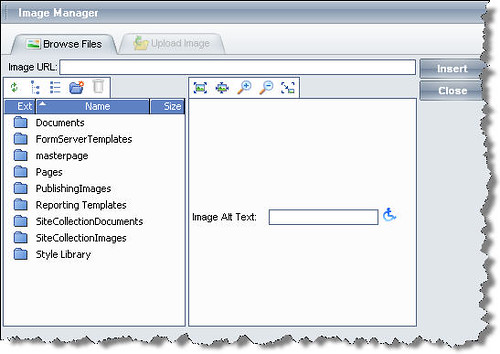
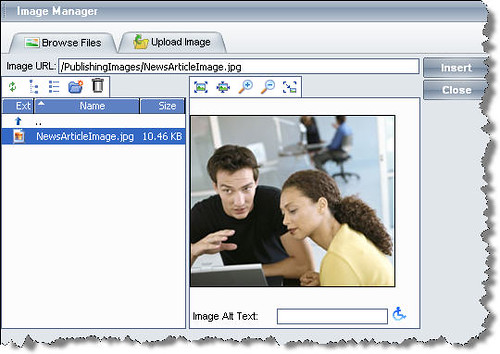
Here is how the image manager looks (Click the image button in the tool bar):
It shows all folders in the SharePoint site and you can browse the folders to select an image. Image preview is available.
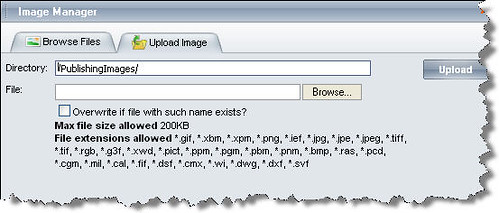
You can also upload your own files:
Select a directory in "Browse Files" and then click "Upload Image" and browse your local folders to select a file.
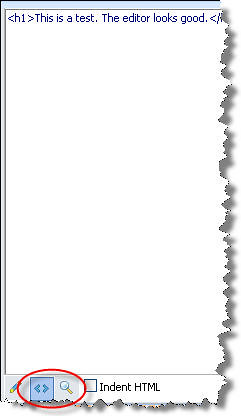
You can also view the HTML:
The button in the center is for HTML viewing and the third button shows the preview. Index HTML shows indented HTML. The toolbar disappears when you work in the HTML mode.
This is how the content is shown in IE:
and this is how it is shown in Mozilla Firefox:
Not very different from what is seen in IE, just some blank space is added when viewed in Firefox! :)
The overall performance is very good. Editor has all the major functionality required for editing content and displaying it in SharePoint.
---------------- 
Update:
Originally posted: Fri, Feb 23, 2007
Reposted: Aug 26, 2007
Some of the links might not work as this version was retrieved from a web archive. If you find any dead links, kindly send an email to share.point@yahoo.com with the URL of this page. Thank you!
-------------------------

Thursday, February 22, 2007

TechnoPart Source Code


Click here to download complete application (source code).
TechnoPart is a web part that displays your blog or site information, pulled from Technorati.com, in SharePoint sites. Click here to read more about TechnoPart.
Development Environment: MOSS 2007, .NET Framework 2.0, VS 2005
Programming Language:
C#

Download and unzip TechnoPart.zip file on your hard disk. It will create a folder TechnoPart. There will be two folders (projects) inside this TechnoPart folder:
1. Technocab -> This is the setup project.
2. WS-DLWP -> This is the web part project.

And there is a WS-DLWP.sln solution file along with these two folders. Double click this solution file to open the project in Visual Studio 2005.
GetSiteData() is the function that connects with Technorati through the API.
public void GetSiteData ()
{

BuildUrl();

string strURL = apiUrl + "bloginfo?" + queryString;

try
{

XmlTextReader _reader = new XmlTextReader(strURL.ToString());

//Read elements

while (_reader.Read())
{
if (_reader.NodeType == XmlNodeType.Element && _reader.Name == "rank")
{
_lblRank.Text =_reader.ReadElementString("rank");
}
else if (_reader.NodeType == XmlNodeType.Element && _reader.Name == "inboundblogs")
{
_lblBlogs.Text = _reader.ReadElementString("inboundblogs");
}
else if (_reader.NodeType == XmlNodeType.Element && _reader.Name == "inboundlinks")
{
_lblLinks.Text = _reader.ReadElementString("inboundlinks");
}
else if (_reader.NodeType == XmlNodeType.Element && _reader.Name == "name")
{
_lblName.Text = _reader.ReadElementString("name");
}
else if (_reader.NodeType == XmlNodeType.Element && _reader.Name == "firstname")
{
_lblAuthor.Text = _reader.ReadElementString("firstname");
}
else if (_reader.NodeType == XmlNodeType.Element && _reader.Name == "lastname")
{
_lblAuthor.Text = _lblAuthor.Text + " " + _reader.ReadElementString("lastname");
}
}

//Close the XML reader
_reader.Close();

}

catch (WebException ex)
{
_lblError.Text = ex.Message;
_lblError.CssClass = "error";
}
Add a style to the web part:
//Create a stylesheet
HtmlGenericControl stylesheet = new HtmlGenericControl("style");
stylesheet.InnerHtml = ReplaceTokens(Constants.Styles);
this.Controls.Add(stylesheet);
Build the interface:
 // Build up the table that is our user interface.
Table t = new Table();
TableRow trRank = BuildTableRow();
TableRow trBlogs = BuildTableRow();
TableRow trLinks = BuildTableRow();
TableRow trError = BuildTableRow();
TableRow trName = BuildTableRow();
TableRow trAuthor = BuildTableRow();

trName.Cells[0].Text = "Name: ";
trName.Cells[1].ForeColor = System.Drawing.Color.Green;
trName.Cells[1].Font.Bold = true;
trName.Cells[1].Font.Size = FontUnit.Medium;
trName.Cells[1].Controls.Add(_lblName);

trAuthor.Cells[0].Text = "Author: ";
trAuthor.Cells[1].ForeColor = System.Drawing.Color.Green;
trAuthor.Cells[1].Font.Bold = true;
trAuthor.Cells[1].Font.Size = FontUnit.Medium;
trAuthor.Cells[1].Controls.Add(_lblAuthor);

trRank.Cells[0].Text = "Rank: ";
trRank.Cells[1].ForeColor = System.Drawing.Color.Green;
trRank.Cells[1].Font.Bold = true;
trRank.Cells[1].Font.Size = FontUnit.Medium;
trRank.Cells[1].Controls.Add(_lblRank);

trBlogs.Cells[0].Text = "Inbound Blogs: ";
trBlogs.Cells[1].ForeColor = System.Drawing.Color.Green;
trBlogs.Cells[1].Font.Bold = true;
trBlogs.Cells[1].Font.Size = FontUnit.Medium;
trBlogs.Cells[1].Controls.Add(_lblBlogs);

trLinks.Cells[0].Text = "Inbound Links: ";
trLinks.Cells[1].ForeColor = System.Drawing.Color.Green;
trLinks.Cells[1].Font.Bold = true;
trLinks.Cells[1].Font.Size = FontUnit.Medium;
trLinks.Cells[1].Controls.Add(_lblLinks);

trError.Cells[0].Text = "";
trError.Cells[1].Controls.Add(_lblError);

t.Rows.AddRange(new TableRow[]{
trName,
trAuthor,
trRank,
trBlogs,
trLinks,
trError
});

this.Controls.Add(t);
Click here to download complete application (source code).
-------------
Update:
Originally posted: Fri, Feb 23, 2007
Reposted: Aug 26, 2007
Some of the links might not work as this version was retrieved from a web archive. If you find any dead links, kindly send an email to share.point@yahoo.com with the URL of this page. Thank you!
-------------------------

Colligo Reader Review

 Colligo Reader Review
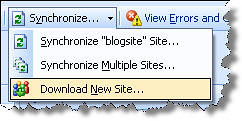
Colligo Reader provides read-only access to SharePoint content offline. Connect to a SharePoint site and download the documents to your machine and access them offline.
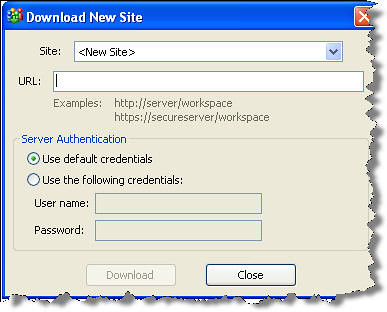
Usage is very easy. Download a site to your local machine (See figure below).
One can use the default credentials or you can log in using any other user name.
After downloading the site, you can synchronize the content any time you want.
Another good feature is "Synchronizing Multiple Sites". You can synchronize multiple downloaded sites at a time. It is a one way synchronization, you can only download files. You can not upload files to the SharePoint sites.
By the way, Colligo Reader has exactly the same core functionality that WS-Downloader provides :). WS-Downloader is a free tool to download SharePoint libraries to the hard disk. All you need is a GUI to show the downloaded files and "Synchronize" button to update the downloaded content. It is also available as a web part and it is open source. You can download the source code here.
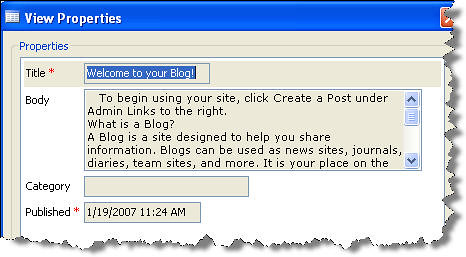
Biggest advantage of Colligo Reader is that you can download stuff from other lists as well and you can open the downloaded content in Colligo Reader, for example, blog posts downloaded from SharePoint open in Colligo Reader.
-------------------- 
Update:
Originally posted: Fri, Feb 23, 2007
Reposted: Aug 26, 2007
Some of the links might not work as this version was retrieved from a web archive. If you find any dead links, kindly send an email to share.point@yahoo.com with the URL of this page. Thank you!
-------------------------

Tuesday, February 20, 2007

Publishing, Sharing And Searching PowerPoint Files in SharePoint

Update: Retrieved from a web archive. Please send an email to share.point@yahoo.com if you find any deadlinks on this page. Thank you.
Reposted on: Aug 30, 2007
---
Update 2: Because of the blog template, all article text is not visible on this page. If you have any problems viewing the complete article here, please read the article here.
Publishing PowerPoint slides in SharePoint
Here is what you will learn in this article:
1. Publishing PowerPoint files in SharePoint.
2. Synchronizing files.
3. Working with properties (Adding new properties to the PowerPoint files)
4. Publishing PPT file properties in SharePoint.
5. Searching PPT files in SharePoint.
6. Customizing SharePoint search to find PPT files using the keywords.

Like all other Office products, PowerPoint has great publishing feature and you can publish PPT slides directly to SharePoint.

As you can see in the figure above, PowerPoint shows two options to save files in SharePoint:
1. Document Management Server
2. Create Document Workspace

Create Document Workspace will allow you to create a site in SharePoint and Document Management Server will allow you to select a network share that points to a SharePoint site.

You can put the SharePoint site path directly in the File name box if you know it and PowerPoint will save the file in SharePoint.
Document Management Pane on the right shows important information related to the file.

To show Document Management pane, select Server > Document Management Information.

Click the options link at the bottom of the Document Management pane to open the settings screen.

You can change some important settings here. For example, to keep your local copy synchronized with the SharePoint copy select Always: update automatically in the last option. This will automatically update your remote copy without asking you first.
Interestingly, you can also view version history of the saved files. To view version history, select Server > View Version History. To view versions saved in SharePoint, click the link shown in the window.

Ok, another very interesting and useful feature is to save properties along with the file in SharePoint. Yes, I know we could do this in Office 2003 as well (Click here to see how!) but in Office 2007, it is now possible to view or add properties from inside the PowerPoint. Select Prepare > Properties from the Office button.

This will start showing the properties window.

Add some keywords in the keywords box to test this feature and save the file. Now go to your SharePoint site and open the document library. From Settings, select Document Library Settings. In General Settings, click Advanced settings. Select Yes in the "Content Types" section (Allow management of content types?) and click OK.  Now, there are two ways to show the properties in the document library. Here is method 1:
Method 1:
On the Settings page, in the Content Types section, click the Document content type. Scroll down and click Add from existing site or site columns. From the columns drop down, select All Groups (See figure below) and select keywords from the list and click the Add > button and then click OK.

Method 2:
On the Settings page, in the Columns section, click Add from existing site columns. From the "site columns" drop down, select All Groups and from "Available site columns" box, select keywords and click the Add > button to add the column to the view and click the OK button. Make sure Add to default view check box is checked at the bottom. You will notice that the new column "keyword" has been added to the list of columns available in the current view and if you look at the third column "Used in", you will see "Document" has been added as the content type.

Now go back to your library and you will see the keywords you entered while working in PowerPoint have been saved in SharePoint. Similarly, you can add other fields from PowerPoint as site columns in SharePoint. If you have enabled Search for your library, you can search documents using the keywords. To enable Search, do the following:
1. Go to the Settings page and click on Advanced settings and select Yes in the Search section (Allow items from this document library to appear in search results?).
2. Click OK to save the changes.
Note: The documents will not appear in search results un less SharePoint indexes all new documents. This can be done manually from the SharePoint Central Administration.
If the documents have been indexed, you will have no difficulty in finding the documents using the site search box. As you may know, you can also search documents using keywords, which in this case are document properties, using the Advanced search. Click the Advanced Search link that appears next to the search box.

Here you can use a property or a combination of properties to search files in SharePoint. Open the Property (Pick Property) drop down, you will notice that the site column "Keywords" that we added to our document library is not visible in this drop down by default. No problem! We can add it ourselves! Yes! this is the beauty of SharePoint. We can customize things easily in this version of the SharePoint. To add "Keywords" column to the "Property" drop down, do the following:
1. Make sure you are on the Advanced Search page. Now, from the Site Actions, select Edit Page.
2. Click the edit link and select Modify Shared Web Part.

3. In the Advanced Search Box, expand Properties by clicking the + sign.

4. Click anywhere in the Properties box, a blue shaded "square" button (ellipsis) will appear. Click this button to view the content of the Properties box in an editor. You will see that the editor contains lot of text and there are quite a few sections in the code. We need to add the "Keywords" property to some of these sections in order to make it appear in the advanced search box properties.

5. Locate the <PropertyDefs> tag in the text and add the following property definition tag inside <PropertyDefs> and </PropertyDefs> tags.
<PropertyDef Name="Keywords" DataType="text" DisplayName="Keywords"/>
There is another property definition (docKeywords) in this section that has a display name "Keywords" so you may want to change your display name to something else, for example, "Keywords2" or "Tags". I kept the name as "Keywords" and everything worked fine.
6. Locate the tag <ResultTypes>. There is another tag inside this tag:
<ResultType DisplayName="All Results" Name="default">
Add the following property reference tag just before the </ResultType> tag:
<PropertyRef Name="Keywords" />
There are different types of results, for example, Document results, Excel results, PowerPoint results, etc. Now, because we, at the moment, are only concerned with the PowerPoint documents, therefore, we will make a change in the results of the type "PowerPoint".
7. Locate the following tag:
<ResultType DisplayName="Presentations" Name="presentations">
and add following tag just before the </ResultType> tag:
<PropertyRef Name="Keywords"/>
8. Click OK to close the editor.
9. Click Apply and then OK to save the web part changes.
10. Click the Publish button to save your changes.

11. Now, go to the Advanced Search Page and search your documents using the keywords.

All you have to do now is enter some relevant keywords every time you save your PowerPoint slide, PPT will be saved along with the keywords to the SharePoint library. Save as many files as you like and "SharePoint Search" will do the main job, that is, finding files for you.