| Deploying InfoPath Forms
Deploying InfoPath 2007 forms, unlike 2003 forms, is easy. My overall experience of working with InfoPath 2007 was really good. InfoPath 2007 has really matured. There are quite a few changes and deploying the forms has become very easy. Another major problem with InfoPath 2003 was that changing the development machine was very difficult. You lost many changes made to the form during the process but interestingly, InfoPath 2007 provides you a way to transfer forms from one development machine to another. Backward compatibility is also supported for InfoPath 2003 forms. You must have InfoPath 2003 Service Pack 1 to view backward compatible forms created with InfoPath 2007.
Let's create a backward compatible form in InfoPath 2007 and deploy it on a server having WSS 2.0 and InfoPath 2003:
For demo purposes, we will create a simple user registration form.
1. Open InfoPath 2007 and select Design a Form Template from the "File" menu.
  3. Add a table with 9 rows and 2 columns and add a text box in the second column of each row. For field names, see the figure below:  Add two buttons and change the label of the buttons (See figure above). It's a simple form with no database connectivity or complexity of any kind. Now, let's deploy this form. For testing purposes, I deployed it on a machine that had WSS 2.0 and InfoPath 2003 installed. 4. Select Publish from the File menu. 5. Select the first option To a SharePoint server with or without InfoPath Forms Services and click Next.  6. Enter server URL in the location box and click Next.  7. Only one option "Document Library" will be shown because content types are not supported in older versions. Click the Next button to continue.  8. Select a library from the list of available libraries or create a new one. Click Next to continue.  9. If you are creating a new library, enter name and description for the library and click Next.  10. Click the Add... button to add fields from the form that you want to show in the SharePoint library. Click Next.  11. Click the Publish button. Depending on the security settings, you might be asked to enter your login credentials. You will see a success message. Click Close to close the form. 12. Open the newly created forms library on the SharePoint server to test the form. 13. Click Fill Out This Form. 14. This will open the form. Enter some information and save the form to the library. |
A Practical Guide to SharePoint 2013

A Practical Guide to SharePoint 2013 - Book by Saifullah Shafiq
Thursday, February 15, 2007
Deploying InfoPath Forms


Wednesday, February 14, 2007
Groove and SharePoint
Groove and SharePoint
I recently blogged about OneNote and SharePoint. Today, we will see how Groove works in conjunction with SharePoint. Click here to learn more about Groove 2007. Groove is a collaboration software that helps teams work together in an effective manner. Users can work online or offline and anywhere they like. There are a number of pre-built tools available in Groove that can help users in increasing their productivity. Following tools are available in Groove:
1. Calendar
2. Chess Game
3. Custom
4. Discussion
5. Files
6. Forms
7. InfoPath Forms
8. Issue Tracking
9. Meetings
10. Notepad
11. Pictures
12. SharePoint Files
13. Sketchpad
2. Chess Game
3. Custom
4. Discussion
5. Files
6. Forms
7. InfoPath Forms
8. Issue Tracking
9. Meetings
10. Notepad
11. Pictures
12. SharePoint Files
13. Sketchpad
With all these tools, working and collaborating on projects has become extremely easy. You don't have to worry about the whereabouts of your team members. Every one can contribute to the project. In this walk through, we will cover "SharePoint Files" tool and see how Groove works with SharePoint.
1. If you have Groove properly installed and configured, you will be asked to log in before accessing Groove's services.

2. You see notifications after logging in. Notifications window show any files pending for synchronization.

3. To create a new shared workspace, select File > New > Workspace.

4. Enter a name for your workspace and select Standard as workspace type.

5. Click your newly created workspace from Active workspaces if it's not visible.

6. Click Add Tools from "Common Tasks" to add SharePoint Files tool.

7. Select SharePoint Files from the list and click OK.

8. Following screen with a setup button will open. Click the Setup button to select the SharePoint library.

9. If you know the URL of the document library, you can type it in the Address box. You can search for the SharePoint libraries from the options available on the left side. You must have appropriate permissions in SharePoint in order to browse these sites and libraries in this interface. Select a library from a list of available libraries in the site you selected and click the Select button. Clicking the Select button without selecting the library will give you an error.

10. Documents from the SharePoint library will appear in Groove. Groove will take care of the synchronization.

Let's see how Groove synchronizes files. Click Add Files... button to add a file in Groove. Select a file from the system and click the Open button. The uploaded file will immediately appear on the right side.
11. Click the Synchronize Now... button to sync the files.

12. Preview Synchronization screen will show you all the pending files that need to be synchronized. Click on the file to see the summary of changes in the box below. Click Synchronize Now button to start synchronizing the files.

13. Go to your SharePoint library to see if the files have been synchronized. You will notice that new files appear with a "new" icon.

14. Now, add a file in SharePoint library and go back to the Groove application and click the Synchronize Now button. The Preview Synchronization window will show you the new file that was added in the SharePoint library with "Get File" message in the "Action" column. Click the Synchronize Now button and the file will be added to the Groove.
15. You can also check out files from SharePoint libraries. There is a button (Manage files checked out from SharePoint) in the toolbar. Click it to view the options it has. Select a file first and then click Check Out from SharePoint to check out the file and your username will immediately appear in the "Checked Out To" column.

16. There are other option available as well. For example, you can save the files in Groove to other locations like your system or other shared folders on your network which shows how useful Groove is for sharing and collaborating.
More Features
1. Click View Workspace Properties in the "Common Tasks" to see the properties of the workspace you created in Groove. There are four tabs:
> General
> Alerts
> Roles
> Permissions
> Alerts
> Roles
> Permissions
There are three roles available in Groove:
> Manager
> Participant
> Guest
> Participant
> Guest
There are five types of permissions in Groove:
> Invite
> Uninvite
> Add Tool
> Delete Tool
> Cancel all outstanding invitations
> Uninvite
> Add Tool
> Delete Tool
> Cancel all outstanding invitations

2. You can add other computers to your Groove network and invite users to join your workspace in Groove.
3. You can chat online with other users in your network.
4. You can send messages to other users.
5. You can also view system and presence information. :)

Tuesday, February 13, 2007
WS-Downloader Web Part
WS-Downloader Web Part
I released WS-Downloader tool last week. WS-Downloader is a small tool that downloads documents from SharePoint libraries.
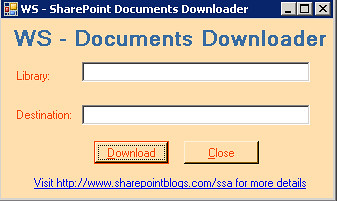
Click here to read more about the WS-Downloader tool.
Today, I re-wrote the same application as a web part. Now, you can plug this web part directly in your site.

Installation Instructions
1. Copy the wsdlcab.CAB file to the following location on the server:
C:Program FilesCommon FilesMicrosoft Sharedweb server extensions12 in
This location also contains stsadm.exe file.
2. From the location mentioned in Step 1, run the following command:
stsadm -o addwppack -filename wsdlcab.CAB -url http://localhost -globalinstall -force
(Change localhost to your servername.)
3. Run following command to reset IIS:
iisreset /timeout:0
4. Now, add the web part to a SharePoint site. Open the SharePoint site in a web browser.
5. Click Site Actions and select Edit Page.

6. Click Add a Web Part (in Right zone).
7. Expand All Web Parts by clicking the + button.
8. Select WS-SharePoint Documents Downloader from the Miscellaneous section.

9. Click the Publish button to publish the changes.

10. Now, test the web part by entering a library path in the first text box and a destination path in the second text box and clicking the Download button. This will download the documents to the destination folder and a message will be displayed in the web part.

Delete Web Part
1. Go to following location on the server:
C:Program FilesCommon FilesMicrosoft Sharedweb server extensions12 in
2. Run following command to remove the web part.
stsadm -o deletewppack -name wsdlcab.cab -url http://localhost
(Change localhost to your servername.)
Advantage
Now, you can run the application remotely and save the files to a local folder on the server. Remember, you still can not save the files to the client machine. For that, we need to write a web service and run the download application locally. To download the files to a folder on the server from a client machine, open the site in a web browser on the client machine. Select source and destination paths and click the Download button.
Saturday, February 10, 2007
Using the Events Manager of the InfoPath Hosted Control (via InfoPath Team Blog)
The InfoPath hosted control gives developers of third party hosted applications the ability to respond to events in the form. The InfoPath event manager provides this functionality. Read more on InfoPath Team Blog.
Thursday, February 8, 2007
Microsoft Knowledge Network Update - Feb 08, 2007
"So expect to hear an announcement in the next week or two about how to get your hands on the technology and to check it out in your own environment." ... Microsoft Knowledge Network Team Blog.
Wednesday, February 7, 2007
Excel Service Settings
Excel Services Settings
Excel services have to be setup properly in SharePoint Central Administration before they are used in SharePoint. New users often forget to set these settings in central administration and they get permissions errors when they try to publish a report in SharePoint or try to access an Excel sheet. For example, one of the errors users get is:
You do not have permissions to open this file on Excel Services.
Make sure that the file is in an Excel Services trusted location and that you have access to the file.
Make sure that the file is in an Excel Services trusted location and that you have access to the file.
Another error related to Excel Services Settings is:
The file you selected could not be found. Check the spelling of the file name and verify that the location is correct. Make sure that the file has not been renamed, moved, or deleted, that the file is in an Excel Services Trusted Location, and that you have access to the file. If the problem persists, contact your administrator.
Here is how you configure Excel Services in SharePoint Central Administration:
1. Click SSP in SharePoint Central Administration.

2. Click Edit Excel Services settings in "Excel Services Settings" section.

3. Select Process account in "File Access Method".

Scroll down to "External Data" section and enter user's information who has appropriate permissions in SharePoint sites.

Click OK to save changes.
4. Click Trusted File Locations (See figure in Step 2)
5. Click Add Trusted File Location.
6. Add site URL in the Address box and select Windows SharePoint Services in the "Location Type". Depending on your requirements, you can select other options, for example, if you want to access files from a UNC then "Location Type" should be UNC. Check Children trusted check box.

In "External Data" section, select Trusted data connection libraries and embedded (Allow External Data section).
Click OK to save changes.
Now, you can access Excel files in SharePoint.
SPS 2003: Displaying library items for a specific time period.
I posted this as a reply to a question last year but I still find people asking the same or a similar question every now and then, therefore, I thought I should post it on the blog so that I don't have to search it everytime some one asks a similar question.
Problem: Displaying library items for a specific time period.
Scenario: Display new items in a library for 7 days. The items should disappear from the library automatically after 7 days.
There can be several ways to do this. One way of accomplishing this is as
follows:
1. Add a new column in your library and name it as "HiddenDate".
2. Keep it invisible by clearing the "Add to default view" check box shown
at the bottom of the page.
3. Select "Date and Time" as the type.
4. Date and Time format = Date only
5. Default value = calculated value.
6. In the calculated value, enter "=Today+7"
7. Click OK to save the changes.
8. In the view where you want to see the changes, add a filter. For example,
you can add a filter in the "All Documents" view.
9. In filter section, select "Show items only when the followint is true:".
10. In the columns drop down, select "HiddenDate"
11. In the filter options (second drop down), select "is greater than or
equal to"
12. In the third text box, enter "[Today]".
13. Click OK to save changes.
Now, every time a document is added to the library, it will remain visible
for 7 days and will disappear automatically after 7 days.
You may notice that a form is shown to the user when he adds a new document.
HiddenDate field appears on this form. Because this is an optional field
therefore user can leave it as it is and click the OK button to save the
document but just imagine what will happen if the user changes the date in
this form. Your filter will not work! Therefore, it is important to hide
this field from the user. One way is to customize the document library
template in SharePoint and add the "HiddenDate" field in the template. This
way, hiddendate field will be available in all libraries created using the
new template and user will not be shown this field when he saves the
document. To see how to add a field in the template, see the following post:
/ssa/archive/2006/05/23/7487.aspx
Problem: Displaying library items for a specific time period.
Scenario: Display new items in a library for 7 days. The items should disappear from the library automatically after 7 days.
 |
| Solution: |
follows:
1. Add a new column in your library and name it as "HiddenDate".
2. Keep it invisible by clearing the "Add to default view" check box shown
at the bottom of the page.
3. Select "Date and Time" as the type.
4. Date and Time format = Date only
5. Default value = calculated value.
6. In the calculated value, enter "=Today+7"
7. Click OK to save the changes.
8. In the view where you want to see the changes, add a filter. For example,
you can add a filter in the "All Documents" view.
9. In filter section, select "Show items only when the followint is true:".
10. In the columns drop down, select "HiddenDate"
11. In the filter options (second drop down), select "is greater than or
equal to"
12. In the third text box, enter "[Today]".
13. Click OK to save changes.
Now, every time a document is added to the library, it will remain visible
for 7 days and will disappear automatically after 7 days.
You may notice that a form is shown to the user when he adds a new document.
HiddenDate field appears on this form. Because this is an optional field
therefore user can leave it as it is and click the OK button to save the
document but just imagine what will happen if the user changes the date in
this form. Your filter will not work! Therefore, it is important to hide
this field from the user. One way is to customize the document library
template in SharePoint and add the "HiddenDate" field in the template. This
way, hiddendate field will be available in all libraries created using the
new template and user will not be shown this field when he saves the
document. To see how to add a field in the template, see the following post:
/ssa/archive/2006/05/23/7487.aspx
Subscribe to:
Posts (Atom)