A Practical Guide to SharePoint 2013

A Practical Guide to SharePoint 2013
A Practical Guide to SharePoint 2013 - Book by Saifullah Shafiq

Wednesday, June 20, 2007

Could not find installable ISAM

Small tip!! Some times things so small take up so much of your precious time that you start getting frustrated. The following is a common error people get when trying to connect with an Excel or Access DB using the Oledb:

Could not find the installable ISAM.

I agree there could be many reasons for this error to occur. For example, the drivers on your system are corrupted, in that case, you will have to reinstall the drivers or may the registry entries are corrupted. For that you will have to modify the registry. (If that is the case, you may want to look at the MS KB article that provides the solution). In my case, the problem was that I was using the latest Office 2007 and I was trying to connect to an Excel file using the following connection string:

string excelConnectionString = @"Provider=Microsoft.Jet.OLEDB.4.0;Data Source=C:Tempmetadata.xls;Extended Properties=Excel 12.0";

Can you locate the problem in the connection string? Give it a try! The string is syntatically correct then where is the problem? The problem is with the "Extended Properties". If I replace "Excel 12.0" with "Excel 8.0" (which is the correct version actually), the problem goes away. I was about to modify my registry when luckily I noticed the correct version and modified my connection string and everything started working fine.

The error message that one gets is so generic that anyone will be easily deluded and this wastes time.

Good luck to anyone stuck with the same or similar problem!

Friday, June 15, 2007

Using "AND" in SPQuery

Level: Beginner

Ok, here is a small tip for the beginners. If you are trying to search records based on two values, for example, "select * from list where a=1 and b=2" then how will you write its equivalent using the SPQuery object. Here is the sample:

SPQuery query = new SPQuery();
query.Query = "<Where><And><Eq><FieldRef Name='Field1'></FieldRef><Value Type='Number'>1</Value></Eq><Gt><FieldRef Name='Field2'></FieldRef><Value Type='Number'>0</Value></Gt></And></Where>";

This query will find records where Field1 = 1 and Field2 > 0.

So you have learnt two new things, using "And" and "Gt".

Sunday, June 10, 2007

What is the datatype of the Yes/No field?

Value type has to be provided when writing a query for the SPQuery object. How do you access a Yes/No field or let's put it in another way! What is the data type of the Yes/No field in SharePoint? The data type is "Boolean" and the value has to be provided as 1 or 0. Providing a value of Yes or No or True or False will not work. Ok, sometimes the query fails even if you provided the value as 1 or 0. You get a strange error. Following is the error message:

"One or more field types are not installed properly. Go to the list settings page to delete these fields"

To fix this error, you will have to use the internal name of the field in the spquery. Yes, internal names can be different from the names displayed in the site. For example, internal name for the field "My Field" can be "My_x0020_Field".

Here is the sample code:

SPQuery query = new SPQuery();
query.Query = "<Where><Eq>FieldRef Name='My_x0020_Field'></FieldRef><Value Type='Boolean'>1</Value></Eq></Where>";

This will search for records where "My Field" has the value of 1 (Yes).

Easiest way to find the internal name of the field is to open the "New" form in browser and then view it's source. Right-click any where in the "New" form to open the context menu and select "View Source". You will find the fields along with their internal names near the end of the source file.

-SSA

Thursday, May 10, 2007

MS CRM and SharePoint 2007 Integration

Rehman Gul, a SharePoint blogger and a friend, has written an article about the integration of CRM with SharePoint. Following is his article:
 ******** Article ***************
http://www.microsoft.com/presspass/press/2007/mar07/03-12Day1DynamicsOfficePR.mspx
Lets have a walkthrough of how can we connect with MS CRM using SharePoint's Business Data Catalog (BDC) and Web Parts.
First of all we need an XML definition file to connect with CRM Database. Writing these files is difficult and error prone. You can easily find tools over the internet that will provide you with the ability to create Application Definitions for MOSS 2007. One such tool could be found here.
Here is the file I am going to use for the purpose of this exercise. This sample metadata XML defines various entities for MS CRM 3.0 database. If you have downloaded Dynamics Snap-ins, you can get one such file already present on your disk. If you intend to use the file that I am using, remember to change the Server and Database Names in it. They have been marked within the file.changes are required at the line 27 and 29.First of all we need to import this definition file to MOSS (Microsoft Office SharePoint Server) 2007.
Go to central Administration. It is usually created at the port 12779. The Url should look something like this:

untitledb.jpg
On the left Navigation Column click "SharedServices1" link. If its not there, you can create one clicking "Shared Services Administration" link on the left navigation column. "SharedServices1" site should look like this:
untitled1b.jpg
Under "Business Data Catalog" click "Import application definition". Following screen appears:
untitled2b.jpg
Browse and select the definition file from your disk. Keep the default settings and click "Import". This will initiate the upload process and take some time.
untitled3b.jpg
After the file has been uploaded you can view the file clicking "View applications" under "Business Data Catalog".
untitled4b.jpg
Now go to the site where you want to provide CRM connectivity. Click " Site Actions" and "Edit Page".
untitled5b1.jpg
Click "Add a Web Part".

untitled6b1.jpg

From the list select "Business Data List" web part and click "Add".

untitled7b.jpg

Click "open the tool pane" link in the "Business Data List" web part.
untitled8b.jpg
Click "Browse" icon right next to the "Type" text box displayed on the right top.
untitled9b.jpg
Select any "Business Data Type" and click "Ok".
untitled10b.jpg
Click "Ok" at the bottom of the options displayed in the right column.
untitled12b.jpgHere is what you should see:untitled13b.jpg
Just add the value in the empty text box that you want to fetch from the CRM Database and click "Retrieve Data". You are connected to MS CRM through your MOSS 2007.
Hope you enjoyed this post..I'll continue on SharePoint's integration with other Microsoft Products..hope to see you again..it's bye for now..:)

Thursday, March 8, 2007

Adding a field to the document library template

Update: This post has been retrieved from a web archive, there might be some dead links. Please send an email to share.point@yahoo.com if you find any dead links on this page. Thank you!
Reposted on: Aug 30, 2007 
-- 
Note: Don't forget to make backup copies of the files you modify in this tip.
1. Open schema.xml file for the document library that is located in the following path:
LocalDrive:Program FilesCommon FilesMicrosoft Sharedweb server extensions12TEMPLATEFEATURESDocumentLibraryDocLib
2. Locate <Fields> tag and add following field inside the <Fields> tag:

  <Field ID="{20487AC7-D872-4B10-ACB8-CF3002C29687}" Type="Text" Name="MyField" ShowInNewForm="FALSE" ShowInFileDlg="FALSE" DisplayName="$Resources:core,MyField;" Filterable="TRUE" Sortable="TRUE" Sealed="TRUE"  SourceID="http://schemas.microsoft.com/sharepoint/v3" StaticName="MyField"><!-- _locID@DisplayName="camlid2" _locComment="  " -->
      </Field>

Field ID should be unique. Run Select NewID() in SQL Query Analyzer to get a new GUID and use it as the field ID.
3. Open core.en-US.resx file located in the following path:
LocalDrive:Program FilesCommon FilesMicrosoft Sharedweb server extensions12Resources
4. Locate following tag in the file:
  <!-- shared resources -->
and add following lines in this section (shared resouces section)
  <data name="MyField">
    <value>My Demo Field</value>
  </data>
5. Save the changes and reset IIS. Next time when you will create a document library, this field will be a part of your document libray.
I once blogged about creating site definitions in SPS 2003. Things have changed a lot in version 2007 but this time we have lot of help available in the form of blogs, forums, etc. If you want to learn more about site definitions in 2007, read following excellent articles by Todd Baginski:

-SSA

Tuesday, February 27, 2007

Installing WSUploadService manually

Update:
Originally posted: Tue, Feb 27, 2007
Reposted: Aug 25, 2007
Some of the links might not work as this version was retrieved from a web archive. If you find any dead links, kindly send an email to share.point@yahoo.com with the URL of this page. Thank you!
-------------------------
I published a WSUploadService in November last year This web service uploads documents from local file system to SharePoint. The web service comes with an installer and installing the web service on the server is a single-click process but recently, I received a complaint from a couple of users who use non-English SharePoint and the complaint is that installation ends prematurely without installing the service successfully. I am not sure as to why the installation fails on the SharePoint server that is not using English as the main language but here are the files required to complete the installation manually. Installing a web service manually is discussed in the following articles:
/ssa/archive/2007/02/23/19968.aspx
/ssa/archive/2006/12/19/17093.aspx
All you need are the files for the web service. You can download the files from here.
1. Download the files.
2. Unzip the downloaded file to a local folder on your machine (SharePoint server).
3. Copy the following files from the folder (where you unzipped the package) to the _vti_bin directory of the SharePoint server.
Files.asmx
Filesdisco.aspx
Fileswsdl.aspx
The _vti_bin virtual directory maps physically to the Local_Drive:Program FilesCommon FilesMicrosoft SharedWeb Server Extensions12ISAPI directory, which contains the default Web service files used in Windows SharePoint Services.
To include the Web service in the list of web services on the server
4. In Notepad, open the spsdisco.aspx file. spsdisco.aspx is located in the following directory (on the SharePoint server):
Local_Drive:Program FilesCommon FilesMicrosoft Sharedweb server extensions12ISAPI
5. Add the following lines to the end of the file within the discovery element (paste these lines just before the </discovery> element) and save the file:
Note: Please paste these lines to the notepad first to avoid copying the illegal characters or copy these lines from the replacement.txt file (included in the zip package).
<contractRef ref=<% SPEncode.WriteHtmlEncodeWithQuote(Response, spWeb.Url + "/_vti_bin/Files.asmx?wsdl",'"'); %> docRef=<% SPEncode.WriteHtmlEncodeWithQuote(Response, spWeb.Url + "/_vti_bin/Files.asmx", '"'); %> xmlns="http://schemas.xmlsoap.org/disco/scl/" />
<soap address=<% SPEncode.WriteHtmlEncodeWithQuote(Response, spWeb.Url + "/_vti_bin/Files.asmx", '"'); %> xmlns:q1="http://schemas.microsoft.com/sharepoint/soap/directory/" binding="q1:FilesSoap" xmlns="http://schemas.xmlsoap.org/disco/soap/" />
Copying the assembly to the Bin folder
6. Copy the UploadService.dll file to the bin folder of the default SharePoint web application. Following path contains the virtual directories of web applications that you have created on your SharePoint server.
Local_Drive:InetpubwwwrootwssVirtualDirectories
If your default web application is configured at port 80 then you should copy the techno.dll file to the following folder:
Local_Drive:InetpubwwwrootwssVirtualDirectories80 in
It is up to you, you may want to install the web service in some other application. For example, if you want to install it in an application configured at port 81, then copy the techno.dll to the following folder:
Local_Drive:InetpubwwwrootwssVirtualDirectories81 in
Adding web service to the GAC
7. Go to following folder:
LocalDrive:Program FilesMicrosoft Visual Studio 8SDKv2.0Bin
and run the following command:
gacutil.exe -i "<Full file system path to UploadService.DLL>".
Hope this will help the users who could not install the WSUploadService with an installer successfully. If someone still has any problem, please feel free to contact me and I will make sure your problem is solved well within time.
Good luck

-SSA

Searching PHP Sites With SharePoint

Update:
Originally posted: Tue, Feb 27, 2007
Reposted: Aug 25, 2007
Some of the links might not work as this version was retrieved from a web archive. If you find any dead links, kindly send an email to share.point@yahoo.com with the URL of this page. Thank you!
-------------------------
Searching PHP Sites With SharePoint
In this walk through, I will setup search that will return data from the PHP site configured on an Apache server.
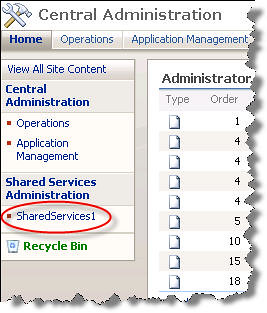
1. Go to "SharePoint 3.0 Central Administration" and select the Shared Service Provider that you have set up for your sites.
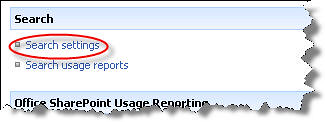
2. Click Search settings.
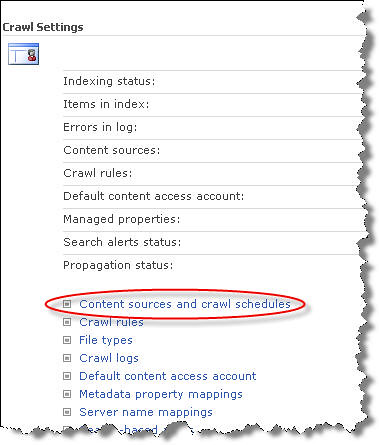
3. Click Content sources and crawl schedules under "Crawl Settings".
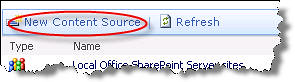
4. Click New Content Source.
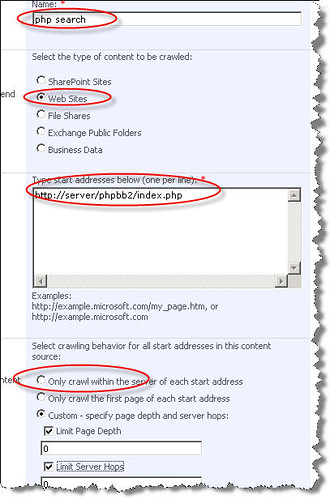
5. Enter a name for your search. Select Web Sites in the "Content Source Type". Enter a URL in the "Start Addresses". This should be the complete URL including the page name. You can customize the crawl settings according to your own needs. For this demo, I selected the first option (Only crawl within the server...) but if you have a fairly large site, you may want to select the custom settings. You can enter a value for "Limit Page Depth". If unchecked, it will search unlimited pages which may not be a good idea if you intend to keep the server hops limit set to "unlimited". Check "Start full crawl of this content source" check box and click the OK button.
6. Now go back to the Search Service Provider page and click Search Settings. On "Configure Search Settings" page, click Crawl rules.
7. Click New Crawl Rule link.
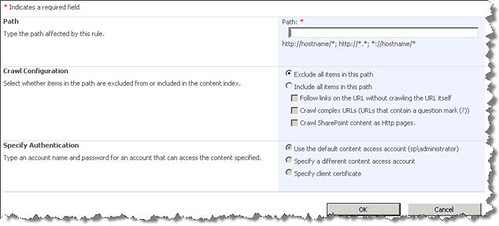
8. Enter a path to the PHP site in the Path, for example, to include all pages in the site, you can enter http://server/phpbb2/*. This will include all site pages or to include only a single page in the search, you can enter a page path like http://server/phpbb2/index.php. This will search only the index.php page. You can also use this interface to exclude items from the search. In fact, you can create multiple rules to manage your search results. To continue with this walk through, we will select Include all items in this path in "Crawl Configuration". You can also specify the authentication type in "Specify Authentication". Note, this is not the web site login credentials, this is the web site access settings, configured in the HTTP server. Click OK to save the changes. You will have to re-crawl the site because you have just created a new rule and new content must be indexed before it appears in the results.
9. Go back to "Configure Search Settings" page and click File types. Make sure PHP is included in the extensions list. If it's not included, click the New File Type button and enter PHP in the box and click the OK button.
10. To create a new scope for the PHP search, go to "Configure Search Settings" page and click View scopes link in the Scopes section
11. Click New Scope.
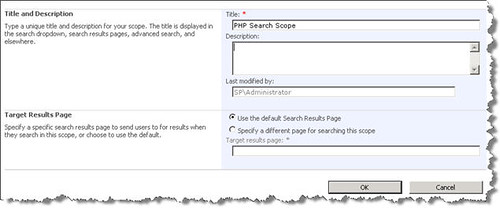
12. Enter title and description for the new scope. For this demo, we will select Use the default Search Results Page option in the "Target Results Page" but for real application, I would select the second option, that is, Specify a different page for searching this scope. To see how to create new search page and scopes, see following articles:
Click OK to save the changes.
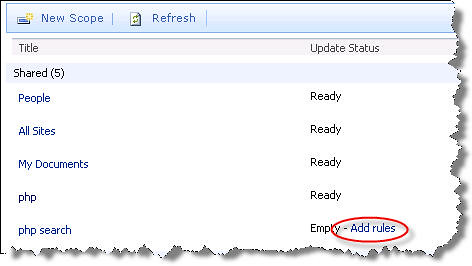
13. New scope will have been added to the scopes page. Click Add rules link to add rules for this new scope.
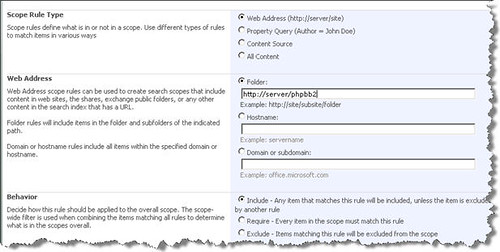
14. This is the most important page. You can define rules here. For demo, I selected the first option and in the "Web Address" section, I entered the web application URL without the page name. Select Include in the "Behavior" section and click OK to save the settings.
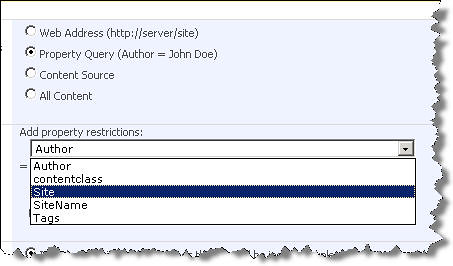
The other option is to select a Property query in "Scope Rule Type".
You can select a property from the drop down box containing available properties and enter a value for that property.
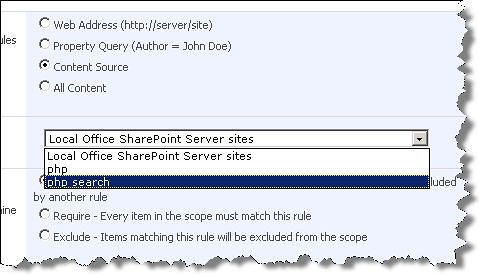
You can also search the content types and include the content type that you just created for your PHP search.
and the most simplest option is to select All Content, that will search all content available to the search.
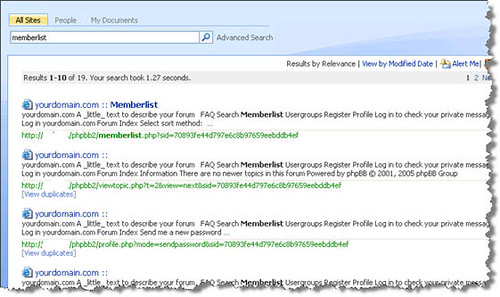
15. Open a SharePoint site in a new browser and go to the Search page. Enter a keyword to test the PHP search and click the search icon. Here are the results that I got:
Notice that I am using the All Sites search to search the PHP pages. Ideally, I would add a new tab for the PHP search and connect that tab with the scope that I created for the PHP search. To see how to add a new tab and connect it with a new search scope, see following articles: