A Practical Guide to SharePoint 2013

A Practical Guide to SharePoint 2013
A Practical Guide to SharePoint 2013 - Book by Saifullah Shafiq

Wednesday, October 29, 2008

InfoPath Tip: Showing filtered column from a SharePoint list

Level: Beginners
Scenario: You have a list in SharePoint that contains user data (profile including name, phone, etc). You have an InfoPath form that has a text box to enter a user ID and a button to show record against the User ID entered in the text box.
Being a developer, a programmatic solution is very easy for me. With a few lines of code I can extract filtered data from a SharePoint list. What about those who are not SharePoint programmers! This tip will give you an easy solution.
1.       Add a new data connection in your form.
Step by Step
1.       Click "Manage Data Connections" in "Design Tasks". This will open a "Data Connections" box.
2.       Click the "Add" button.
3.       Select "Create a new connection to" option and then select "Receive data" option. Click "Next".
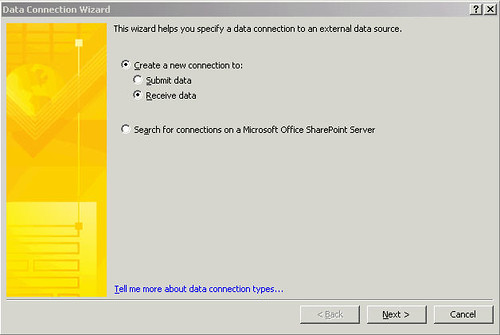
 
    
4.       Select "SharePoint library or list" and click "Next".
5.       Enter the URL of the list that will be used to fetch data from. Click "Next".
6.       Select list from the available lists and libraries and click "Next".
7.       Select the fields that you want to show in the form and click "Next". If you intend to use the form in Offline mode (that is when you are not connected to the SharePoint), then select the option "Store a copy of the data in the form template" otherwise do nothing and click "Next".
8.       Enter a name for this new data connection and select "Automatically retrieve data when form is opened" and click "Finish".
9.       Click "Close".
 
2.       Display data in your form. Suppose you want to show a single field/column in your form. Follow the instructions below to show a single field.
 
1.       Add a data source (type: string).
2.       Right click the new data source and select "Properties".
3.       "Data" tab is selected by default when your open the control's properties. Click the function button (fx) that is located on the right side of the "Value" field.
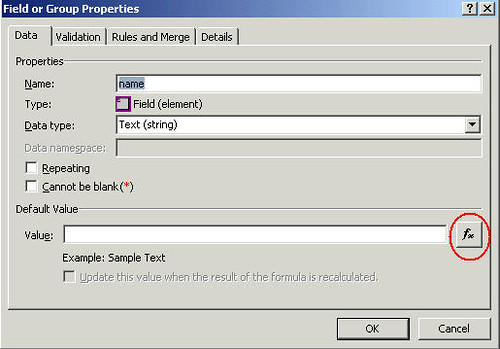
 
    
4.       Click "Insert Field or Group." button.
5.       Select the data connection that you created in the first step from the "Data Source" drop down.
6.       Expand nodes unless you can see all field/column names. Select the column name that you want to show in your form. As I said earlier, we are assuming that we are retrieving user profile data from a SharePoint list and this data will be filtered by a value passed from the InfoPath form. As I mentioned in the scenario above, there is a field that will contain a User ID entered by the user. So after you select the value that you want to show on your form, click the "Filter Data." button. This button remains disabled unless you select a field.
7.       Click "Add" button.
8.       There will be three drop down boxes on the form. The first drop down will have the column names retrieved from the SharePoint list and by default the column name you selected in the previous step will be selected in the drop down. The second drop down contains the filter conditions. Keep the default condition selected, that is, "is equal to". In the third drop down, Select "Type text ." if you want to hard code the user ID against which you want to show the data. If you want to keep it dynamic then select "Select a field or group.".
9.       From the "Data Source" drop down, select the main data source and then select the field name that corresponds to the "User ID" text box on your form. Click "Ok" and then again click "Ok". Click "Ok" thrice more to close open boxes and then click "Ok" once more to close the main properties box.
10.   Drag and drop the data source to your form. Save the form and run it to view the preview. (Hint: If this is a web enabled form, make sure to set the postback settings of the control that will show data to "Always".)
 
Repeat the steps above for each new field added to your form to show the SharePoint list column data.
  

Friday, September 19, 2008

Populating InfoPath drop down with "FILTERED" SharePoint list data programmatically

This article shows how one can populate InfoPath drop downs with "FILTERED" SharePoint list data. This article uses SPQuery to query the SharePoint lists.

Thursday, August 28, 2008

Comparing two different date formats

If one date control is using a format different than the other date control, how will you compare the dates? Why will this happen? Why will the two dates be using different formats in the same form? well, you can't argue with the client. can you? This was a real scenario that I faced some time ago. So, convert the dates to one format and compare them. For example,
   string shortDate1 = Microsoft.VisualBasic.Strings.FormatDateTime(Convert.ToDateTime(Date1), Microsoft.VisualBasic.DateFormat.ShortDate);
   string shortDate2 = Microsoft.VisualBasic.Strings.FormatDateTime(Convert.ToDateTime(Date2), Microsoft.VisualBasic.DateFormat.ShortDate);
   if (DateTime.Parse(shortDate1) < DateTime.Parse(shortDate2))
   {
         //Display message
   }
In the code above, I am comparing two dates, Date1 and Date2. These dates are stored in string format in the form. So we convert them to date format first and then to short date format and then compare them.

Monday, August 18, 2008

InfoPath: Deleting all rows except the first one in repeating table

Code:
XPathNavigator Node = this.CreateNavigator().SelectSingleNode("/my:myFields/my:RepeatingGroup", this.NamespaceManager);
XPathNodeIterator node_2b_deleted = this.CreateNavigator().Select("/my:myFields/my:RepeatingGroup", NamespaceManager);
                                    if (node_2b_deleted.Count > 1)
                                    {
                                        string group = "/my:myFields/my:RepeatingGroup";
                                        XPathNavigator firstItem = Node.SelectSingleNode(groupResults + "[2]", NamespaceManager);
                                        XPathNavigator lastItem = Node.SelectSingleNode(groupResults + "[position()=last()]", NamespaceManager);
                                        firstItem.DeleteRange(lastItem);
                                        lastItem = null;
                                        firstItem = null;
                                    }
                                    node_2b_deleted = null;
Explanation:

We start with second row and delete all rows till the last row. Why will we leave the first row? It depends. There are scenarios where one required to re-populate the repeating table after deleting all rows. In that case, if there is no first row, it will not be possible to create a clone of the first row. We first create a clone of the first row and then populate the fields of the repeating row. This continues until all rows are populated with data and then we delete the master row to avoid creating a duplicate entry of the first row. So, first row is always required. You can blank out all fields in the first row and if the repeating table is in a section, hide the section which will give users the feeling that whole repeating table has been deleted.

Saturday, August 16, 2008

Populating InfoPath drop down with SharePoint list data programmatically - Part 2 (Using SPQuery)

Learn how to use SPQuery object to fetch data from a SharePoint list.  SPuery is fast and efficient. Populate InfoPath drop down with SharePoint list data.