
Working With SharePoint Search - Part 2
In this article, we will customize the search results page that we created in Part 1.
1. Open the search center (Select Search from the tabs bar) in your SharePoint site.
2. Select Edit Page from the Site Actions menu.
3. Click the edit link in the Search Box and select Modify Shared Web Part. Expand Scopes Dropdown. There are several options listed in the Dropdown mode dropdown. If you want to show scopes drop down on the search page, select "Show scopes dropdown" and if you want to hide it, select "Do not show scopes dropdown". It doesn't make sense to show the scopes drop down because we are searching only one scope that we added in Part 1.
4. To increase the width of the search box, expand Query Text Box and add "350" in the Query text box width field. Click Ok to save the changes.
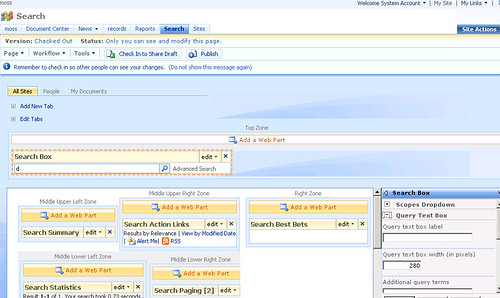
5. Click edit link in the Search Core Results web part and select Modify Shared Web Part. Expand Results Display/Views. Enter "5" in the Results Per Page field. Enter "1" in Sentences in Summary field. This will reduce the cluttering on the results page. Select "Modified Date" in the Default Results View drop down to show the results sorted by the modified date.
6. You can also modify the appearance of the results page by modifying the XSL. Click the XSL Editor... button to open the editor. You will notice there are different sections in the stylesheet. You can change image paths in this stylesheet. You can also modify the text messages that appear on the results page.
7. Click Check In to Share Draft link to publish the changes. You will see the changes that you just made on the results page. There will be only 5 rows, only 1 line summary, etc.
There are some more interesting features related to search that we can take advantage of. For example, SharePoint provides a way to view search usage reports. We all know how important reports are for the administrators, senior managers and executives. Let's explore some of these great features.
1. Open SharePoint Central Administration and click on the Shared Services link. Depending on your needs, you can create more than one SSP. Click on Search usage reports to view some interesting reports. This page shows following reports:
a. Queries over previous 30 days
b. Queries over past 12 months
c. Top query origin site collections over previous 30 days
d. Queries per scope over previous 30 days
e. Top queries over previous 30 days
Good thing about these reports is that you can export them to other formats like Excel and PDF. For example, select "Acrobat(PDF) File" from the Select a format dropdown and click the Export link located next to the dropdown. SharePoint will prompt you to open or save the document.
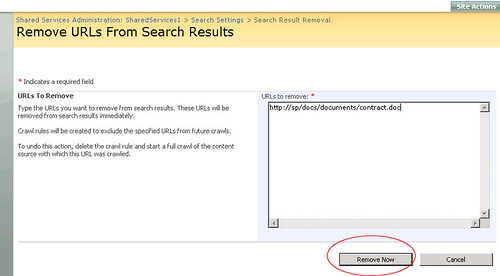
2. Another nice feature in SharePoint Search is the Search Result Removal. Suppose some one mistakenly uploaded a confidential document which should not have been published and you, as an administrator, want to remove the document from the search results. What will you do? Click Search settings on the Shared services page. Under Crawl Settings, select Search result removal. Enter the path of the confidential document in the URLs to remove and click Remove Now button. That's it! The link(s) will be immediately removed from the index and yes, there is no need to start the crawl to re-index the site.
3. There are some more useful reports that I forgot to mention. On shared services page, click Search usage reports. Click Search results from the Search usage reports box on the left. This view shows following reports:
a. Search Results Top Destination Pages
b. Queries With Zero Results
c. Most Clicked Best Bets
d. Queries With Zero Best Bets
e. Queries With Low Clickthrough
4. You can create crawl rules of your own. On the Configure Search Settings page, click Crawl rules link and then click New Crawl Rule.
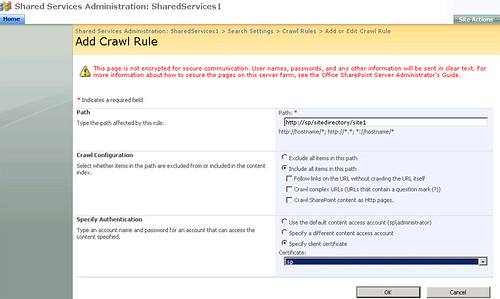
Enter a path in the Path field. You can exclude or include this path from the crawl process depending on your requirements. If you select Exclude all items in this path, all other options on this page will be grayed out. In that case, this path will not be included in the crawl process. If you include it in the indexing process, then you can make some more configurations which can be seen in the above figure. For example, you can enable the Crawl complex URLs option to include all types of URLs in the indexing process. You can also specify authentication and not only that, you can also select a certificate from the drop down if you select the Specify client certificate option.
5. You can enable or disable search based alerts by clicking the Search-based alerts link on the Configure Search Settings page.
Well, these were some of the nice features that are part of the latest SharePoint portal server. I am sure administrators will love these features.
In this article, we will customize the search results page that we created in Part 1.
1. Open the search center (Select Search from the tabs bar) in your SharePoint site.
2. Select Edit Page from the Site Actions menu.
3. Click the edit link in the Search Box and select Modify Shared Web Part. Expand Scopes Dropdown. There are several options listed in the Dropdown mode dropdown. If you want to show scopes drop down on the search page, select "Show scopes dropdown" and if you want to hide it, select "Do not show scopes dropdown". It doesn't make sense to show the scopes drop down because we are searching only one scope that we added in Part 1.
4. To increase the width of the search box, expand Query Text Box and add "350" in the Query text box width field. Click Ok to save the changes.
5. Click edit link in the Search Core Results web part and select Modify Shared Web Part. Expand Results Display/Views. Enter "5" in the Results Per Page field. Enter "1" in Sentences in Summary field. This will reduce the cluttering on the results page. Select "Modified Date" in the Default Results View drop down to show the results sorted by the modified date.
6. You can also modify the appearance of the results page by modifying the XSL. Click the XSL Editor... button to open the editor. You will notice there are different sections in the stylesheet. You can change image paths in this stylesheet. You can also modify the text messages that appear on the results page.
7. Click Check In to Share Draft link to publish the changes. You will see the changes that you just made on the results page. There will be only 5 rows, only 1 line summary, etc.
There are some more interesting features related to search that we can take advantage of. For example, SharePoint provides a way to view search usage reports. We all know how important reports are for the administrators, senior managers and executives. Let's explore some of these great features.
1. Open SharePoint Central Administration and click on the Shared Services link. Depending on your needs, you can create more than one SSP. Click on Search usage reports to view some interesting reports. This page shows following reports:
a. Queries over previous 30 days
b. Queries over past 12 months
c. Top query origin site collections over previous 30 days
d. Queries per scope over previous 30 days
e. Top queries over previous 30 days
Good thing about these reports is that you can export them to other formats like Excel and PDF. For example, select "Acrobat(PDF) File" from the Select a format dropdown and click the Export link located next to the dropdown. SharePoint will prompt you to open or save the document.
2. Another nice feature in SharePoint Search is the Search Result Removal. Suppose some one mistakenly uploaded a confidential document which should not have been published and you, as an administrator, want to remove the document from the search results. What will you do? Click Search settings on the Shared services page. Under Crawl Settings, select Search result removal. Enter the path of the confidential document in the URLs to remove and click Remove Now button. That's it! The link(s) will be immediately removed from the index and yes, there is no need to start the crawl to re-index the site.
3. There are some more useful reports that I forgot to mention. On shared services page, click Search usage reports. Click Search results from the Search usage reports box on the left. This view shows following reports:
a. Search Results Top Destination Pages
b. Queries With Zero Results
c. Most Clicked Best Bets
d. Queries With Zero Best Bets
e. Queries With Low Clickthrough
4. You can create crawl rules of your own. On the Configure Search Settings page, click Crawl rules link and then click New Crawl Rule.
Enter a path in the Path field. You can exclude or include this path from the crawl process depending on your requirements. If you select Exclude all items in this path, all other options on this page will be grayed out. In that case, this path will not be included in the crawl process. If you include it in the indexing process, then you can make some more configurations which can be seen in the above figure. For example, you can enable the Crawl complex URLs option to include all types of URLs in the indexing process. You can also specify authentication and not only that, you can also select a certificate from the drop down if you select the Specify client certificate option.
5. You can enable or disable search based alerts by clicking the Search-based alerts link on the Configure Search Settings page.
Well, these were some of the nice features that are part of the latest SharePoint portal server. I am sure administrators will love these features.
Comments
Mike Walsh's WSS and more said:
Mike Walsh's WSS and more said: