The CSS reference guide highlights the major styles used in MOSS and WSS v3 sites.
|
A Practical Guide to SharePoint 2013

A Practical Guide to SharePoint 2013 - Book by Saifullah Shafiq
Tuesday, January 30, 2007
CSS Reference Chart for SharePoint 2007 (By Heather Solomon)
Some beautiful sunset pictures
Some beautiful sunset pictures
| I took some sunset pics last weekend. Some of them are really beautiful. I wanted to share these pics with all my blog readers. I hope readers will like them. Tags: sunset, lake view | |
 |
 |
 |
 |
 |
 |
 |
 |
20 of the "Fantastic/Fabulous 40" Application Templates and "Shared Hosting Solutions" whitepaper for WSS 3.0 now available!
The 20 Site Admin templates are now available for public download:
|
Thursday, January 25, 2007
Wednesday, January 24, 2007
Getting Started with Windows SharePoint Services & Server 2007 - Useful Resources (via Dave Glover)
Here is another nice post about the useful resources for the SharePoint technologies:
Here are a couple of links extracted from the post:
Understanding Workflow in Microsoft Windows SharePoint Services and the 2007 Microsoft Office System
Click here to read the complete post.
Friday, January 19, 2007
Working With SharePoint Search - Part 2
Working With SharePoint Search - Part 2
In this article, we will customize the search results page that we created in Part 1.
1. Open the search center (Select Search from the tabs bar) in your SharePoint site.
2. Select Edit Page from the Site Actions menu.
3. Click the edit link in the Search Box and select Modify Shared Web Part. Expand Scopes Dropdown. There are several options listed in the Dropdown mode dropdown. If you want to show scopes drop down on the search page, select "Show scopes dropdown" and if you want to hide it, select "Do not show scopes dropdown". It doesn't make sense to show the scopes drop down because we are searching only one scope that we added in Part 1.
4. To increase the width of the search box, expand Query Text Box and add "350" in the Query text box width field. Click Ok to save the changes.
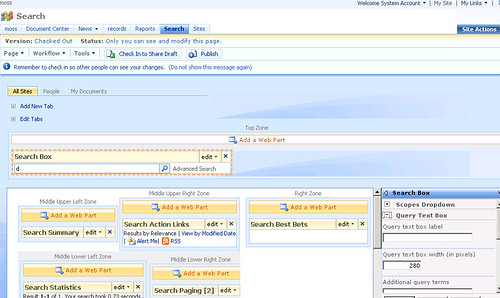
5. Click edit link in the Search Core Results web part and select Modify Shared Web Part. Expand Results Display/Views. Enter "5" in the Results Per Page field. Enter "1" in Sentences in Summary field. This will reduce the cluttering on the results page. Select "Modified Date" in the Default Results View drop down to show the results sorted by the modified date.
6. You can also modify the appearance of the results page by modifying the XSL. Click the XSL Editor... button to open the editor. You will notice there are different sections in the stylesheet. You can change image paths in this stylesheet. You can also modify the text messages that appear on the results page.
7. Click Check In to Share Draft link to publish the changes. You will see the changes that you just made on the results page. There will be only 5 rows, only 1 line summary, etc.
There are some more interesting features related to search that we can take advantage of. For example, SharePoint provides a way to view search usage reports. We all know how important reports are for the administrators, senior managers and executives. Let's explore some of these great features.
1. Open SharePoint Central Administration and click on the Shared Services link. Depending on your needs, you can create more than one SSP. Click on Search usage reports to view some interesting reports. This page shows following reports:
a. Queries over previous 30 days
b. Queries over past 12 months
c. Top query origin site collections over previous 30 days
d. Queries per scope over previous 30 days
e. Top queries over previous 30 days
Good thing about these reports is that you can export them to other formats like Excel and PDF. For example, select "Acrobat(PDF) File" from the Select a format dropdown and click the Export link located next to the dropdown. SharePoint will prompt you to open or save the document.
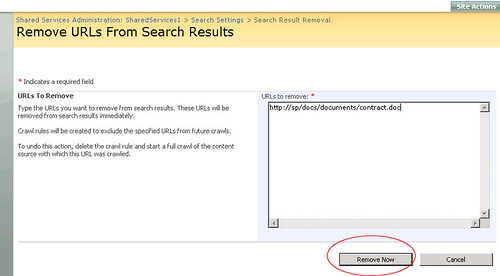
2. Another nice feature in SharePoint Search is the Search Result Removal. Suppose some one mistakenly uploaded a confidential document which should not have been published and you, as an administrator, want to remove the document from the search results. What will you do? Click Search settings on the Shared services page. Under Crawl Settings, select Search result removal. Enter the path of the confidential document in the URLs to remove and click Remove Now button. That's it! The link(s) will be immediately removed from the index and yes, there is no need to start the crawl to re-index the site.
3. There are some more useful reports that I forgot to mention. On shared services page, click Search usage reports. Click Search results from the Search usage reports box on the left. This view shows following reports:
a. Search Results Top Destination Pages
b. Queries With Zero Results
c. Most Clicked Best Bets
d. Queries With Zero Best Bets
e. Queries With Low Clickthrough
4. You can create crawl rules of your own. On the Configure Search Settings page, click Crawl rules link and then click New Crawl Rule.
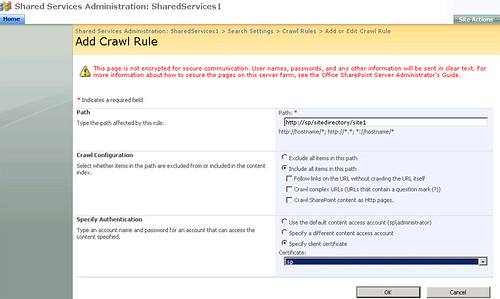
Enter a path in the Path field. You can exclude or include this path from the crawl process depending on your requirements. If you select Exclude all items in this path, all other options on this page will be grayed out. In that case, this path will not be included in the crawl process. If you include it in the indexing process, then you can make some more configurations which can be seen in the above figure. For example, you can enable the Crawl complex URLs option to include all types of URLs in the indexing process. You can also specify authentication and not only that, you can also select a certificate from the drop down if you select the Specify client certificate option.
5. You can enable or disable search based alerts by clicking the Search-based alerts link on the Configure Search Settings page.
Well, these were some of the nice features that are part of the latest SharePoint portal server. I am sure administrators will love these features.
In this article, we will customize the search results page that we created in Part 1.
1. Open the search center (Select Search from the tabs bar) in your SharePoint site.
2. Select Edit Page from the Site Actions menu.
3. Click the edit link in the Search Box and select Modify Shared Web Part. Expand Scopes Dropdown. There are several options listed in the Dropdown mode dropdown. If you want to show scopes drop down on the search page, select "Show scopes dropdown" and if you want to hide it, select "Do not show scopes dropdown". It doesn't make sense to show the scopes drop down because we are searching only one scope that we added in Part 1.
4. To increase the width of the search box, expand Query Text Box and add "350" in the Query text box width field. Click Ok to save the changes.
5. Click edit link in the Search Core Results web part and select Modify Shared Web Part. Expand Results Display/Views. Enter "5" in the Results Per Page field. Enter "1" in Sentences in Summary field. This will reduce the cluttering on the results page. Select "Modified Date" in the Default Results View drop down to show the results sorted by the modified date.
6. You can also modify the appearance of the results page by modifying the XSL. Click the XSL Editor... button to open the editor. You will notice there are different sections in the stylesheet. You can change image paths in this stylesheet. You can also modify the text messages that appear on the results page.
7. Click Check In to Share Draft link to publish the changes. You will see the changes that you just made on the results page. There will be only 5 rows, only 1 line summary, etc.
There are some more interesting features related to search that we can take advantage of. For example, SharePoint provides a way to view search usage reports. We all know how important reports are for the administrators, senior managers and executives. Let's explore some of these great features.
1. Open SharePoint Central Administration and click on the Shared Services link. Depending on your needs, you can create more than one SSP. Click on Search usage reports to view some interesting reports. This page shows following reports:
a. Queries over previous 30 days
b. Queries over past 12 months
c. Top query origin site collections over previous 30 days
d. Queries per scope over previous 30 days
e. Top queries over previous 30 days
Good thing about these reports is that you can export them to other formats like Excel and PDF. For example, select "Acrobat(PDF) File" from the Select a format dropdown and click the Export link located next to the dropdown. SharePoint will prompt you to open or save the document.
2. Another nice feature in SharePoint Search is the Search Result Removal. Suppose some one mistakenly uploaded a confidential document which should not have been published and you, as an administrator, want to remove the document from the search results. What will you do? Click Search settings on the Shared services page. Under Crawl Settings, select Search result removal. Enter the path of the confidential document in the URLs to remove and click Remove Now button. That's it! The link(s) will be immediately removed from the index and yes, there is no need to start the crawl to re-index the site.
3. There are some more useful reports that I forgot to mention. On shared services page, click Search usage reports. Click Search results from the Search usage reports box on the left. This view shows following reports:
a. Search Results Top Destination Pages
b. Queries With Zero Results
c. Most Clicked Best Bets
d. Queries With Zero Best Bets
e. Queries With Low Clickthrough
4. You can create crawl rules of your own. On the Configure Search Settings page, click Crawl rules link and then click New Crawl Rule.
Enter a path in the Path field. You can exclude or include this path from the crawl process depending on your requirements. If you select Exclude all items in this path, all other options on this page will be grayed out. In that case, this path will not be included in the crawl process. If you include it in the indexing process, then you can make some more configurations which can be seen in the above figure. For example, you can enable the Crawl complex URLs option to include all types of URLs in the indexing process. You can also specify authentication and not only that, you can also select a certificate from the drop down if you select the Specify client certificate option.
5. You can enable or disable search based alerts by clicking the Search-based alerts link on the Configure Search Settings page.
Well, these were some of the nice features that are part of the latest SharePoint portal server. I am sure administrators will love these features.
Friday, January 12, 2007
MOSS 2007 and Code Access Security
MOSS 2007 and Code Access Security
Have you ever written a web part or a web service? If yes then you must have dealt with a security problem. Writing a web part or web service may not be a big issue but deploying them is certainly a headache. You start getting permission errors as soon as you deploy your code on the server. I recently wrote an article demonstrating the web service creation process and I promised in that article that I would write about Code Access Security (CAS) in another article. There are three ways to assign execution permissions to your code:
1. Increase the trust level for the entire virtual server
2. Create a custom policy file for your assemblies
3. Install your assemblies in the GAC
2. Create a custom policy file for your assemblies
3. Install your assemblies in the GAC
In the article, we installed our assembly in the GAC but the safest method is to create a custom policy file for the assembly. Following article on MSDN contains complete details on code access security:
Written in July 2003, this is one of the most comprehensive articles written on "SharePoint and Code Access Security".
For security reasons, the assembly must be installed in the bin directory of the application instead of GAC but installing it in the bin directory requires you to assign execution permissions to the assembly. One way is to increase the trust level of the entire virtual server. This is easy to implement but this option is least secure as it affects all assemblies used by that virtual server. Second way is to create a custom policy file and this is the recommended approach. This option is most secure but difficult to implement. In this article, we will create a custom policy file for an assembly (web service assembly) written for MOSS 2007.
Creating a Custom Policy File
1. Go to the following location on the server:
LocalDrive:Program FilesCommon FilesMicrosoft Sharedweb server extensions12CONFIG
2. Make a copy of wss_minimaltrust.config and rename it wss_customtrust.config.
3. Open wss_customtrust.config file using any text editor.
4. Under the <SecurityClasses> element, add a reference to the SharePointPermissions class as follows:
|
<SecurityClass Name="SharePointPermission" Description="Microsoft.SharePoint.Security.SharePointPermission, Microsoft.SharePoint.Security, Version=12.0.0.0, Culture=neutral, PublicKeyToken=71e9bce111e9429c" />
|
5. Search for the <PermissionSet> tag where the name attribute equals ASP.NET. If you couldn't find that <PermissionSet> tag, locate the one that has SPRestricted in the name attribute.
6. Copy the entire tag and all of its children, and paste a copy of it immediately below the one you copied.
7. Change the name of the PermissionSet element from ASP.NET (or SPRestricted) to CustomTrust.
Before:
|
<PermissionSetclass="NamedPermissionSet"version="1"Name="SPRestricted">
|
After:
|
<PermissionSetclass="NamedPermissionSet"version="1"Name="CustomTrust">
|
8. Add the following <IPermission> node to the <PermissionSet> element where the name attribute equals CustomTrust:
|
<IPermission class="SharePointPermission" version="1" ObjectModel="True" />
|
Therefore, the resulting customized <PermissionSet> will look as follows:
| <PermissionSet class="NamedPermissionSet" version="1" Name="CustomTrust">
<IPermission class="AspNetHostingPermission"
<IPermission class="SecurityPermission"version="1" Level="Minimal" /> version="1" Flags="Execution" /> <IPermission class="WebPartPermission" version="1" Connections="True" />
<IPermission class="SharePointPermission" version="1" ObjectModel="True" />
</PermissionSet> |
9. Once you define the customized element, you must create a code group to specify when the CLR should apply the permission set. (For details, see the original Microsoft article). Locate <CodeGroup> tag where the class attribute equals FirstMatchCodeGroup and copy following CodeGroup immediately below it:
|
<CodeGroup class="UnionCodeGroup" version="1" PermissionSetName="CustomTrust">
<IMembershipCondition class="UrlMembershipCondition" version="1" Url="$AppDirUrl$/bin/*" /> </CodeGroup> |
The membership condition for this new code group is based on URL membership and the URL points to the bin directory. The permissions will be applied to all the assemblies in the bin directory of the current application. You can also use strong name membership but then the permissions will be applied only to one assembly. For example, if I have written a web service and I wanted to assign permissions to my assembly only, I would use strong name membership. Copy following code immediately below the <CodeGroup> tag where the class attribute equals FirstMatchCodeGroup, if you want to use strong name membership:
<CodeGroup class="UnionCodeGroup"
version="1" PermissionSetName="CustomTrust"> <IMembershipCondition class="StrongNameMembershipCondition" version="1" PublicKeyBlob="0x00240000048000009400000006020000002400005253413100040000010001004" Name="UploadService" /> </CodeGroup> |
Replace PublicKeyBlob value with your own value and change the name of the assembly in the Name attribute. Name attribute contains the name of the assembly. To retrieve the public key blob for an assembly, use the secutil.exe tool. Please note that publickeyblob is different from publickeytoken. Secutil.exe is located in the following folder:
LocalDrive:Program FilesMicrosoft Visual Studio 8SDKv2.0Bin
To retrieve the public key blob for your assembly, either copy the secutil.exe tool to the folder that contains your assembly else provide exact path to the assembly in the command, and run the tool as follows:
secutil.exe -hex -s UploadService.dll > blob.txt
UploadService.dll is the name of the assembly. This command will create a text file named blob.txt. Open blob.txt and copy the public key and paste it in the publickeyblob attribute.
10. Save and close the file. The policy file is ready to use.
11. Open the web.config file for the virtual server where you have deployed your component and add the following <trustlevel> tag to the SecurityPolicy element:
<trustLevel name="WSS_Custom" policyFile="LocalDrive:Program FilesCommon FilesMicrosoft SharedWeb Server Extensions12configwss_customtrust.config" />
|
Virtual Directories for web applications are located in the following folder:
LocalDrive:InetpubwwwrootwssVirtualDirectories
Suppose I want to deploy my web service in the web application configured at port 17316. The URL of that application would be http://localhost:17316/ and its virtual directory will be:
LocalDrive:InetpubwwwrootwssVirtualDirectories17315
Create a bin folder in this path and copy your assembly to the bin folder. The web.config for this virtual server will be located in the following folder:
LocalDrive:InetpubwwwrootwssVirtualDirectories17315
In the web.config file, change the <trust> tag so that it refers to the newly defined trust level.
<trust level="WSS_Custom" originUrl="" />
|
12. Save and close the web.config file.
13. Restart IIS to apply the custom policy to the specified virtual server.
====
Comments:
 |
Di niente, di meno, sul mondo dell'informatica.... said: |
| |
Di niente, di meno, sul mondo dell'informatica.... said: |
| |
deeptyranjan said:
It will be very much usefull if it will display all the detail and complete structure of MOSS 2007 object model
SharePoint 2007 Object Model It's very urgent !!! If anybody have any Idea Please let me know. |
| |
Ryan said:
This was very helpful. After following the steps listed in your post I get the following exception when running my application:
"System.IO.FileLoadException: The given assembly name or codebase was invalid. (Exception from HRESULT: 0x80131047)". Any ideas? |
| |
ssa said:
Hi Ryan,
Thanks for reading and liking the article. The error you are getting has nothing to do with the code access security. This error occurs when path to your assembly is longer than 255 characters. Make the path shorter to get rid of this error. There are a couple of good links on google that discuss this issue in detail. Here are a couple of links for your convenience: Hope this helps. Let me know if this does not solve your problem. Good luck Regards, SSA |
| |
Abhishek Agrawal said:
It is very useful and comprehensive article for deploying/developing ASP.NET application in sharepoint
|
| |
Pedro Rainho said:
I have used your Sample Custom Policy File and i have looked at the microsoft site and i'm still having the same problem. i'm doing this in my sample webpart
using (SPSite site = SPControl.GetContextSite(HttpContext.Current)) {
ServerContext context = ServerContext.GetContext(site);
SPWeb ferias = site.AllWebs["Ferias"];
site.AllowUnsafeUpdates = true;
ferias.AllowUnsafeUpdates = true;
ferias.Lists.ListsForCurrentUser = true;
SPList feriasConfiguracao = ferias.Lists["FeriasConfiguracao"];
SPListItem item = feriasConfiguracao.Items.Add();
item["Nome"] = "Nome1";
item["Valor"] = "Valor1";
item.Update();
} it's simple insert an item in a list, and the error continues to be: Request for the permission of type 'Microsoft.SharePoint.Security.SharePointPermission, Microsoft.SharePoint.Security, Version=12.0.0.0, Culture=neutral, PublicKeyToken=71e9bce111e9429c' failed. i have simple created a webpart and copy the dll to the bin folder and when i use the web part i receive that error. Any ideas???? |
| |
ssa said:
Thanks Abhishek
|
| |
ssa said:
Pedro!
Did you install the assembly in the GAC? |
| |
Anders Rask said:
Hi, thanx for the article.
A comment though: Wouldnt it be better (read more fine grained) to use the assembly name instead of the blob? Using the blob will give access to all assemblies signed with the same SNK file. Using the name will give you more control on what assemblies are allowed higher privileges -and IMHO thats what CAS is all about ;-) |
| |
Anders Rask said:
Ahh sorry, i just saw you specified both blob and assembly name :-D
|
| |
ssa said:
Thanks for commenting Anders! :)
-SSA |
| |
Pedro Rainho said:
No, i don't want to install in the gac, i want to copy dll to bin directory, install in the gac is't the same as give full trust in the web.config and i don't want that. If i give full trust my webpart works fine but that is not recomended by MS. i just want to create a simple Custom Policy File that runs the example i posted before.
|
| |
Suleman said:
Hi,
Your both articles (MOSS 2007 and Code Access Security & Creating a Custom Web Service for SharePoint ) are really good, the way you described, steps, is simply great. I'm facing a problem, if you have some solution please let me know and thanks in advance. I have deployed a simple web service (that returns "Hello world") on "Server2" then deployed a webpart on "Server1" and call the service from "Server2" it throws an exception "401 Unauthorized ......" when I use Default or Default Network Credentials. e.g. Web_Ref.PagesList listService = new Web_Ref.PagesList(); listService.Url = siteURL + "/_layouts/KPMGTestService/pageslist.asmx"; listService.Credentials = System.Net.CredentialCache.DefaultNetworkCredentials; listService.PreAuthenticate = true; writer.Write(listService.HelloWorld()); but when I pass userName and password to Network Credentials it works fine. e.g. System.Net.NetworkCredential ntCred = new System.Net.NetworkCredential("UID", "Pwd", "Domain"); listService.Credentials = ntCred; My Problem is, I want to use DefaultCredentials or DefaultNetworkCredentials because in my actual webpart somehow i don't wanna impersonate or pass any UID and Pwd etc because i need to check user rights in webservice. Note: this service works fine if i called it using a Console application. If you have any Idea, please let me know here in this blog or if you can mail me , that will be great, at suleman.ibrahim@hotmail.com Once again Thanks. |
| |
ssa said:
One thing, the line listService.PreAuthenticate = true; should come before the "credentials" line. Like this:
listService.PreAuthenticate = true; listService.Credentials = System.Net.CredentialCache.DefaultNetworkCredentials; Second thing, make sure the login you use for logging in has approp. permissions in SharePoint. |
| |
ssa said:
Pedro,
Which method of authetication are you using in the custom policy file? the URL method OR the blob method?? |
| |
Suleman said:
Yes, the line listService.PreAuthenticate = true; is come before the "credentials" line. It was just an copy pasting mistake.
I have tried both URL and Blob methods in Custom policy file and after updating file I did IISReset but it doesn't work. Login, I'm using for logging has Administrator rights on both servers and has site Collection administrator rights on both portals. One thing more, if I make changes in my service should I create disco and wsdl files again or that is not necessary And what is the imapct of these files cuz I tried my service without these files but result doesn't change wheather I have deployed these files or not. Thanks for your time. |
| |
Suleman said:
The problem has been resolved actually we should have to use "Kerberos" Authentication Settings instead of "NTLM", if we wanna access some remote server Services etc. I dont wanna go into details but if anyone wanna know about it, differences between "Kerberos" and "NTLM", can read following article.
Once again thanks for time and comments. |
| |
Suleman said:
But, I still wanna know about my last question.
"if I make changes in my service should I create disco and wsdl files again or that is not necessary And what is the imapct of these files cuz I tried my service without these files but result doesn't change wheather I have deployed these files or not." thanks |
| |
ssa said:
If there are no major changes then there is no need to recreate wsdl and disco files, your web service will work fine.
|
| |
sireve said:Hi, I have a problem with this sentence: string rol = myweb.RoleDefinitions["admin"].Name; Webpart "x" seems to be causing a problem .Is not the level of permissions. Any Ideas?? And Pedro, I have the same problem in other webpart... Have you got the solution? web.configgg!! :s thanks |
| |
ssa said:
Sireve,
What is the error message that you get? Cant tell you the problem without looking at the error first! Thanks |
| |
sireve said:
Hi, I said you, sorry I'm not explain,
this is the error: Webpart "mywebpart" seems to be causing a problem .Is not the level of permissions. (this is a traslation message, my MOSS is in spanish) thanks |
| |
ssa said:
hmm.. i guess the web part tries to access an area in SharePoint for which it does not have permissions. wait a minute! What are you creating? a web part, web service or just an application using the object model?
ssa |
| |
sireve said:This is an error webpart. But the objective is to obtain the group/rol to which the user belongs, in my example user "admin".. how I get it?? thanks ssa |
| |
Paul said:
Great Article! I was going around in circles for a couple hours befire finding your post. I walked thru it and presto, my webpart is now showing. I was getting the same error that Pedro(above) was getting.
(Pedro, in case you haven't resolved your issue. I believe the key part of the post was to edit the local web.config file and make sure the wss_custom_minimaltrust.config (in my case) has a reference in the security policy section (I'd done most of the edits already, but forgot to tell the local web.config about it ): <securityPolicy> <trustLevel name="WSS_Custom" policyFile="C:Program FilesCommon FilesMicrosoft Sharedweb server extensions12CONFIGwss_custom_minimaltrust.config" /> </securityPolicy> Thanks again, Paul |
| |
ssa said:
Many Thanks Paul!
Regards, SSA |
| |
Geo said:
This was very helpful. After following the steps listed in your post I get the following exception when running my application:
The given assembly name or codebase was invalid. (Exception from HRESULT: 0x80131047). The only additional part which I am trying to do in my web part is Loading the XML in XMLDocument object using Load method from the local drive. |
Tuesday, January 2, 2007
Creating a MOSS VPC Image
Tony Zink has written a series of articles describing the process of setting up SharePoint in a virtual environment.
http://www.pptspaces.com/sharepointreporterblog
I have often seen people struggling with VPC deployment. This series will be a great help resource for all those who wanted to set up SharePoint in a virtual environment.
http://www.pptspaces.com/sharepointreporterblog
I have often seen people struggling with VPC deployment. This series will be a great help resource for all those who wanted to set up SharePoint in a virtual environment.
Subscribe to:
Posts (Atom)
Comments
Mike Walsh's WSS and more said:
Mike Walsh's WSS and more said: