A Practical Guide to SharePoint 2013

A Practical Guide to SharePoint 2013
A Practical Guide to SharePoint 2013 - Book by Saifullah Shafiq

Saturday, September 8, 2007

Populating multiselect list box in InfoPath 2007 web forms programmatically

Multi select list box that comes with InfoPath 2007 does not work in web forms so you have to create your own control for usage in web forms. The following article shows you how to create a multiselect list box for web forms:
Ok, you have created a multiselect list box and now you can add static values but what if you want to populate this list box programmatically. How will you do that? The following tip shows you how you can populate this list box programmatically:
Please read the article mentioned above before continuing because without reading that article first it won't make sense to you what I am talking.
I will use the same names (for controls) as mentioned in the Microsoft article so that it's easier for you to understand what's happening. 
For your convenience, I will list the control names here:
options: is the group name
option: is the repeating group
selected: is used for the checkbox and contains true/false value
text: is a text box and is used to store the text value
Create a navigator first to navigate the xml nodes.
XPathNavigator DOM = this.MainDataSource.CreateNavigator();

"arrayItems" is an array of items retrieved from the database. Write a function that returns an array containing the items that you want to show in the multi select list box. I have not included that function here. It's a straight forward thing and not related directly to what I am trying to explain.
We will get the items from the array and add them to the list box. We will not touch the checkbox right now. We will just add the text values to the text boxes. By default, there is one row in the multi select list box. You must create new rows dynamically. Check the array length. If the lenth is 10 items, create 10 new rows. Best way is to iterate through the array and create new rows and populate the rows with the items retrieved from the array.
if (arrayItems.Length > 0)
{
       XPathNavigator Item = DOM.SelectSingleNode("/my:myFields/my:options/my:option", this.NamespaceManager);
       XPathNavigator newItemNode = null;
       for (int itemIndex = 0; itemIndex < arrayItems.Length-1; itemIndex++)
       {
              if (Item != null)
              newItemNode = Item.Clone();
              XPathNavigator navText = newItemNode.SelectSingleNode("/my:myFields/my:options/my:option/my:text", this.NamespaceManager);
                  
              navText.SetValue(arrayItems[itemIndex].ToString());
           
              Item.InsertAfter(newItemNode);
              navText = null;
              newItemNode = null;
       }
              
       Item.DeleteSelf();
       Item = null;
              
}
DOM = null;
           
Ok, so here is what I do. I create a clone of the original row and add a value to the text box of this new row.
newItemNode = Item.Clone(); // create a clone
select the text box of the newly created (cloned) row:
XPathNavigator navText = newItemNode.SelectSingleNode("/my:myFields/my:options/my:option/my:text", this.NamespaceManager);
and set it's value with the item retrieved from the array:
navText.SetValue(arrayItems[itemIndex].ToString());

Likewise, if you want to check the checkboxes programmatically, set the value of the control to boolean true or false. True will check the box, and False will uncheck the box. For example, you can check the box like this:
XPathNavigator navCheck = newItemNode.SelectSingleNode("/my:myFields/my:options/my:option/my:selected", this.NamespaceManager); 
navCheck.SetValue("true");
That's it!

Using powershell to add a policy feature to the collection

Following is the script to add a policy to the feature collection. This script will add a policy to the Records Management's feature collection. 
[System.Reflection.Assembly]::LoadWithPartialName("Microsoft.Office.Policy")
[System.Reflection.Assembly]::LoadWithPartialName("Microsoft.Office.Server")
[System.Reflection.Assembly]::LoadWithPartialName("Microsoft.SharePoint.Portal")
[System.Reflection.Assembly]::LoadWithPartialName("Microsoft.SharePoint")
$Url = "http://server/marketing"
$site = new-Object Microsoft.SharePoint.SPSite($Url)
#add policy to the collection
$xml = [System.IO.File]::ReadAllText("C:My Documentsfeature.xml")
[Microsoft.Office.RecordsManagement.InformationPolicy.PolicyFeatureCollection]::Add($xml)
 Similarly, to delete the policy, use following script:
[Microsoft.Office.RecordsManagement.InformationPolicy.PolicyFeatureCollection]::Delete("MarketingPolicy")
feature.xml will contain the following:
<PolicyFeature
  id="MarketingPolicy" xmlns="urn:schemas-microsoft-com:office:server:policy">
 <Name>Marketing Policy</Name>
 <Description>Marketing Policy</Description>
 <Publisher>ABC</Publisher>
 <AssemblyName>MarketingPolicy,Version=1.0.0.0,Culture=neutral,PublicKeyToken=a0231d53df8a952</AssemblyName>
 <ClassName>Marketing</ClassName>
</PolicyFeature>
Add your own assembly's information in this file (feature.xml).
See following links if you want to learn more about policies, adding policies, records management, etc:
Some more links that you may be interested in (not related to policy feature installation): 
Installing and uninstalling features using stsadm.exe:
How to create a simple feature:

Thursday, September 6, 2007

Using caspol.exe to add assemblies to full trust assembly list

Code Access Security Policy Tool (Caspol.exe) can be used to modify security policy for different policy levels. You can use it to add an assembly to the full trust assembly list for a specific policy level. Security exception is common when you try to run your application from a network share. See following article for more details:
You also get stuck sometimes when you try to deploy your application to a local folder. See following article for details:
In this tip, I will show you how you can use caspol.exe to add your assembly to a full trust assembly list.
caspol.exe is located in the following directory:
LocalDrive:WindowsMicrosoft.NetFrameworkv2.0.50727
Use the following command to put an assembly to the trust: 
caspol.exe -u -addgroup All_Code -url "*"  FullTrust -name "Your Assembly Name"
Assembly name will be like "YourCompany.ApplicationName" (without extension)
Suppose, you are deploying your application on a remote machine using a script. How will you run the caspol.exe tool on the remote machine? One way is to create a batch file and run it programmatically on the remote machine after copying the assembly to that machine. Create a batch file and copy the following in the file:
CD
PATH=%windir%microsoft.netframeworkv2.0.50727
caspol.exe -polchgprompt off -u -addgroup All_Code -url "*"  FullTrust -name "MyAssembly"
caspol.exe -polchgprompt on
polchgprompt option enables or disables the prompt that is displayed whenever Caspol.exe is run using an option that would cause policy changes. addgroup adds a new code group to the code group hierarchy. For more details, see following article:
Now, call this batch file programmatically from your deployment application.
string tempFolder = Environment.GetEnvironmentVariable("Temp");
FileStream fyle = new FileStream(tempFolder + "file://errlog.txt",FileMode.Create,FileAccess.Write/);
StreamWriter sw = new StreamWriter(fyle);
sw.Write("Ready to run the batch file!");
System.Diagnostics.Process proc = new System.Diagnostics.Process();
proc.EnableRaisingEvents = false;
proc.StartInfo.FileName = Environment.CurrentDirectory + "\security.bat";
                  
proc.Start();
sw.Write("security.bat ran successfully!");
sw.Close();
Remember, this can be a unattended installation, so you  may want to log errors. You can log errors to the Windows log file. You can also create your own text file for logging errors, as shown in the code above. The code creates "errlog.txt" file in the Windows' Temp directory and then executes the batch file. This code does not show how to trap and log errors, you can simply use try ... catch blocks to write the errors in the text file.
Using this technique you can put assemblies to a list of full trust assemblies.

-SSA

Adding content to Word "content control" programmatically

Category: Word programming
Level: Advance 
Here is a small tip on how to add data to Word content control programmatically. If you don't know what are content controls, you can read about them at the following sites:
The articles above will give you a clear picture about content controls. The beauty of content controls is that these can be populated with data programmatically. Of course, this could be done in different ways. Following is one way of doing it:
object contentcontrolIndex;
               
contentcontrolIndex = 1; //index of content controls always start from 1, not from 0!!
               
Word.ContentControl contentcontrolSample = this.Application.ActiveDocument.ContentControls.get_Item(ref contentcontrolIndex);
contentcontrolSample.Range.InsertAfter("This is a test!"); 
"this" in third line points to the current open document. When trying this code, replace "this.Application" with your own Word reference. If you want to learn more about this topic, read the following article (VSTO 2005 SE Sample):
The code above assumes there is only one content control in the application. The index of the control will be 1. Using this technique, you can populate content controls with data retrieved from different data sources including databases and other documents.
-SSA


Adding content to Word "content control" programmatically

Category: Word programming
Level: Advance
Here is a small tip on how to add data to Word content control programmatically. If you don't know what are content controls, you can read about them at the following sites:
 http://blogs.msdn.com/microsoft_office_word/archive/2006/10/23/control-yourself.aspx
http://blogs.msdn.com/modonovan/archive/2006/05/23/604704.aspx
http://blogs.msdn.com/erikaehrli/archive/2006/08/11/word2007DataDocumentGenerationPart1.aspx
http://msdn2.microsoft.com/en-us/library/ms406053.aspx
The articles above will give you a clear picture about content controls. The beauty of content controls is that these can be populated with data programmatically. Of course, this could be done in different ways. Following is one way of doing it:

object contentcontrolIndex;
               
contentcontrolIndex = 1; //index of content controls always start from 1, not from 0!!
               
Word.ContentControl contentcontrolSample = this.Application.ActiveDocument.ContentControls.get_Item(ref contentcontrolIndex);

contentcontrolSample.Range.InsertAfter("This is a test!"); 

"this" in third line points to the current open document. When trying this code, replace "this.Application" with your own Word reference. If you want to learn more about this topic, read the following article (VSTO 2005 SE Sample):
http://www.microsoft.com/downloads/details.aspx?familyid=9331eaa4-fc4f-49e1-ac78-aa2f112d854e&displaylang=en
The code above assumes there is only one content control in the application. The index of the control will be 1. Using this technique, you can populate content controls with data retrieved from different data sources including databases and other documents.

-SSA

Tuesday, September 4, 2007

Exporting data from Access to SharePoint and Importing data into InfoPath from a SharePoint List

Category: Administration
Level: Beginner 
This beginner level tutorial will show you how you can export data from Access to SharePoint and then import data from a SharePoint list into InfoPath. Let me tell you that you can also create an InfoPath form that could access data in an external database including Access. Using a built-in wizard in InfoPath, creating such a form is very easy. You can display data from Access in the InfoPath form. You can also incorporate search feature with ease using the wizard. This tutorial is divided into parts. The first part shows how to export data to SharePoint from an Access database. 
Export data from Access to a SharePoint list.
Detailed Steps:
1.       Export Access data to a SharePoint list. Go to 'External Data' in Access and select 'SharePoint List' from the 'Export' section.
Well, honestly speaking that's the only step required. Using the wizard you can either select a pre-built SharePoint list or you can create a new one before exporting data.

Importing data from a SharePoint list into an InfoPath Form
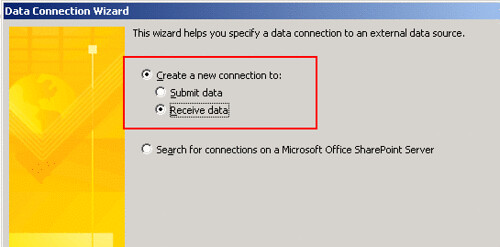
1.       Create a new data connection in InfoPath and select following options:
a.       Create a new connection > Receive data
     
b.      Select "SharePoint library or list" option.
c.       Enter the (SharePoint) list's path where you exported the Access data.
d.      Select your list from the list of lists and libraries.
e.       Select the field (or fields) that you want to show in InfoPath.
f.        Check 'Store a copy of the data in the form template'.
g.        Add a name for the data connection and check the "Automatically retrieve data when form is opened" option.
h.      Click "Finish".
Use following steps to populate a text box with data imported from MS Access:
1.       Add a text box in your form.
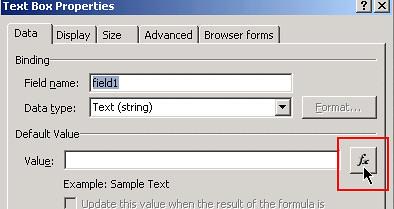
2.       Right click the text box and select "Text Box Properties" to open the properties page. Enter a default value for this field (Click the button (fx) shown on the right side of the "value" text box).
      3. Click 'Insert Field or Group.' button.
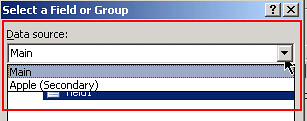
      4. Select secondary data source from the 'Data source' drop down.
      5. Expand all nodes until you see field names. Select the field that you want to retrieve value from.
      6. Click OK twice and that's it!
You can use more fields to display data from different columns of the Access table.

Monday, September 3, 2007

Fix "calling GetScopeID from a non-Office server binary" error

Scopes are usually used in search code. One of the very common errors when working with scopes in search code is as following:
"Calling GetScopeID from a non-Office server binary."
This error occurs when you instantiate the query object, for example: 
KeywordQuery kwQuery = new KeywordQuery(site);
To resolve this issue, include the correct namespace when defining the kwQuery object, for example:
Microsoft.Office.Server.Search.Query.KeywordQuery kwQuery = new Microsoft.Office.Server.Search.Query.KeywordQuery(site)
When you skip the namespace, SharePoint tries to call the GetScopeID() from an assembly different than the one it should be using. This especially happens when both of the following namespaces are included in your code:
using Microsoft.SharePoint.Search.Query;
using Microsoft.Office.Server;

Sunday, September 2, 2007

OneNote and SharePoint

OneNote and SharePoint
It will not be wrong to call OneNote an e-notebook. In OneNote, one can write down notes of all kind and share them with others easily. Users can easily manipulate information in OneNote. They can add, delete, edit information without any problem and good thing is they can share this information with others. There are different ways of sharing this information with people. Email used to be a popular method of sharing information but with the increase in the popularity of SharePoint, more and more people are turning toward the OneNote-SharePoint combination. There are some very good blogs that discuss OneNote in detail:
In this article, I will explore some sharing features of OneNote and see how SharePoint is used to share notes from OneNote.
Live Sharing
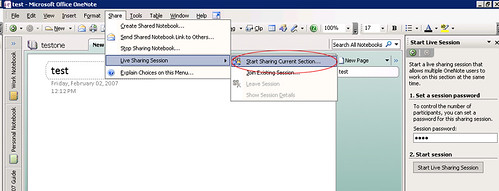
1. In the menu bar, select Share > Live Sharing Session > Start Sharing Current Section.

2. In the "Start Live Session" task pane, enter a session password and click Start Live Sharing Session button.
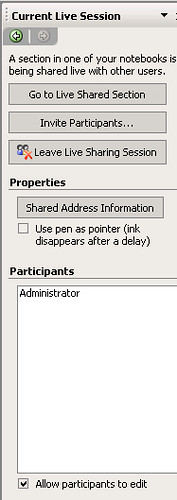
3. In the "Current Live Session" task pane, you will find following three options:
a. Go to Live Shared Section
b. Invite Participants
c. Leave Live Sharing Session


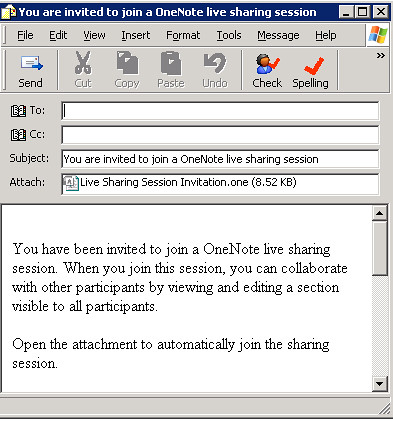
4. Click Invite Participants to invite more people to this live session. Clicking the Invite Participants button will open an email editor. Insert users in the To: field and click Send.

Shared Notebook
Ok, time to see SharePoint in action!
1. In the menu bar, select Share > Create Shared Notebook...

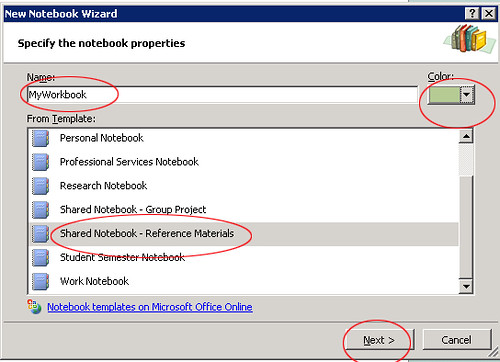
2. Enter a name for your shared notebook in the Name field and select a color of your choice. There are different templates available for you to select. I selected Shared Notebook - Reference Materials. Click Next to proceed.

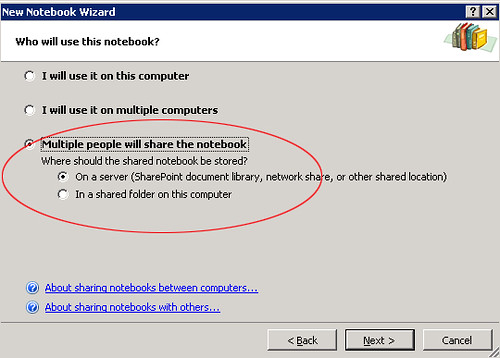
3. Select the third option Multiple people will share the notebook and select On a server ... in the other options.

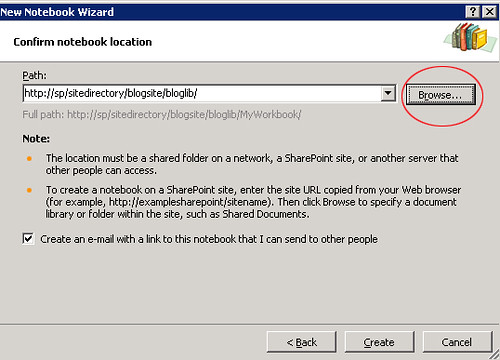
4. Click the Browse... button to select a destination path. It should be a document library in SharePoint. Check the checkbox shown at the bottom if you want to create an email to send to other people and finally, click Create.

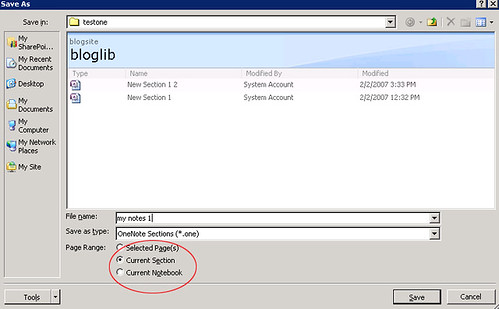
5. This will create a shared notebook in SharePoint. Now, to test sharing, create a note and type something in it and select File > Save As from the menu bar.

6. Enter a file name and select a page range. You have following options to save the note book:
a. Selected Pages.
b. Current Section
c. Current Notebook.

Select an option and click the Save button. This will save your note in SharePoint. If you open SharePoint, you will see your note saved in there. Click the link to the saved note in SharePoint and it will open the note in OneNote. Now, everyone in the document library will have access to the note. You can manage permissions in the document library. Contributors will be able to modify your saved notebook.
7. You can manage SharePoint document library right from within OneNote. Select Tools > Document Management from the menu bar.

8. This will open Document Management task pane on the right.

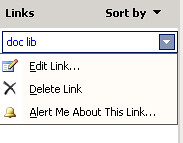
The first icon shows the members of the document library and number below the icon is the total number of members in the document library. The second icon shows the tasks. The third icon shows the number of items in the library and the number below the icons shows the number of items. The fourth option shows the links. Move mouse over one of the listed links, a drop down will appear, open it. You will see three options. You can edit the listed link or even delete it permanently and if you want to be notified about the changes in this link, select the third option. It will take you to the alerts setting page in SharePoint where you will be able to subscribe to the alert.

That's it. There are a couple of nice tips on Olya's blog:
1. Assigning Outlook tasks from OneNote shared notebooks
2. Enabling searching of OneNote content on SharePoint sites (My favorite!)
Published Friday, February 02, 2007 7:51 PM by ssa

Comment Notification

If you would like to receive an email when updates are made to this post, please register here
Subscribe to this post's comments using RSS

Comments


ssa said:

Bob Mixon has written an excellent post on OneNote and SharePoint. Here is the link to his blog:


-SSA
February 7, 2007 2:04 AM