A Practical Guide to SharePoint 2013

A Practical Guide to SharePoint 2013
A Practical Guide to SharePoint 2013 - Book by Saifullah Shafiq
Showing posts with label code. Show all posts

Thursday, September 22, 2011

Use Two Different Ways to Enable Anonymous Access in SharePoint 2010 (Via Lance Cheng)

Extracted

This blog post introduce use two different ways to enable anonymous access in SharePoint 2010.

As a SharePoint administrator, you should be familiar with SharePoint Central Administration. So you can use the following 10 steps to set up anonymous access in SharePoint 2010.

1. Open the SharePoint 2010 Central Administration.

2. On the Central Administration home page, under Application Management, click on the Manage web applications. Then you see the list of web applications.

For complete article, click here.


Monday, May 5, 2008

Validating contact selector control programmatically

How to know if contact selector is empty?
XpathNavigator selector = this.CreateNavigator().SelectSingleNode("/my:myFields/my:contactselector", this.NamespaceManager);
if (selector.SelectChildren(XPathNodeType.Element).Count == 0)
{
this.Errors.Add(selector, "Error","Selector is empty");
}
How to raise error if user has selected more than one person in the selector?
if (selector.SelectChildren(XPathNodeType.Element).Count > 1)
{
this.Errors.Add(selector, "Error","Please select one user");
}
How to tell if user hasn't selected a valid person?
  selector = selector.SelectSingleNode("my:Person", this.NamespaceManager);
XPathNavigator displayname = this.CreateNavigator().SelectSingleNode("/my:myFields/my:contactselector/my:Person/my:DisplayName", this.NamespaceManager);
string strDisplayName = displayname.value.toString();
XPathNavigator accountid = this.CreateNavigator().SelectSingleNode("/my:myFields/my:contactselector/my:Person/my:AccountId", this.NamespaceManager);
string strAccountid = accountid.value.toString();
XPathNavigator accounttype = this.CreateNavigator().SelectSingleNode("/my:myFields/my:contactselector/my:Person/my:AccountType", this.NamespaceManager);
string strAccountType = accounttype.value.toString();

                    if (string.IsNullOrEmpty(strDisplayName)) ||
                        string.IsNullOrEmpty(strAccountId)) ||
                        string.IsNullOrEmpty(strAccountType))
                    {
                         this.Errors.Add(selector,"Error","Please select valid user");
                    }
Note: This was off the top of my head, you may find minor mistakes in XPaths or spellings.

Friday, April 18, 2008

Permissions error when adding data to a list (programmatically)

MSDN article does not mention this but the code smaple wont work if you copy it directly from the MSDN article. You get an error when you try to add a record in list. Here is the code:
SPSite site = SPContext.Current.Site;
SPWeb localweb = site.OpenWeb();
SPList list = localweb.Lists["User List"];
SPListItem listItem = list.Items.Add();
localweb.AllowUnsafeUpdates = true;
listItem["Title"] = "test";
listItem.Update();
localweb.AllowUnsafeUpdates = false;
This will not work. First thing, you should use elevated privileges to get rid of the permissions exception. Second thing, the SPContext should be used outside the elevated privilges code. Here is how to do it correctly:

SPWeb webroot = null;
try
{
webroot = SPContext.Current.Web;
SPSecurity.RunWithElevatedPrivileges(delegate()
{
using (SPSite site = new SPSite(webroot.Site.ID))
{
using (SPWeb localweb = site.OpenWeb(webroot.ID))
{
SPList list = localweb.Lists["User List"];
SPListItem listItem = list.Items.Add();
localweb.AllowUnsafeUpdates = true;
listItem["Title"] = fname.Value.ToString();
listItem.Update();
localweb.AllowUnsafeUpdates = false;
}
}
});
Instantiate the SPWeb object to null. Assign SPContext outside elevated privileges. Set AllowUnsafeUpdates to true before updating the item.

Friday, March 14, 2008

How to find a node using expressions

If your main data source contains hundreds of nodes, how will you find one using expressions? Suppose "Nodes" is the parent node with the following xpath:
XPathNavigator nodes = this.CreateNavigator().SelectSingleNode("/my:myFields/my:Nodes", this.NamespaceManager);
To find nodes inside "Nodes" (parent node), do the following
nodes.SelectSingleNode("child::*[contains(name(),"abc")]");
This will select the child node that has "abc" in its name. This is just an example and can have many practical uses.

Monday, November 26, 2007

WS-FileConvertor 1.0a

WS-FileConvertor 1.0a

WS-FileConvertor 1.0a
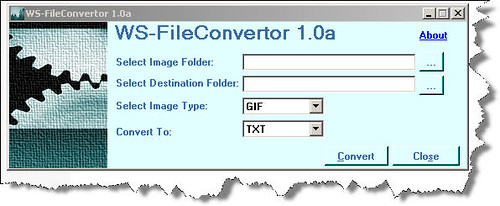
WS-FileConvertor is a .NET application that converts image files into text readable format. Currently, the output is TXT files. All image formats are supported including GIF, JPG, TIFF, etc. I have only tested major formats like GIF, BMP, etc. I am still working on this application. I am working on a feature that will allow users to upload the converted files (TXT) to SharePoint. You can download the setup package from here.
I tested this application in development environment (Windows Server 2003, .NET Framework 2.0) only. I will try to test it in other environments too. Please report bugs etc directly on the CodePlex project page.

-SSA

Thursday, September 6, 2007

Adding content to Word "content control" programmatically

Category: Word programming
Level: Advance 
Here is a small tip on how to add data to Word content control programmatically. If you don't know what are content controls, you can read about them at the following sites:
The articles above will give you a clear picture about content controls. The beauty of content controls is that these can be populated with data programmatically. Of course, this could be done in different ways. Following is one way of doing it:
object contentcontrolIndex;
               
contentcontrolIndex = 1; //index of content controls always start from 1, not from 0!!
               
Word.ContentControl contentcontrolSample = this.Application.ActiveDocument.ContentControls.get_Item(ref contentcontrolIndex);
contentcontrolSample.Range.InsertAfter("This is a test!"); 
"this" in third line points to the current open document. When trying this code, replace "this.Application" with your own Word reference. If you want to learn more about this topic, read the following article (VSTO 2005 SE Sample):
The code above assumes there is only one content control in the application. The index of the control will be 1. Using this technique, you can populate content controls with data retrieved from different data sources including databases and other documents.
-SSA


Sunday, June 10, 2007

What is the datatype of the Yes/No field?

Value type has to be provided when writing a query for the SPQuery object. How do you access a Yes/No field or let's put it in another way! What is the data type of the Yes/No field in SharePoint? The data type is "Boolean" and the value has to be provided as 1 or 0. Providing a value of Yes or No or True or False will not work. Ok, sometimes the query fails even if you provided the value as 1 or 0. You get a strange error. Following is the error message:

"One or more field types are not installed properly. Go to the list settings page to delete these fields"

To fix this error, you will have to use the internal name of the field in the spquery. Yes, internal names can be different from the names displayed in the site. For example, internal name for the field "My Field" can be "My_x0020_Field".

Here is the sample code:

SPQuery query = new SPQuery();
query.Query = "<Where><Eq>FieldRef Name='My_x0020_Field'></FieldRef><Value Type='Boolean'>1</Value></Eq></Where>";

This will search for records where "My Field" has the value of 1 (Yes).

Easiest way to find the internal name of the field is to open the "New" form in browser and then view it's source. Right-click any where in the "New" form to open the context menu and select "View Source". You will find the fields along with their internal names near the end of the source file.

-SSA

Friday, February 23, 2007

Showing web service data in a Data View web part

Update:
Originally posted: Sat, Feb 24, 2007
Reposted: Aug 26, 2007
Some of the links might not work as this version was retrieved from a web archive. If you find any dead links, kindly send an email to share.point@yahoo.com with the URL of this page. Thank you!
-------------------------
We can use a data view web part to show information retrieved through a web service. All you need is a web service link. Showing web service data in SharePoint sites is very easy if you use SharePoint Designer. I have already published all this information in another post but because this is a totally different topic, I thought I should publish it as a separate post.
For this walk through, I have used a TechnoService web service. You can use any other web service.
1. Open a SharePoint site (Where you want to deploy the web service) in SharePoint designer.
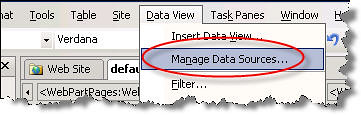
2. Select Manage Data Sources... from  the "Data View" menu. This will open the "Data Source Library" pane on the right side.
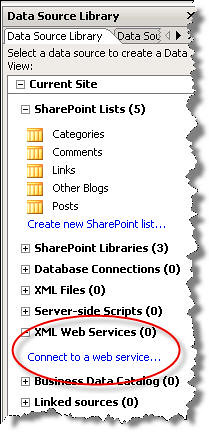
3. Expand the "XML Web Services" node and click Connect to a web service.
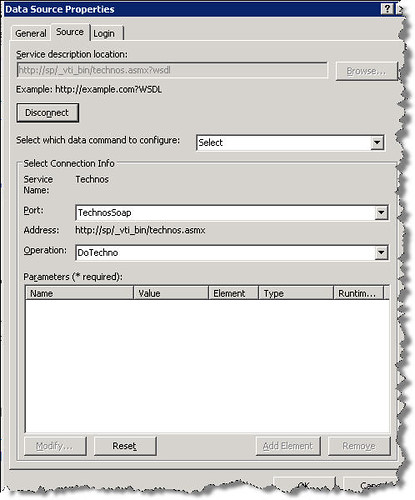
4. Enter the web service reference in the Service description location. If you installed the web service in the root application then the path will look like this:
http://localhost/_vti_bin/technos.asmx?wsdl
Leave all other options as they are and click the OK button.
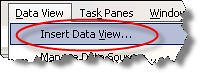
5. Select Insert Data View... from the "Data View" menu. This will add a data view web part to the page.
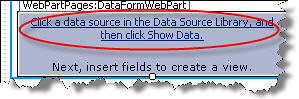
6. Click the link shown in the data view web part. This will open the Data Sources Library if it's not already open.
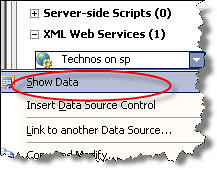
7. Right click the web service that you added to the "XML Web Services" node in the "Data Sources Library" and click Show Data.
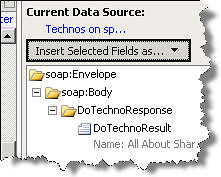
Data returned from your web service will be displayed.
8. Click the Insert Selected Fields as... drop down and select Single Item View.
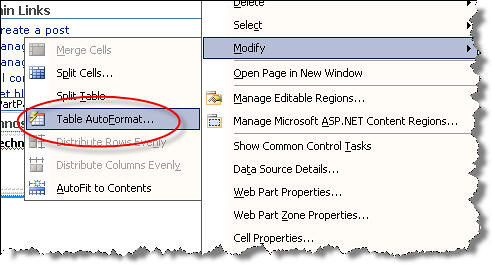
9. That's it. Save the page and if you want to add some style to the data view web part, right click the data view web part and select Modify > Table AutoFormat. It will show you several options. Select the option of your choice and your data view web part is ready.
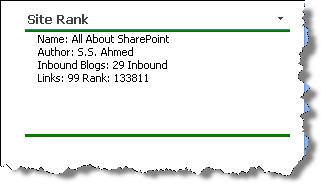
You can apply formatting to the output returned by the web service manually as well. Anyway, here is how the data view web part looked in my SharePoint site after applying some styles:
I changed the title and applied auto formatting.

Thursday, February 22, 2007

TechnoPart Source Code


Click here to download complete application (source code).
TechnoPart is a web part that displays your blog or site information, pulled from Technorati.com, in SharePoint sites. Click here to read more about TechnoPart.
Development Environment: MOSS 2007, .NET Framework 2.0, VS 2005
Programming Language:
C#

Download and unzip TechnoPart.zip file on your hard disk. It will create a folder TechnoPart. There will be two folders (projects) inside this TechnoPart folder:
1. Technocab -> This is the setup project.
2. WS-DLWP -> This is the web part project.

And there is a WS-DLWP.sln solution file along with these two folders. Double click this solution file to open the project in Visual Studio 2005.
GetSiteData() is the function that connects with Technorati through the API.
public void GetSiteData ()
{

BuildUrl();

string strURL = apiUrl + "bloginfo?" + queryString;

try
{

XmlTextReader _reader = new XmlTextReader(strURL.ToString());

//Read elements

while (_reader.Read())
{
if (_reader.NodeType == XmlNodeType.Element && _reader.Name == "rank")
{
_lblRank.Text =_reader.ReadElementString("rank");
}
else if (_reader.NodeType == XmlNodeType.Element && _reader.Name == "inboundblogs")
{
_lblBlogs.Text = _reader.ReadElementString("inboundblogs");
}
else if (_reader.NodeType == XmlNodeType.Element && _reader.Name == "inboundlinks")
{
_lblLinks.Text = _reader.ReadElementString("inboundlinks");
}
else if (_reader.NodeType == XmlNodeType.Element && _reader.Name == "name")
{
_lblName.Text = _reader.ReadElementString("name");
}
else if (_reader.NodeType == XmlNodeType.Element && _reader.Name == "firstname")
{
_lblAuthor.Text = _reader.ReadElementString("firstname");
}
else if (_reader.NodeType == XmlNodeType.Element && _reader.Name == "lastname")
{
_lblAuthor.Text = _lblAuthor.Text + " " + _reader.ReadElementString("lastname");
}
}

//Close the XML reader
_reader.Close();

}

catch (WebException ex)
{
_lblError.Text = ex.Message;
_lblError.CssClass = "error";
}
Add a style to the web part:
//Create a stylesheet
HtmlGenericControl stylesheet = new HtmlGenericControl("style");
stylesheet.InnerHtml = ReplaceTokens(Constants.Styles);
this.Controls.Add(stylesheet);
Build the interface:
 // Build up the table that is our user interface.
Table t = new Table();
TableRow trRank = BuildTableRow();
TableRow trBlogs = BuildTableRow();
TableRow trLinks = BuildTableRow();
TableRow trError = BuildTableRow();
TableRow trName = BuildTableRow();
TableRow trAuthor = BuildTableRow();

trName.Cells[0].Text = "Name: ";
trName.Cells[1].ForeColor = System.Drawing.Color.Green;
trName.Cells[1].Font.Bold = true;
trName.Cells[1].Font.Size = FontUnit.Medium;
trName.Cells[1].Controls.Add(_lblName);

trAuthor.Cells[0].Text = "Author: ";
trAuthor.Cells[1].ForeColor = System.Drawing.Color.Green;
trAuthor.Cells[1].Font.Bold = true;
trAuthor.Cells[1].Font.Size = FontUnit.Medium;
trAuthor.Cells[1].Controls.Add(_lblAuthor);

trRank.Cells[0].Text = "Rank: ";
trRank.Cells[1].ForeColor = System.Drawing.Color.Green;
trRank.Cells[1].Font.Bold = true;
trRank.Cells[1].Font.Size = FontUnit.Medium;
trRank.Cells[1].Controls.Add(_lblRank);

trBlogs.Cells[0].Text = "Inbound Blogs: ";
trBlogs.Cells[1].ForeColor = System.Drawing.Color.Green;
trBlogs.Cells[1].Font.Bold = true;
trBlogs.Cells[1].Font.Size = FontUnit.Medium;
trBlogs.Cells[1].Controls.Add(_lblBlogs);

trLinks.Cells[0].Text = "Inbound Links: ";
trLinks.Cells[1].ForeColor = System.Drawing.Color.Green;
trLinks.Cells[1].Font.Bold = true;
trLinks.Cells[1].Font.Size = FontUnit.Medium;
trLinks.Cells[1].Controls.Add(_lblLinks);

trError.Cells[0].Text = "";
trError.Cells[1].Controls.Add(_lblError);

t.Rows.AddRange(new TableRow[]{
trName,
trAuthor,
trRank,
trBlogs,
trLinks,
trError
});

this.Controls.Add(t);
Click here to download complete application (source code).
-------------
Update:
Originally posted: Fri, Feb 23, 2007
Reposted: Aug 26, 2007
Some of the links might not work as this version was retrieved from a web archive. If you find any dead links, kindly send an email to share.point@yahoo.com with the URL of this page. Thank you!
-------------------------

Wednesday, February 7, 2007

TechnoService Source Code

Update:
Originally posted: Sat, Feb 24, 2007
Reposted: Aug 25, 2007
Click here to download the source code of TechnoService web service. TechnoService is a web service that retrieves blog information from Technorati.com. This service can be used to display blog information in MOSS 2007 and WSS 3.0 sites.

-SSA

Friday, October 7, 2005

Checking User Permissions in SharePoint Sites

Download application and source code


Many people have been asking me this question as to how they can check user permissions in sites programmatically. This brief tutorial will tell you how you can do this. I have included the complete source code of the application for your convenience.

Figure 1: Application screenshot

Let's take a look at the code:

MsgBox(CheckGroupRights(txtSiteURL.Text, txtSubSite.text, txtUserLogin.Text))

We have called the main function, CheckGroupRights in the msgbox function. CheckGroupRights() returns a string telling us whether the user has rights in the subsite or not. Please note that this tool will look for "Reader" privileges only. For example, if you provide a user named as "domainuser1" then this tool will check whether user1 has reader rights or not. You can modify the code to check for any type of rights.


If you look at the screen shot above, you will notice there are three fields where you would have to enter some text. For example, Site URL will contain the main URL of the site. User Login contains the user's login name, that is, complete login name including the domain, for example, domain1johndoe. Sub Site Name is the name of the site where you want to check the permissions. For example, you have a subsite named as subsite1 under the main site which has the following URL:

http://mainsite/sites/site1

The application will form the following URL from the values provided by you:

http://mainsite/sites/site1/subsite1

Here is the code that checks the rights:

Function CheckGroupRights(ByVal FolderPath As String, ByVal SubSite As String, ByVal UserLogin As String) As String
'Notes:
'Folderpath: is the main url where you want to find the permissions. I know this is cumbersome to provide
'both the url of the main site and the name of the subsite but this is just a sample to show you how things
'work. I may make it more simpler in the next version provided i got enough time to make the modifications.
'Examples: Folderpath: http://mainportalsite/sites/site1
' http://mainportalsite
'SubSite: This should be the name of the subsite, it should not be a URL, e.g,
'abc, 123, site1, site2, site3, etc
'final url that will be formed if your folderpath contained http://mainsite/sites/site1 and subsite contained "abc", will be
'http://mainsite/sites/site1/abc
'userlogin: is the users domain login, e.g, domainusername


Try
Dim strStatus As String = "User " & UserLogin & " does not have Reader permissions in " & FolderPath & "/" & SubSite & "."

If Not FolderPath Is Nothing Or Not FolderPath = "" Then


Dim siteCollection As SPSite
siteCollection = New SPSite(FolderPath)
Dim site As SPWeb = siteCollection.OpenWeb(SubSite)


Dim allUsers As SPUserCollection = site.Users
Dim user As SPUser


For Each user In allUsers


If user.LoginName.ToUpper = UserLogin.ToUpper Then


Dim allGroups As SPRoleCollection = user.Roles
Dim group As SPRole


For Each group In allGroups


Dim right As Integer
right = group.PermissionMask And SPRights.ViewListItems


If right = SPRights.ViewListItems Then


strStatus = "User " & UserLogin & " has Reader permissions in " & FolderPath & "/" & SubSite & "."
Return strStatus
Exit Function


End If
Next


End If
Next


Return strStatus


End If


Catch ex As Exception
MsgBox(ex.Message)
End Try


End Function


Code is pretty simple. Nothing fancy! Please look at these lines again:
…..
right = group.PermissionMask And SPRights.ViewListItems
If right = SPRights.ViewListItems Then
…..

SPRights.ViewListItems checks for the "Reader" privileges only. You can modify these lines to check other privileges. For example:


SPRights.ManageLists: Use "ManageLists" if you want to check whether the user has "Approver" rights in the subsite. User with these rights can add, edit, delete, approve content in the sites.


SPRights.EditListItems: User with these permissions can add, delete, modify site content but can not approve items in the site.


Similarly, you can check for many other types of privileges in the site. For complete list of rights, see SPS SDK.


I hope you will find this small tool useful. It is meant for learning purposes only. If you are a beginner, you can pick up hints from this code and can expand and make some other useful application out of this code. I will posting more small applications soon. Stay tuned!


-SSA

Saturday, September 3, 2005

How to use UserProfileManager in .NET code?

TopologyManager topology = new TopologyManager();

  PortalSite portal = topology.PortalSites[new Uri("http://test-server")];

  PortalContext context = PortalApplication.GetContext(portal);

  UserProfileManager profileManager = new UserProfileManager(context);