A Practical Guide to SharePoint 2013

A Practical Guide to SharePoint 2013
A Practical Guide to SharePoint 2013 - Book by Saifullah Shafiq
Showing posts with label members web part. Show all posts

Saturday, February 6, 2010

SP2010 Tip: Content Query Web Part missing in SharePoint 2010

If you don't see content query web part listed in the web parts list, this is because you have not enabled "Search Server Web Parts" feature in site collection features. Enable this feature and content query web part will show in the list of web parts.
[caption id="attachment_433" align="alignnone" width="521" caption="content query web part"]content query web part[/caption]

Tuesday, October 16, 2007

SPWeb fails to return the list

When working on large applications, we usually make mistakes and then spend time debugging the errors that occur because of the mistakes that we make during programming but there are some errors that occur even if you don't make any mistake. Have a look at the following code:
SPWeb web = Site.OpenWeb(SPContext.Current.Web.ID); string strList = SPContext.Current.Web.Url.Substring( .... substring processing ....);
SPList list = web.Lists[strList]; //This line gives error!
Do you see any problem with this code? I didn't notice any thing. It gave me the following error:
Value does not fall within the expected range.<BR/>Source: Microsoft.SharePoint<BR/>Stack trace: at Microsoft.SharePoint.SPListCollection.GetListByName(String strListName, Boolean bThrowException)
at Microsoft.SharePoint.SPListCollection.get_Item(String strListName)
The reason of the error turned out to be the list name. The list name had parentheses which resulted in the error. In small companies, you are the all in all when working on a project but in big companies or when working on large projects, there are several people involved in the project. The list was created by the SharePoint admin and I was getting the list name programmatically. I didn't know the list name had parentheses in it. When you load such a list in browser, SharePoint automatically removes parentheses from the list name and the list works fine but when you try to access the same list programmatically, SharePoint gives you an error. As you will notice, in the code above, I am extracting the list name from "SPContext.Current.Web.Url" and it returns the list name without parentheses in it while the actual list name has parentheses and hence you get an error. Even if you add parentheses to the list name (in your code), you still get an error but a different one. It's a SPException error and returns following message:
Action can not be completed.
Conclusion: Do not use parentheses in list name.

Friday, February 23, 2007

Showing web service data in a Data View web part

Update:
Originally posted: Sat, Feb 24, 2007
Reposted: Aug 26, 2007
Some of the links might not work as this version was retrieved from a web archive. If you find any dead links, kindly send an email to share.point@yahoo.com with the URL of this page. Thank you!
-------------------------
We can use a data view web part to show information retrieved through a web service. All you need is a web service link. Showing web service data in SharePoint sites is very easy if you use SharePoint Designer. I have already published all this information in another post but because this is a totally different topic, I thought I should publish it as a separate post.
For this walk through, I have used a TechnoService web service. You can use any other web service.
1. Open a SharePoint site (Where you want to deploy the web service) in SharePoint designer.
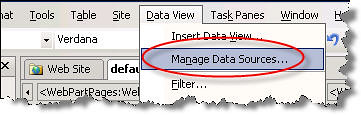
2. Select Manage Data Sources... from  the "Data View" menu. This will open the "Data Source Library" pane on the right side.
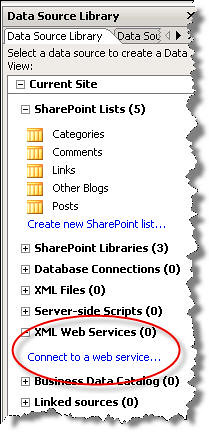
3. Expand the "XML Web Services" node and click Connect to a web service.
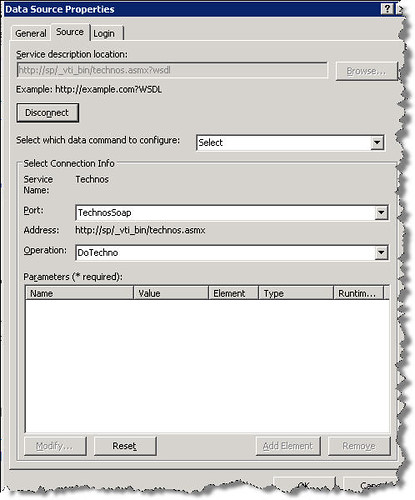
4. Enter the web service reference in the Service description location. If you installed the web service in the root application then the path will look like this:
http://localhost/_vti_bin/technos.asmx?wsdl
Leave all other options as they are and click the OK button.
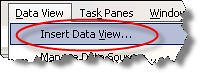
5. Select Insert Data View... from the "Data View" menu. This will add a data view web part to the page.
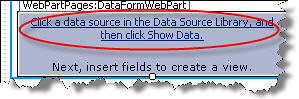
6. Click the link shown in the data view web part. This will open the Data Sources Library if it's not already open.
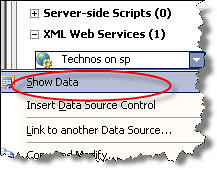
7. Right click the web service that you added to the "XML Web Services" node in the "Data Sources Library" and click Show Data.
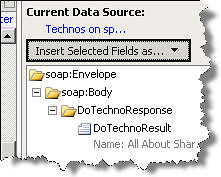
Data returned from your web service will be displayed.
8. Click the Insert Selected Fields as... drop down and select Single Item View.
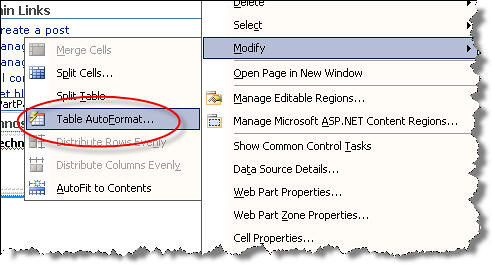
9. That's it. Save the page and if you want to add some style to the data view web part, right click the data view web part and select Modify > Table AutoFormat. It will show you several options. Select the option of your choice and your data view web part is ready.
You can apply formatting to the output returned by the web service manually as well. Anyway, here is how the data view web part looked in my SharePoint site after applying some styles:
I changed the title and applied auto formatting.

Tuesday, February 13, 2007

WS-Downloader Web Part

WS-Downloader Web Part
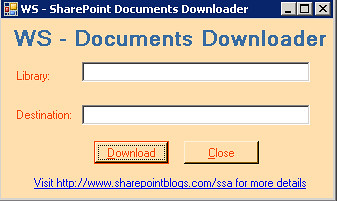
I released WS-Downloader tool last week. WS-Downloader is a small tool that downloads documents from SharePoint libraries.
Click here to read more about the WS-Downloader tool.
Today, I re-wrote the same application as a web part. Now, you can plug this web part directly in your site.
Installation Instructions
1. Copy the wsdlcab.CAB file to the following location on the server:
C:Program FilesCommon FilesMicrosoft Sharedweb server extensions12 in
This location also contains stsadm.exe file.
2. From the location mentioned in Step 1, run the following command:
stsadm -o addwppack -filename wsdlcab.CAB -url http://localhost -globalinstall -force
(Change localhost to your servername.)
3. Run following command to reset IIS:
iisreset /timeout:0
4. Now, add the web part to a SharePoint site. Open the SharePoint site in a web browser.
5. Click Site Actions and select Edit Page.
6. Click Add a Web Part (in Right zone).
7. Expand All Web Parts by clicking the + button.
8. Select WS-SharePoint Documents Downloader from the Miscellaneous section.
9. Click the Publish button to publish the changes.
10. Now, test the web part by entering a library path in the first text box and a destination path in the second text box and clicking the Download button. This will download the documents to the destination folder and a message will be displayed in the web part.
Delete Web Part
1. Go to following location on the server:
C:Program FilesCommon FilesMicrosoft Sharedweb server extensions12 in
2. Run following command to remove the web part.
stsadm -o deletewppack -name wsdlcab.cab -url http://localhost
(Change localhost to your servername.)
Advantage
Now, you can run the application remotely and save the files to a local folder on the server. Remember, you still can not save the files to the client machine. For that, we need to write a web service and run the download application locally. To download the files to a folder on the server from a client machine, open the site in a web browser on the client machine. Select source and destination paths and click the Download button.

Wednesday, February 7, 2007

Creating an Installer for your web service

Update: 
Originally posted: Wednesday, Feb 28, 2007
Some of the links might not work. If you find any dead links, kindly send an email to share.point@yahoo.com. Retrieved from web archive! 
When I first wrote the installer for the WSUploadService, some people asked me how did I create the installer and yesterday when I published the post "Installing WSUploadService manually", again there was a request from one of my blog readers to share the installer code with the community. In this post, I will discuss the installer code.
This installer is a .NET application that copies the web service files to the correct folders on the destination machine. All manual work stated in the article "Installing WSUploadService manually" is done automatically by the installer. After copying the files and modifying some of the default SharePoint files, installer application runs another installer package that simply copies the web service assembly to the correct bin folder. Even this step could have been added in the installer application but I did not have the time so I created a new installer to add the assembly to the GAC. Just a few more lines and we can get rid of the second installer! The source code is attached. Feel free to modify it to meet your own requirements. I found a couple of links on Google that show how to add an assembly to the GAC programmatically:
Creating the second installer (to install assembly in the GAC) is very easy. Just create a web setup project, add the web service assembly file to the project, compile it and you are done. Of course, you may want to take some additional steps that are not actually required but can enhance the performance. For example, remove all dependency files from the package to reduce the installer size. Include a readme.txt in the package to let your users know about the installation steps, history, functionality, etc.
Create a C# application and add following namespaces at the top:
using System.IO;
using System.Diagnostics;
using Microsoft.Win32;
Check Registry to see if the application is already installed. Ask the user if he wants to keep the application. Based on his response, take the action.
RegistryKey rk = Registry.LocalMachine;
RegistryKey nk = rk.OpenSubKey("SOFTWARE\UploadService");
bool bGoAhead = false;

DialogResult response;

if (nk == null)
{
bGoAhead = true;
}
else
{
if ((string)nk.GetValue("Installed") == "1")
{
response = MessageBox.Show("UploadService is already installed! Do you want to uninstall?", "Uninstall", MessageBoxButtons.YesNo, MessageBoxIcon.Question);

If the response from the user is Yes, that is, if he wants to continue with the uninstall, run the following code:
 if (response == DialogResult.Yes)
{
//Uninstall
string dest = (string)nk.GetValue("Path") + @"Program FilesCommon FilesMicrosoft Sharedweb server extensions12ISAPI";

if (File.Exists(dest + "Files.asmx"))
{
File.Delete(dest + "Files.asmx");
}
if (File.Exists(dest + "Filesdisco.aspx"))
{
File.Delete(dest + "Filesdisco.aspx");
}
if (File.Exists(dest + "Fileswsdl.aspx"))
{
File.Delete(dest + "Fileswsdl.aspx");
}
if (File.Exists(dest + "spsdisco_backup.aspx"))
{
File.Delete(dest + "spsdisco.aspx");
File.Copy(dest + "spsdisco_backup.aspx", dest + "spsdisco.aspx");
File.Delete(dest + "spsdisco_backup.aspx");
}
RegistryKey regkey = Registry.LocalMachine;
RegistryKey newkey = regkey.CreateSubKey("SOFTWARE\UploadService");
newkey.SetValue("Installed", "0");

//MessageBox.Show("Uninstall");
System.Diagnostics.Process.Start(Environment.CurrentDirectory + "\setup.exe");

//bGoAhead = true;
this.Close();
This code will remove the values from the registry and then invoke the setup.exe (the second installer) which will remove the web service assembly from the GAC.
If he cancels the setup, simply close the application.
else
{
bGoAhead = false;
this.Close();
}
If the user is running the setup for the first time to install the web service, then use the following code to add values to the registry and run the second installer:
string[] drives = Environment.GetLogicalDrives();
string sPath = @"Program FilesCommon FilesMicrosoft Sharedweb server extensions12ISAPI";


foreach (string sDrive in drives)
{
if (System.IO.Directory.Exists(sDrive + sPath))
{

if ((File.Exists(Environment.CurrentDirectory + "\Files.asmx") && (!File.Exists(sDrive + sPath + "Files.asmx"))))
{
installed = true;
File.Copy(Environment.CurrentDirectory + "\Files.asmx", sDrive + sPath + "Files.asmx", true);

//Modify spsdisco.aspx file!
Modify(sDrive + sPath,"spsdisco",".aspx");

}
if ((File.Exists(Environment.CurrentDirectory + "\Filesdisco.aspx") && (!File.Exists(sDrive + sPath + "Filesdisco.aspx"))))
{
File.Copy(Environment.CurrentDirectory + "\Filesdisco.aspx", sDrive + sPath + "Filesdisco.aspx", true);
}
if ((File.Exists(Environment.CurrentDirectory + "\Fileswsdl.aspx") && (!File.Exists(sDrive + sPath + "Fileswsdl.aspx"))))
{
File.Copy(Environment.CurrentDirectory + "\Fileswsdl.aspx", sDrive + sPath + "Fileswsdl.aspx", true);
}
if (!installed)
{
MessageBox.Show("UploadService could not be installed because default SharePoint installation directory could not be found. Make sure SharePoint is installed on this machine.");
this.Close();
}

System.Diagnostics.Process.Start(Environment.CurrentDirectory + "\setup.exe");


//MessageBox.Show("UploadService has been installed successfully!");
RegistryKey regkey = Registry.LocalMachine;
RegistryKey newkey = regkey.CreateSubKey("SOFTWARE\UploadService");
newkey.SetValue("Installed", "1");
newkey.SetValue("Path", sDrive.ToString());
//break;
this.Close();
The above code uses a Modify() function. Modify() function modifies the spsdisco.aspx file and includes the reference to the web service being installed. After this, the web service will become visible to the users searching for the web services on the server. Here is the Modify() code:
public void Modify(string spsPath, string filename, string ext)
{
try
{
File.Copy(spsPath + filename + ext, spsPath + filename + "_backup" + ext);
File.Delete(spsPath + filename + ext);

StreamReader sr,sr1;
StreamWriter sw;

sw = File.CreateText(spsPath + filename + ext);
sr1 = File.OpenText(Environment.CurrentDirectory + "\replacement.txt");
string str2 = sr1.ReadLine();
string str1 = string.Empty;

while (str2 != null)
{
str1 += str2;
str2 = sr1.ReadLine();
}


sr = File.OpenText(spsPath + filename + "_backup" + ext);
string str = sr.ReadLine();

while (str!=null)
{
if (str.Substring(0) == "</discovery>")
{
str = str.Replace("</discovery>", str1);

}

sw.WriteLine(str);
str = sr.ReadLine();

}

sr.Close();
sr1.Close();
sw.Close();

}
catch (Exception ex)
{
MessageBox.Show(ex.Source + " - " + ex.Message + " - Could not modify the spsdisco.aspx file. Contact web service vendor!");
}
}
This function copies the content of replacement.txt to the spsdisco.aspx file. The code automatically makes a backup copy of the spsdisco.aspx file so that you can go back to the original settings if required. Replacement.txt contains the following:
<contractRef ref=<% SPEncode.WriteHtmlEncodeWithQuote(Response, spWeb.Url + "/_vti_bin/Files.asmx?wsdl",'"'); %> docRef=<% SPEncode.WriteHtmlEncodeWithQuote(Response, spWeb.Url + "/_vti_bin/Files.asmx", '"'); %> xmlns="http://schemas.xmlsoap.org/disco/scl/" />
<soap address=<% SPEncode.WriteHtmlEncodeWithQuote(Response, spWeb.Url + "/_vti_bin/Files.asmx", '"'); %> xmlns:q1="http://schemas.microsoft.com/sharepoint/soap/directory/" binding="q1:FilesSoap" xmlns="http://schemas.xmlsoap.org/disco/soap/" />

</discovery>
To learn more about these tags and to know what this text is, read the following article, which is by the way, one of the most read articles on my blog:
To download the installer code, click here. Download size is 414 KB.
To download the installer application that installs web service assembly to the GAC, click here. Download size is 358 KB.

Wednesday, December 13, 2006

Manually installing office web parts in SharePoint v3 (by Shane Young)

Manually installing office web parts in SharePoint v3 (by Shane Young)

Following blog post by Shane Young contains details of installing office web parts in SharePoint v3.0. I posted a similar solution a couple of months ago but this one is more detailed:
Published Wednesday, December 13, 2006 9:00 PM by

ssa

Sunday, November 19, 2006

Source code of UploadService (web service)

I  have uploaded UploadService source code on codeplex.com. Original post describing the uploadservice web service is:
Source code can be downloaded from:

-SSA   

Tuesday, May 2, 2006

Error: Local admin can access my WSS sites

A user who has not been permitted access to the content in your Windows SharePoint Services Web sites has full access to this content. The user can visit any Web page in all your Windows SharePoint Services Web sites. Because of the security requirements in your organization, you may not want all the members of the local Administrators group to have this access. 

Here is the hotfix from Microsoft:

Friday, March 3, 2006

LocalSystem Account in Pool Identity

Q: I am experiencing problems in accessing my portal site. I don't know what I have done wrong. I think I changed identity in application's pool. 

Check the identity of your application's pool! Network Service and Local User accounts have low access rights and are useful for situations that do not require access to resources on remote computers. If you are not using single server installation and have your database on a different machine then try setting your pool's identity to LocalSystem Account. LocalSystem Account has higher access rights but poses a security risk.

Tuesday, February 28, 2006

How to connect a web part to the aspx page?

How to connect a web part to the aspx page?

Scenario: I have created a workflow application for Document and Form Libraries. I have also created an "Administration" application for this workflow application. Admin application consists of a web part. I want to include a button in the navigation bar of the document/form library and clicking that button will take the user to an aspx page which will contain my "admin" web part.
1. Here is the screen shot of the document library:
Note the "Administration" button in the menu bar (encircled in red). This is the new button i just added. This page is linked to the aspx page that contains my web part. Here are the steps:
1. First, decide where you want to include this new link. In your document library? In your form library? Do you want to create a new document library or do you want to modify default document library? Modifying the default document library is not recommended. Keep the default document library intact and create a new document library template instead. As an example, i am adding this button to my form library. Edit the schema.xml file in your form library template. The path is:
C:Program FilesCommon FilesMicrosoft Sharedweb server extensions60TEMPLATE1033STSLISTSXMLFORM
Edit the schema.xml file in editor. Locate following text in the file:

<Default>
<Switch><Expr><GetVar Name="GridSwitch"/></Expr>
<Case Value="Unavailable">
</Case>
<Default>
<HTML><![CDATA[
<TD class="ms-toolbar"> <table cellpadding=1 cellspacing=0 border=0> <tr> <td class="ms-toolbar" nowrap> <a tabindex=2 ID=diidEditInGridButton class="ms-toolbar" title=]]></HTML><HTML>"Edit in Datasheet"</HTML><HTML><![CDATA[ ACCESSKEY=G href="BLOCKED SCRIPTEditInGrid(]]></HTML><GetVar Name="WPQ"/><HTML><![CDATA[varPageUrl,']]></HTML><GetVar Name="View" URLEncode="TRUE"/><HTML><![CDATA[');" target=_self> <img src="/_layouts/images/editgrid.gif" ID="tbbuttonstart1" alt=]]></HTML><HTML>"Edit in Datasheet"</HTML><HTML><![CDATA[ border=0 width=16 height=16></a></td> <td nowrap> <a tabindex=2 ID=diidEditInGridButton class="ms-toolbar" ACCESSKEY=G href="BLOCKED SCRIPTEditInGrid(]]></HTML><GetVar Name="WPQ"/><HTML><![CDATA[varPageUrl,']]></HTML><GetVar Name="View" URLEncode="TRUE"/><HTML><![CDATA[');" target=_self>
]]></HTML><HTML>Edit in Datasheet</HTML><HTML><![CDATA[
</a> </td> </tr> </table> </TD>
At the end of the above code, copy the following additional code. This will add a new button:
<TD class=ms-separator>|</TD>
<TD class="ms-toolbar"> <table cellpadding=1 cellspacing=0 border=0> <tr> <td class="ms-toolbar" nowrap> <a tabindex=2 ID=diidEditInGridButton class="ms-toolbar" title=]]></HTML><HTML>"Edit in Datasheet"</HTML><HTML><![CDATA[ ACCESSKEY=G href="BLOCKED SCRIPTAdministration(]]></HTML><GetVar Name="WPQ"/><HTML><![CDATA[varPageUrl,']]></HTML><GetVar Name="View" URLEncode="TRUE"/><HTML><![CDATA[');" target=_self> <img src="/wpresources/EPWebParts/1.0.0.0__32bb15c33a2f8eca/images/admin.jpg" ID="tbbuttonstart1" alt=]]></HTML><HTML>"Workflow Administration"</HTML><HTML><![CDATA[ border=0 width=16 height=16></a></td> <td nowrap> <a tabindex=2 ID=diidEditInGridButton class="ms-toolbar" ACCESSKEY=G href="BLOCKED SCRIPTAdministration(]]></HTML><GetVar Name="WPQ"/><HTML><![CDATA[varPageUrl,']]></HTML><GetVar Name="View" URLEncode="TRUE"/><HTML><![CDATA[');" target=_self>
]]></HTML><HTML>Administration</HTML><HTML><![CDATA[
</a> </td> </tr> </table> </TD>

Note the bold text in the above code. Administration() is the function that will be called on the click of the new link. Where this function will be added, i will tell you later. You also need to provide proper path to the link's image. "wpresources" is a good location to add store your image along with your web part.
Location of the "wpresources" folder in your inetpub. On my machine the path is:
Because i have installed SharePoint on a different port other than the default port, therefore, i have a different path. Whatever is your default site path, add the "wpresources" folder. This folder will contain another folder that will contain your web part files. "js" folder contains the javascript file that contains the "Administration()" function. Another good location to include this function which many people find easier to find is "ows.js" in the following default path:
C:Program FilesCommon FilesMicrosoft Sharedweb server extensions60TEMPLATELAYOUTS1033
"ows.js" is the default script file that contains all the SharePoint functions. Modifying this file is not a good practice. Either take back up of the original file before modifying it or there are other methods, for example, creating a new script file that will overwrite your default script file. See SDK for more information. Right now, i will be modifying the default js file. Edit the ows.js in your favorite editor and add the following function anywhere in the file:
function Administration(using, viewguid)
{
    document.location = 'AppForm.aspx';
}
Now, you also need to include the AppForm.aspx that you are using in your function. Where will this page be added? The aspx page will be added in your form library's folder. For example, if you are adding new link in your Form library, then add AppForm.aspx in the following folder:
C:Program FilesCommon FilesMicrosoft Sharedweb server extensions60TEMPLATE1033STSLISTSXMLFORM
This ASPX page contains your webpart:
<%@ Register Tagprefix="EPWebParts" Namespace="SharePoint.AdminWebParts" Assembly="AdminWebPart, Version=1.0.0.0, Culture=neutral, PublicKeyToken=65fb13d34a5f5gsa"%> 
 

Friday, February 3, 2006

Error: SharePoint backup tool must execute on a web client.

Error: SharePoint backup tool must execute on a web client.

I am posting this hoping that someone may find it useful. It is a common practice to migrate SharePoint deployment from one machine to another. Many people use Backup and Restore utility that comes with SPS 2003. Recently, someone asked me a question that when he tried to run the backup tool to restore a site, he got following error message:
"SharePoint backup tool must execute on a web client."
The user was quite confused.

Perform these actions to solve the problem:
1. Open SharePoint Central Administration page.
2. Click "Configure server topology".
3. Click "Change Components" button
4. Check "Web" (Component Assignment) if not already checked.
5. Click OK.
6. If you are trying to restore to a new site, create that site first in IIS.
Try running the backup tool again, it should work fine now.

Saturday, December 3, 2005

How can we create a site in portal server?

How can we create a site in Portal Server?

SPWeb mySite = SPControl.GetContextWeb(Context);
SPWebCollection subSites = mySite.Webs;
string currentTemplate = mySite.WebTemplate;
string siteUrl = TextBox1.Text.ToString(); //you can use hard coded path
here
string siteTitle = TextBox2.Text.ToString(); //you can use hard coded title
for testing purposes
string siteDescription = TextBox3.Text.ToString(); //use hard coded
description for testing
subSites.Add(siteUrl, siteTitle, siteDescription, 1033, currentTemplate,
true, false);

Thursday, September 1, 2005

SPS 2003: How to access users in members web part?

SharePoint Tip


Audience: Beginners

Question: Members web part shows all the users in my site but when i click a user to see details, it asks for a password and after i enter my username and password, i am refused access to the user details. Why? I have admin rights in the site.
You must have at least "Reader" rights on the portal. It doesn't matter if you have admin rights in the site itself but if you dont have rights at the portal level, then you can not see user details in the members web part. Clicking on a user in the members webpart takes you to the personal site (public view) of that user and if you dont have atleast "Reader" rights on the portal then you can not access the personal site of any user. This question is frequently asked by new SharePoint users so next time, if you face this situation, ask you SharePoint administrator to give you rights at the portal level.


Good luck

-SSA