A Practical Guide to SharePoint 2013

A Practical Guide to SharePoint 2013 - Book by Saifullah Shafiq
Wednesday, September 29, 2010
Tuesday, September 28, 2010
Sales Account Manager - Template for SharePoint 2007


Screenshot 2


Monday, September 27, 2010
SharePoint Document Puller v4.0
Download SharePoint Document Puller v4.0
Introduction
SharePoint Document Puller is a tool to extract documents from the SharePoint's DB. It works with SharePoint Portal Server 2003 (and WSS 2.0).
I have made several changes in this version. There were requests for new features. I have tried to include everything that people requested. The only thing you will find missing is a progress bar or a status bar that displays the download status.
History
Version 1.0
Version 2.0
Version 3.0
Details
You see a configuration screen when you run the application for the first time.
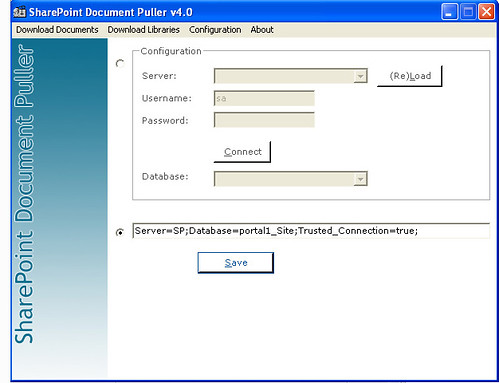
Use this screen to add your database connectivity details. Select server from Server dropdown. Click (Re)Load to populate the Server dropdown if it's empty. Add Username and Password and click Connect. This will populate the Database dropdown. There is a possibility that some one is using different databases for different instances (portals) of SharePoint. Select the database from the Database and click the Save button. This will save the configuration and next time, you start the application, you will be taken directly to the Download Documents screen. You can also add a connection string. Select the second radio button to enable the text box and add the connection string and click the Save button to save the configuration.
Shortcut keys
Key Functionality Screen Ctrl+1 Download Documents Alt+O Download Documents Ctrl+2 Download Libraries Alt+E Download Libraries Ctrl+3 Configuration Alt+C Configuration Ctrl+4 About Alt+A About Alt+S Select All Items Download Documents Alt+D Copy Directory Structure Download Documents Alt+B Browse Download Documents Alt+V View Documents Download Documents Alt+P Pull Document(s) Download Documents Alt+S Select All Items Download Libraries Alt+D Copy Directory Structure Download Libraries Alt+B Browse Download Libraries Alt+V View Sites Download Libraries Alt+P Pull Document(s) Download Libraries Alt+L (Re)Load Configuration Alt+C Connect Configuration Alt+S Save Configuration
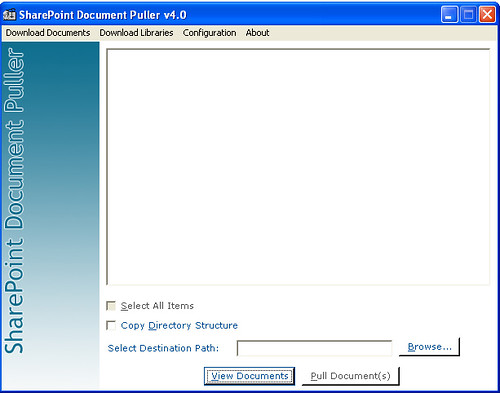
Download Documents
Click View Documents to populate list box with the documents. Select a destination and click Pull Document(s) to download all documents to your hard disk. Check Copy Directory Structure checkbox if you want to copy the directory structure of each file. Similarly, if you want to download complete libraries, select Download Libraries from the menu bar. List box will show you all the libraries that have documents. Select the libraries you want to download, select a destination and click Pull Document(s). Application searches almost all types of files including .doc, .xls, .mdb, .pdf, .gif, .jpg, etc.
SharePoint Document Puller v4.0
Download SharePoint Document Puller v4.0
Introduction
SharePoint Document Puller is a tool to extract documents from the SharePoint's DB. It works with SharePoint Portal Server 2003 (and WSS 2.0).
I have made several changes in this version. There were requests for new features. I have tried to include everything that people requested. The only thing you will find missing is a progress bar or a status bar that displays the download status.
History
Version 1.0
Version 2.0
Version 3.0
Details
You see a configuration screen when you run the application for the first time.
Use this screen to add your database connectivity details. Select server from Server dropdown. Click (Re)Load to populate the Server dropdown if it's empty. Add Username and Password and click Connect. This will populate the Database dropdown. There is a possibility that some one is using different databases for different instances (portals) of SharePoint. Select the database from the Database and click the Save button. This will save the configuration and next time, you start the application, you will be taken directly to the Download Documents screen. You can also add a connection string. Select the second radio button to enable the text box and add the connection string and click the Save button to save the configuration.
Shortcut keys
| Key | Functionality | Screen |
| Ctrl+1 | Download Documents | |
| Alt+O | Download Documents | |
| Ctrl+2 | Download Libraries | |
| Alt+E | Download Libraries | |
| Ctrl+3 | Configuration | |
| Alt+C | Configuration | |
| Ctrl+4 | About | |
| Alt+A | About | |
| Alt+S | Select All Items | Download Documents |
| Alt+D | Copy Directory Structure | Download Documents |
| Alt+B | Browse | Download Documents |
| Alt+V | View Documents | Download Documents |
| Alt+P | Pull Document(s) | Download Documents |
| Alt+S | Select All Items | Download Libraries |
| Alt+D | Copy Directory Structure | Download Libraries |
| Alt+B | Browse | Download Libraries |
| Alt+V | View Sites | Download Libraries |
| Alt+P | Pull Document(s) | Download Libraries |
| Alt+L | (Re)Load | Configuration |
| Alt+C | Connect | Configuration |
| Alt+S | Save | Configuration |
Download Documents
Click View Documents to populate list box with the documents. Select a destination and click Pull Document(s) to download all documents to your hard disk. Check Copy Directory Structure checkbox if you want to copy the directory structure of each file. Similarly, if you want to download complete libraries, select Download Libraries from the menu bar. List box will show you all the libraries that have documents. Select the libraries you want to download, select a destination and click Pull Document(s). Application searches almost all types of files including .doc, .xls, .mdb, .pdf, .gif, .jpg, etc.
2. Create a custom policy file for your assemblies
3. Install your assemblies in the GAC
|
<SecurityClass Name="SharePointPermission" Description="Microsoft.SharePoint.Security.SharePointPermission, Microsoft.SharePoint.Security, Version=12.0.0.0, Culture=neutral, PublicKeyToken=71e9bce111e9429c" />
|
|
<PermissionSetclass="NamedPermissionSet"version="1"Name="SPRestricted">
|
|
<PermissionSetclass="NamedPermissionSet"version="1"Name="CustomTrust">
|
8. Add the following <IPermission> node to the <PermissionSet> element where the name attribute equals CustomTrust:
|
<IPermission class="SharePointPermission" version="1" ObjectModel="True" />
|
<PermissionSet
class="NamedPermissionSet" version="1" Name="CustomTrust">
<IPermission class="AspNetHostingPermission"
version="1" Level="Minimal" />
<IPermission class="SecurityPermission"
version="1" Flags="Execution" /> <IPermission class="WebPartPermission" version="1" Connections="True" />
<IPermission class="SharePointPermission" version="1" ObjectModel="True" />
</PermissionSet> |
|
<CodeGroup class="UnionCodeGroup" version="1" PermissionSetName="CustomTrust">
<IMembershipCondition class="UrlMembershipCondition" version="1" Url="$AppDirUrl$/bin/*" /> </CodeGroup> |
<CodeGroup class="UnionCodeGroup"
version="1" PermissionSetName="CustomTrust"> <IMembershipCondition class="StrongNameMembershipCondition" version="1" PublicKeyBlob="0x00240000048000009400000006020000002400005253413100040000010001004" Name="UploadService" /> </CodeGroup> |
<trustLevel name="WSS_Custom" policyFile="LocalDrive:Program FilesCommon FilesMicrosoft SharedWeb Server Extensions12configwss_customtrust.config" />
|
<trust level="WSS_Custom" originUrl="" />
|
 |
Di niente, di meno, sul mondo dell'informatica.... said: |
| |
Di niente, di meno, sul mondo dell'informatica.... said: |
| |
deeptyranjan said:
It will be very much usefull if it will display all the detail and complete structure of MOSS 2007 object model
SharePoint 2007 Object Model It's very urgent !!! If anybody have any Idea Please let me know. |
| |
Ryan said:
This was very helpful. After following the steps listed in your post I get the following exception when running my application:
"System.IO.FileLoadException: The given assembly name or codebase was invalid. (Exception from HRESULT: 0x80131047)". Any ideas? |
| |
ssa said:
Hi Ryan,
Thanks for reading and liking the article. The error you are getting has nothing to do with the code access security. This error occurs when path to your assembly is longer than 255 characters. Make the path shorter to get rid of this error. There are a couple of good links on google that discuss this issue in detail. Here are a couple of links for your convenience: Hope this helps. Let me know if this does not solve your problem. Good luck Regards, SSA |
| |
Abhishek Agrawal said:
It is very useful and comprehensive article for deploying/developing ASP.NET application in sharepoint
|
| |
Pedro Rainho said:
I have used your Sample Custom Policy File and i have looked at the microsoft site and i'm still having the same problem. i'm doing this in my sample webpart
using (SPSite site = SPControl.GetContextSite(HttpContext.Current)) { ServerContext context = ServerContext.GetContext(site); SPWeb ferias = site.AllWebs["Ferias"]; site.AllowUnsafeUpdates = true; ferias.AllowUnsafeUpdates = true; ferias.Lists.ListsForCurrentUser = true; SPList feriasConfiguracao = ferias.Lists["FeriasConfiguracao"]; SPListItem item = feriasConfiguracao.Items.Add(); item["Nome"] = "Nome1"; item["Valor"] = "Valor1"; item.Update(); } it's simple insert an item in a list, and the error continues to be: Request for the permission of type 'Microsoft.SharePoint.Security.SharePointPermission, Microsoft.SharePoint.Security, Version=12.0.0.0, Culture=neutral, PublicKeyToken=71e9bce111e9429c' failed. i have simple created a webpart and copy the dll to the bin folder and when i use the web part i receive that error. Any ideas???? |
| |
ssa said:
Thanks Abhishek
|
| |
ssa said:
Pedro!
Did you install the assembly in the GAC? |
| |
Anders Rask said:
Hi, thanx for the article.
A comment though: Wouldnt it be better (read more fine grained) to use the assembly name instead of the blob? Using the blob will give access to all assemblies signed with the same SNK file. Using the name will give you more control on what assemblies are allowed higher privileges -and IMHO thats what CAS is all about ;-) |
| |
Anders Rask said:
Ahh sorry, i just saw you specified both blob and assembly name :-D
|
| |
ssa said:
Thanks for commenting Anders! :)
-SSA |
| |
Pedro Rainho said:
No, i don't want to install in the gac, i want to copy dll to bin directory, install in the gac is't the same as give full trust in the web.config and i don't want that. If i give full trust my webpart works fine but that is not recomended by MS. i just want to create a simple Custom Policy File that runs the example i posted before.
|
| |
Suleman said:
Hi,
Your both articles (MOSS 2007 and Code Access Security & Creating a Custom Web Service for SharePoint ) are really good, the way you described, steps, is simply great. I'm facing a problem, if you have some solution please let me know and thanks in advance. I have deployed a simple web service (that returns "Hello world") on "Server2" then deployed a webpart on "Server1" and call the service from "Server2" it throws an exception "401 Unauthorized ......" when I use Default or Default Network Credentials. e.g. Web_Ref.PagesList listService = new Web_Ref.PagesList(); listService.Url = siteURL + "/_layouts/KPMGTestService/pageslist.asmx"; listService.Credentials = System.Net.CredentialCache.DefaultNetworkCredentials; listService.PreAuthenticate = true; writer.Write(listService.HelloWorld()); but when I pass userName and password to Network Credentials it works fine. e.g. System.Net.NetworkCredential ntCred = new System.Net.NetworkCredential("UID", "Pwd", "Domain"); listService.Credentials = ntCred; My Problem is, I want to use DefaultCredentials or DefaultNetworkCredentials because in my actual webpart somehow i don't wanna impersonate or pass any UID and Pwd etc because i need to check user rights in webservice. Note: this service works fine if i called it using a Console application. If you have any Idea, please let me know here in this blog or if you can mail me , that will be great, at suleman.ibrahim@hotmail.com Once again Thanks. |
| |
ssa said:
One thing, the line listService.PreAuthenticate = true; should come before the "credentials" line. Like this:
listService.PreAuthenticate = true; listService.Credentials = System.Net.CredentialCache.DefaultNetworkCredentials; Second thing, make sure the login you use for logging in has approp. permissions in SharePoint. |
| |
ssa said:
Pedro,
Which method of authetication are you using in the custom policy file? the URL method OR the blob method?? |
| |
Suleman said:
Yes, the line listService.PreAuthenticate = true; is come before the "credentials" line. It was just an copy pasting mistake.
I have tried both URL and Blob methods in Custom policy file and after updating file I did IISReset but it doesn't work. Login, I'm using for logging has Administrator rights on both servers and has site Collection administrator rights on both portals. One thing more, if I make changes in my service should I create disco and wsdl files again or that is not necessary And what is the imapct of these files cuz I tried my service without these files but result doesn't change wheather I have deployed these files or not. Thanks for your time. |
| |
Suleman said:
The problem has been resolved actually we should have to use "Kerberos" Authentication Settings instead of "NTLM", if we wanna access some remote server Services etc. I dont wanna go into details but if anyone wanna know about it, differences between "Kerberos" and "NTLM", can read following article.
Once again thanks for time and comments. http://web.archive.org/web/20070514154151/http://ablog.apress.com/?p=1127 |
| |
Suleman said:
But, I still wanna know about my last question.
"if I make changes in my service should I create disco and wsdl files again or that is not necessary And what is the imapct of these files cuz I tried my service without these files but result doesn't change wheather I have deployed these files or not." thanks |
| |
ssa said:
If there are no major changes then there is no need to recreate wsdl and disco files, your web service will work fine.
|
| |
sireve said:Hi, I have a problem with this sentence: string rol = myweb.RoleDefinitions["admin"].Name; Webpart "x" seems to be causing a problem .Is not the level of permissions. Any Ideas?? And Pedro, I have the same problem in other webpart... Have you got the solution? web.configgg!! :s thanks |
| |
ssa said:
Sireve,
What is the error message that you get? Cant tell you the problem without looking at the error first! Thanks |
| |
sireve said:
Hi, I said you, sorry I'm not explain,
this is the error: Webpart "mywebpart" seems to be causing a problem .Is not the level of permissions. (this is a traslation message, my MOSS is in spanish) thanks |
| |
ssa said:
hmm.. i guess the web part tries to access an area in SharePoint for which it does not have permissions. wait a minute! What are you creating? a web part, web service or just an application using the object model?
ssa |
| |
sireve said:This is an error webpart. But the objective is to obtain the group/rol to which the user belongs, in my example user "admin".. how I get it?? thanks ssa |
| |
Paul said:
Great Article! I was going around in circles for a couple hours befire finding your post. I walked thru it and presto, my webpart is now showing. I was getting the same error that Pedro(above) was getting.
(Pedro, in case you haven't resolved your issue. I believe the key part of the post was to edit the local web.config file and make sure the wss_custom_minimaltrust.config (in my case) has a reference in the security policy section (I'd done most of the edits already, but forgot to tell the local web.config about it ): <securityPolicy> <trustLevel name="WSS_Custom" policyFile="C:Program FilesCommon FilesMicrosoft Sharedweb server extensions12CONFIGwss_custom_minimaltrust.config" /> </securityPolicy> Thanks again, Paul |
| |
ssa said:
Many Thanks Paul!
Regards, SSA |
| |
Geo said:
This was very helpful. After following the steps listed in your post I get the following exception when running my application:
The given assembly name or codebase was invalid. (Exception from HRESULT: 0x80131047). The only additional part which I am trying to do in my web part is Loading the XML in XMLDocument object using Load method from the local drive. |
SPS 2003: Deleting a site completely
Go to your site > Site Settings > Go to Site Administration > Delete Site (Under "Management and Statistics")
To remove the link, do this:
1. Go to site directory (sites area) > Manage sites
Find your site in the list, open the context menu (click the down arrow (drop down)) and select "Delete Item".
Now, your site is deleted and you can create it again with the same name!
Regards,
-SSA
MOSS 2007 Installation Guide
2. Disable Internet Enhanced Security in IE 6. You can disable it by going to Add/Remove Windows components.
3. Install SQL Server. I have tested MOSS 2007 with both SQL Server 2000 and 2005. If you are installing SQL Server 2000 then make sure you install SQL Server 2000 Service Pack 3 as well.
4. The file downloaded from Microsoft is in ISO format. You can download ISOBuster or any other ISO software to extract setup files from the ISO image. I would recommend WinRAR. There is a problem with other ISO software. You get "Language not supported" error during installation. The solution to "Language not supported" error is to use RAR instead of ISO software. Simply, change the extension of the downloaded file to .RAR and then use WinRAR to extract files from the ISO image.
5. Download WinFX from the following page:
| File Name: | winfxsetup.exe |
| Version: | 3.0.3906.22 |
| Date Published: | 5/23/2006 |
| Language: | English |
| Download Size: | 2.5 MB |


- Standalone


ClearType Technology
Read more on http://www.microsoft.com/typography/WhatIsClearType.mspx
You can use online tuner on Microsoft site to turn on ClearType settings on your machine.
This is useful especially if you are using a laptop. There is no harm in trying.
If you think you have committed a mistake and you are not happy with the cleartype font, follow these steps to revert to your original settings:
- Go to Display settings in control panel.
- Select "Appearance" tab in Display Settings.
- Click on "Effects." button.
- Select "Standard" in the "smooth edges" drop down. Complete drop down name is "Use the following method to smooth edges of screen fonts:"
- Save your settings.
-SSA
Sunday, September 26, 2010
I want alert to be sent to multiple users.
One way is to use "Alert Me" option. If you are using Outlook, use Tools > Rules and Alerts > New Rule to create a rule that will automatically forward the email to other people.
Update: This post was written long ago when there was no MOSS or WSS 3. Managing alerts for different users was not possible OTB. So, this simple technique provided a way to the users to forward the important news to the other users. for example, users used "Alert Me" to subscribe to the site messages and in the outlook created a rule to forward the received email from SharePoint to the group of other users who had not subscribed to the site news.
SSA
Q: I want alert to be sent to multiple users. "Alert Me" doesn't help!
One way is to use "Alert Me" option. If you are using Outlook, use Tools > Rules and Alerts > New Rule to create a rule that will automatically forward the email to other people.
Update: This post was written long ago when there was no MOSS or WSS 3. Managing alerts for different users was not possible OTB. So, this simple technique provided a way to the users to forward the important news to the other users. for example, users used "Alert Me" to subscribe to the site messages and in the outlook created a rule to forward the received email from SharePoint to the group of other users who had not subscribed to the site news.
Friday, September 24, 2010
Have a look at the following code. You can get file's URL in EventFileURL if you are using EventHandlerToolkit.
spFile = EventWeb.GetFile( EventFileUrl );
if (spFile.Exists)
{
spListItem = spFile.Item;
}
string strModifiedBy = spListItem["Modified By"].ToString();
and if you want to send an email, here is how you can do it. You can send email in OnDelete(), OnInsert(), OnUpdate(), etc
private void OnDelete()
{
//Insert code here: capture the name of the person who modified the document
//Send email
MailMessage msg;
SmtpMail.SmtpServer = "smtp.yourserver.com";
msg = new MailMessage();
msg.BodyFormat = MailFormat.Html;
msg.From = currentWeb.Author.Email; //you can use hard code the sender here
msg.Subject = "File Deleted";
msg.Body = "File has been deleted";
msg.To = currentWeb.Users[strModifiedBy].Email;
SmtpMail.Send(msg);
}
-SSA
Comments
Krishna said:
Krishna
Neha said:
TIA
Neha
grayghost said:
William V. said:
ajaxspider said:
ssa said:
I didn't know that Keith's utility suite had a similar tool included. Although i tested a couple of utilities from his suite months ago but didn't notice the tool you are talking about. I would like to check that out! :)
Thanks,
SSA
Ramba said:
I just need a list of all files in the sharepoint. It would be nice if you include a feature to publish a list of files available in sharepoint.
Thanks
Ramba
ssa said:
I wrote an application years ago :) that did exactly what you are looking for. That application is still available somewhere on my blog. Just search my blog for keywords like explorer, sharepoint explorer. That application generates an excel sheet as an output.
Thanks,
SSA
David Moore said:
David Moore said:
Geena said:
David Moore said:
Try using the trusted connection in the connection string. See the second figure in the post. It contains the connection string! ;)
Geena said:
Thanks for the help. :) you r genius!
Joseph said:
grayghost said:
ssa said:
Remco Ploeg said:
decatec said:
ssa said:
ssa said:
Alberto said:
Now, i have a question... and if someone (I... for example) wants that the documents in a site are download and after delete from the site every 5 days... do you know a method for do it?
ssa said:
Thanks for liking the tool. You are suggesting a new feature! :) Yes, of course, you can do it. With some extra programming this can be done! I will try to incorporate this feature but it will take time.
Regards,
SSA
Alberto said:
If you want a help perhaps I can avail you.
I don't know the SharePoint architecture but I have knowledge of SQL Server and some language of programming (Java, VB, C, ASP) ...
In each case i attend your new solutions. :)
Regards,
Alberto
ssa said:
Regards,
SSA