A Practical Guide to SharePoint 2013

A Practical Guide to SharePoint 2013
A Practical Guide to SharePoint 2013 - Book by Saifullah Shafiq

Thursday, December 27, 2007

WS-FileConvertor 1.0c - Convert images to text and upload into SharePoint


I have made some changes in the previous version and now users can also upload the original files along with the converted text files into the SharePoint.

FileConvertor version 3

Click here to download this tool.

For your convenience, you can create two different views in SharePoint library to show image and text files separately. For example, if the source image files are of GIF type, then you can create a view with the following filter settings:

Show only items when the following is true:

Column Name: Name

Condition: Contains

Text: gif
You can make this view the default view and it will only show the image files. Similarly, create another view that will only show the text files.

What to expect next? Capability to extract metadata from the converted text files and uploading the original image files along with the extracted meta data. This will allow users to upload only the image files without the need to upload the text files. The common words extracted from the converted text files will be uploaded as metadata. This will allow users to search image files using keywords.

-SSA

Wednesday, December 26, 2007

Inspecting Logic and Checking Design of InfoPath Form


Inspecting Logic and Checking Design of InfoPath Form

It is easier to inspect the logic manually in simple forms but companies use InfoPath not to create simple forms but to create forms in an easy and simple way. These forms can get quite complex and large. Once developed and deployed, there are different techniques that developers can use to track down errors but even at design time inspecting and fixing errors in the form can be a tedious job. Forms can have hundreds of nodes or may be 20-30 fields in a single view. It's not easy to find problems with the data sources without the help of a tool. Unfortunately, logic inspector and design checker, tools that come with InfoPath are usually overlooked and not taken advantage of by the developers.
Figure 1: Logic Selector can be selected from the Tools menu
There are some errors that become evident only after when a developer tries to deploy the form. Large number of data sources or fields is not the only problem, no form is complete without the data validation checks, rules and business logic. Logic Inspector enables developers to find problems with the form before they try and deploy it on the destination server. It allows them to view the data validation checks, rules, calculated default values, and business logic, all in one place. Design Checker is another tool that can be used to check the form design for performance related issues before deploying the form. I admit, even I used to underestimate the power of this tool but It really helped me once to resolve performance issues in a large form that comprised of hundreds of nodes, validation checks, rules and thousands of lines of business logic code. Let's take a look at the Logic Inspector first before moving on towards the Design Checker.

Figure 2: Logic Inspector inspects Data validation, Calculated Default Values, Rules and Programming
Logic Inspector and Design Checker  can be selected from the Tools menu. Design Checker is also available in the Design Tasks pane. When you work on a large form, it is very common to delete fields and/or nodes from the form and at the same time adding new nodes or fields in the form. This can easily inject problems in your form because many of the fields are interdependent on each other. One field may be dependent on a value in another field. Now suppose you remove the field that had data that was being used in another field. You will not get any error message but when you will try to deploy the form, it will fail. Now imagine you have to find the problem manually in the form that houses hundreds of nodes and 30-40 fields in each view and there may be more than one view in your form. It will be a tedious task. Logic Inspector comes to your rescue at this point.
invalid field error
Figure 3: Logic Inspector catches broken rules
See Figure 3 above. "Invalid Field" message shown in red tells you that a field that was being used in a rule has been deleted. You will have to re-add the field, remove the rule or edit the rule in order to fix the problem. Your form will not publish unless you fix this problem. 
You can run Logic Inspector to view the logic in the complete form or you can also invoke it to inspect logic in a single field.
logic inspector invoked from a field 
Figure 4: Logic Inspector can be invoked for a single field
To inspect a single field, right click the field and select "Logic Inspector". It will show you the complete details, for example, there will be a section called "Logic that depends on the value in this field group". There will be another one called "Logic that is triggered by a change in this field or group". (See figure 4). You can also view logic for a single field by clicking the "Field Name" hyperlink. It will open another pane to the right that will show you the details.
Now let's turn towards the Design Checker. Design Checker is another very important tool that you should not miss when working on a complex form. Performance may not matter in case of small forms but it really matters when one is developing a complex form. Creating nested sections, nested tables, nested nodes is a very common scenario in complex forms. This is where developers usually make a mistake without thinking about the implications that will affect the form's performance. Especially if it's a web enabled form that will run in a browser, then of course you can not comprise on the form's performance. No one will know the difference when opening the form in the InfoPath client application but loading the same form in a web browser will show you why it is important to take care of the performance issues. Complex forms load very slow in browsers. It can take a complex form 2 to 20 seconds or may be even more to load in a browser. Well, that's a lot of time and you won't believe how annoying it becomes when the form takes so much time to load. You can reduce this loading time by fine tuning your form and resolving the performance issues. One mistake that developers usually make is that they don't take care of the hierarchy in which they insert the nodes in the data source. This can have serious implications. For example, if you have added fields to a section then in the nodes' hierarchy, fields' nodes should come under the section's node. Look at the figure below to get a better understanding of what  I mean.

Figure 5: Locate node hierarchy inconsistencies with Design Checker
"RelatedRecord" is a repeating table and is a part of "RelatedRecords" which is a repeating section and we can see this in the design view of the form but in the data source, if you notice, the "RelatedRecord" comes under "myFields" and not under the "RelatedRecords" node. This will work. Preview the form and everything will work as expected. This is a very simple example. In real life scenarios, some times we have to use nested tables that can go up to 5 levels deep and in such cases if a developer does not take care of the hierarchy in which the fields are added to the data source then this can have serious implications as far as form's performance is concerned. Form will load very slow.  If you want to read more about the performance related issues and tips on how to fine tune InfoPath forms, then there are a couple of very good articles available on Microsoft site:
Improving the Performance of InfoPath 2007 Forms
InfoPath Forms Services  best practices
If your form has hundreds of data nodes then use Design Checker to check hierarchy related inconsistencies.

Figure 6: Design Checker Pane
All inconsistencies are shown in the "Offline Compatibility" section. To view a detailed message, click the message in this section. It will pop-up a message box that will show you the detailed message. Developers should always run Design Checker before publishing the form and should fix all issues reported by the Design Checker. Design Checker also helps in pin pointing "Online Compatibility" issues. Check the "Verify on server" option and click "Refresh". If the publishing location is SharePoint then the Design Checker will verify if the destination site or library still exists or not. This can also help if there is an issue with any of your promoted fields. If you change the data type of a field in your form that was previously promoted to be used in a SharePoint forms library, and you forget to remove the previously promoted field and re-add it, your form will not publish and will give you an error. Again, as I said, if your form contains many fields then locating such issues becomes easier with Design Checker. Design Checker will show you the source of the error which you can then easily fix before trying to publish the form again. All in all, Design Checker is a handy tool and lots of headaches can be avoided if developers use these tools to find and fix the problems at design time.
We just saw why Logic Inspector and Design Checker are important tools for any professional developer working on complex InfoPath forms. I would also like to discuss two more tools very briefly that can be helpful in finding issues with complex forms. These may not offer help in finding the business logic issues but you can locate the javascript errors with these tools. One is Fiddler. Fiddler can be used to log all HTTP traffic between computer and Internet. Fiddler, when used with a browser, can be very useful in finding javascript issues with forms. Fiddler uses its own built-in inspector to analyze HTTP traffic.
   
Figure 7: Catch HTTP and javascript errors with Fiddler
Another important tool is Internet Explorer Developer Toolbar. IE Developer Toolbar is a must have for every web developer. It is not meant for finding issues with InfoPath forms but because web enabled InfoPath forms load and run in a browser, developers can use it to find any javascript related errors. It allows users to explore Document Object Model (DOM) of a web page.
And finally, if you developed a form using Visual Studio then you don't need any other debugger. Built-in Visual Studio debugger is enough to find business logic and javascript related errors in your web form. Javascript error will show you the filename that contains the source of the error. You can open that file in Visual Studio and put a break point in the function that you think contains the source of the error. Visual Studio will show the exact source and the error message that you can then fix easily.

Tuesday, December 25, 2007

Renaming the changed Title field back to 'Title'

Title field once changed can not be renamed back to 'Title' through UI. I had to make a change in the DB to forcefully rename the field but there is an easy solution also. Today while browsing the net, I found this interesting post that discusses in detail the cause and the solution for this problem:
Title is a reserved word and once changed, can only be renamed back to 'Title' through programming.

SharePoint file uploading problem

Sometimes strange things happen after applying security updates to the SharePoint server. Recently a friend told me that after applying a security update, users in his company complained that they were no longer able to upload files to the SharePoint. If this happens to you, make sure it's not because of transaction log. Usually when transaction log is full, users get these types of errors. Also, run following command and it should solve the problem:
stsadm -o setsitelock -url http://yoursiteurl -lock none
lock types: none, noadditions, readonly, noaccess

Enabling Anonymous access in surveys

I am asked quite often about the anonymous access in surveys. This may be because I wrote a couple articles about surveys in MOSS 2007 some time ago.
If you have a subscription to Advisor magazine, you can read a more refined article here.
Enabling anonymous access in surveys is easy. All you have to do is make some changes in the SharePoint Central Administration and the site where the survey is hosted. Following are the detailed steps required to do this:
1. Go to IIS settings. Select the SharePoint site for which you want to enable anonymous access. Select "Properties".  Select "Directory Security" and enable anonymous access by checking the "Enable anonymous access" option. Use "IUSR_MACHINENAME" as the user (If your machine name is "DEV", this user name will be "IUSR_DEV".)
2. Go to SharePoint Central Administration. Select "Application Management". Select "Authentication providers" under "Application Security".
3. Select correct web application from the drop down. Click "Default" zone.
4. Check "Enable anonymous access" option.
5. Create a group for anonymous users at site level and assign "Contributor" rights.
Creating a group for anonymous users:
a. Open SharePoint site that hosts the survey
.
b. Go to Site Actions > Site Settings and select "People and groups" from the "Users and Permissions" section.

c. Select New > New Group. Give this group a name, for example, "anon users". Scroll down and check "Contribute" option in "Give Group Permission to this Site" section. If you don't want the users to have the "delete" right, create a new permission level and use that instead of the "Contribute" option.
6. Open your survey. Go to "Settings". Click "Permissions for this survey" (under "Permissions and Management").
7. Click "New" and add the anonymous group that you created for this survey. Alternatively, you can also define anonymous permissions directly. Select "Anonymous Access" from "Settings" drop down. Select permissions that you will like to give to the anonymous users and click OK.
8. Log out and access the survey list without logging in again and test the user access. You should be able to respond to a question without logging in.

Monday, December 24, 2007

KB934525: Database issue!

KB934525 is required to fix a vunerability in Sharepoint. Read security bulletin for more information.
Information about KB934525 can be read at http://support.microsoft.com/kb/934525
Many people have reported that their SharePoint broke after installing this security update. This can happen if the security update fails to install properly. People have reported different issues and errors. One of the common errors if this update fails is:
'SharePoint_AdminContent_GUID' on SQL Server instance 'XXXXXXMicrosoft##SSEE' is not empty and does not match current database schema.

Another error is:
The specified SPContentDatabase Name=SharePoint_AdminContent_GUID Parent=SPDatabaseServiceInstance Name=Microsoft##SSEE has been upgraded to a newer version of SharePoint. Please upgrade this SharePoint application server before attempting to access this object.
How can you fix these errors?
First, restart the SPWebService. You can do it manually from the "Services" mmc. You can also run the stsadm command to restart this service.
Then, run the following command:
PSCONFIG -cmd upgrade -inplace b2b -wait -force
You must perform b2b (build to build) upgrade.
Hopefully this will fix your database problem.

WS-FileConvertor 1.0b - Tool for converting images into text readable format and uploading into SharePoint

I have modified the first version. It can now upload converted files to the SharePoint. You can download it here.

WS File Convertor 1.0 b
This application uses WSUploadService web service to upload files to the SharePoint. You can download WSUploadService here.

Select Image Folder: This is the folder where source images are stored.

Enter SharePoint Site: This is the library URL where converted files will be saved. If you are saving files to a document library, the URL will look like: http://server/sites/doclibrary ("http://" is required).

Enter Service URL: This is the web service URL. "http://" is required at the start of the URL. Suppose you are uploading files to the following document library:

http://server/sites/site1/doclibrary

Then the web service URL will be: http://server/sites/site1/_vti_bin/Files.asmx


This is just an experiment. Currently it works with GIF files and converts them into TXT format. I am still working on it and intend to expand it by including more useful features and formats.
Download Tool

-SSA

Friday, December 21, 2007

Tip: SESSION_STATE_PASCAL_CASED is not configured properly

Error Description: InfoPath Forms Services has detected a mismatch between the user's data in the browser and on the server. This may indicate the SESSION_STATE_PASCAL_CASED is not configured properly on a multiple front end farm or that a malicious user is trying to tamper with client data.
 Possible Fix: Clear browser's cache and try again and if that doesn't solve the problem then run the following command:
 stsadm -o reconvertallformtemplates

-SSA

Seasons Greetings

Seasons Greetings,
I would like to wish a wonderful holiday season to all my blog readers.
Merry Christmas and Happy New Year!!

SSA

Monday, November 26, 2007

WS-FileConvertor 1.0a

WS-FileConvertor 1.0a

WS-FileConvertor 1.0a
WS-FileConvertor is a .NET application that converts image files into text readable format. Currently, the output is TXT files. All image formats are supported including GIF, JPG, TIFF, etc. I have only tested major formats like GIF, BMP, etc. I am still working on this application. I am working on a feature that will allow users to upload the converted files (TXT) to SharePoint. You can download the setup package from here.
I tested this application in development environment (Windows Server 2003, .NET Framework 2.0) only. I will try to test it in other environments too. Please report bugs etc directly on the CodePlex project page.

-SSA

Sunday, November 25, 2007

Operation is not valid due to the current state of the object

Operation is not valid due to the current state of the object
This is one of the common errors that you see during SharePoint development. There could be many reasons for this error to occur. Here I will discuss one scenario. I have noticed that sometimes calling SPContext throws this error. It seems to be a bug. The code works for the first time but throws an error if you run the same statement again (during the same session). For example, consider the following code:
SPSecurity.RunWithElevatedPrivileges(delegate(){     using (SPSite site = new SPSite(SPContext.Current.Site.ID))     using (SPWeb web = site.OpenWeb(SPContext.Current.Web.ID))
     string ItemID = web.Lists["myList"].Items[0]["ItemID"].ToString();});
Interestingly, sometimes this code works but sometimes it fails after running successfully for the first time. I feel something goes wrong with the session. SPContext returns correct context when accessed for the first time but then throws the following error:
Operation is not valid due to the current state of the object
The error goes away if you remove the SPContext code and hard code the site and web values, for example:
SPSecurity.RunWithElevatedPrivileges(delegate(){      using (SPSite site = new SPSite(http://server/))      using (SPWeb web = site.OpenWeb("myweb"))
      string ItemID = web.Lists["myList"].Items[0]["ItemID"].ToString();
}
);
Obviously, we can not hard code the values in professional level applications. So, what's the solution? How can we get rid of this error? The error can be avoided if we write the same code in a different way. Here is the modified code:
SPWeb  webContext = null; //declare webContext out side the try ... catch and assign "null"
try
{
     webContext = SPContext.Current.Web; // Assign SPContext to the webContext
    SPSecurity.RunWithElevatedPrivileges(    delegate()
   {
        using (SPSite site = new SPSite(webContext.Site.ID))        using (SPWeb web = site.OpenWeb(webContext.ID))
        string ItemID = web.Lists["myList"].Items[0]["ItemID"].ToString();
   }
);
}
catch (Exception ex)
{
}
finally{
    if (webContext != null)
         webContext.Dispose();
}

Now, you won't get any error. Note that we declared the webContext outside the try... catch block and used SPContext only once. You can get "site" by calling webContext.Site.ID and similarly you can get "web" by calling webContext.ID. It's important that you dispose off the object after using it.

Monday, October 22, 2007

A deployment or retraction is already under way for the solution ... Publishing InfoPath form

You get this error when you try to publish an already published InfoPath form in SharePoint:
"A deployment or retraction is already under way for the solution ..."
If you go into the event log, you will notice different error messages related to this event. For example, one message will be as following:
EventType ulsexception12, P1 w3wp.exe, P2 6.0.3790.1830, P3 42435be1, P4 microsoft.office.infopath.server, P5 12.0.4518.0, P6 4541816a, P7 12961, P8 161, P9 nullreferenceexception, P10 8gec.
Another will look like the following:
An exception occurred during loading of business logic. (User: ServerAdministrator, Form Name: Teachers, IP: , Request: http://Server/_layouts/Formserver.aspx?XsnLocation=http://server/FormServerTemplates/teachers.xsn, Type: FileNotFoundException, Exception Message: Could not load file or assembly 'file:///C:Program FilesCommon FilesMicrosoft SharedWeb Server Extensions12TemplateFeaturesFT-01-08f7ce0d-e5ba-7eab-8b14-ac2eb94f1addTeachers.dll' or one of its dependencies. The system cannot find the file specified.)
For more information, see Help and Support Center at
Now both these messages are misleading. The first one shows a "nullreferenceexception" and the other one mentions a missing file or dependency. Because of these messages I wasted time in trying to resolve the "nullreferenceexception" error but later it turned out that somehow the form didn't get published properly the first time we published it in SharePoint. Now when we were trying to republish the form but SharePoint was giving us errors. On each attempt SharePoint threw a new error message. One thing that I noticed was that the publishing process stopped the "Windows SharePoint Services Administration" service which was one of the reasons we were unable to republish the form. So check services and start this service if it's stopped and then run the following command:
stsadm -o execadmsvcjobs
If you try to publish the form without starting the "Windows SharePoint Services Administration" service, you will get the following error:
"The timer job for the operation has been created. However, it cannot be run because the administrative service for this server is not enabled."
So start the service and run the stsadm command. This will publish your form and hopefully, you will get rid of the error that said that there was a "nullreferenceexception" in your form. If you still get the same error (A deployment or retraction is already ...) then try running the following command to cancel the deployment that was started earlier:
stsadm -o canceldeployment -id <Timer Job ID>
Timer Job ID can be copied from "Central Administration > Operations > Timer Job Definitions" page. See the most recently created job, you can also verify by looking at the title. Right click the "Job" link and copy the URL. Locate the "JobId" parameter in the URL, this parameter contains the ID.

Tuesday, October 16, 2007

Null is null or not an object

Have you seen this error before? Did you find a solution? I was getting this javascript error on the click of a button that had a simple rule attached to it. Everytime I clicked the button, it produced this javascript error:
Null is null or not an object.
After some debugging, I noticed that the error was occuring in the "owsbrows.js". This file contained a line that was trying to load a value from the control that was clicked in the form. The control returned "null" and hence InfoPath generated this beautiful error message.
Reason?
The postback setting of the button was set to "Never".
Solution?
Set the postback setting of the button to "Always".
1. Right click the button.
2. Select "Button Properties".
3. Select "Browser forms" tab.
4. Select "Always". Note: Selecting the default recommended option "Only when necessary for correct rendering of the form (recommended)"will not solve this problem.
When you are using rules, you  must set the postback settings of the button to "Always" so that the click event sends data to the server everytime the button is clicked.
p.s. The error occurs in browser enabled forms.

InfoPath button with simple rule attached doesn't work!

I had a button in my form and there was a simple rule attached to this button. Rule was that If someone clicked the button, a (hidden) textbox would appear in the form, a very simple rule! Problem?? The button was not working. Somehow the event was not firing. I had this problem even before but simply changing the ID of the button resolved my problem but this time, changing the ID didn't work. I spent a couple of hours trying to find the cause but in the end, I needed a quick solution as I was short of time (as usual). The problem was resolved when I added an empty event handler for the button in the form.
 ((ButtonEvent)EventManager.ControlEvents["Button"]).Clicked += new ClickedEventHandler(Button_Clicked);
  public void Button_Clicked(object sender, ClickedEventArgs e)
        {
            // Write your code here.
        }
Now, I don't understand why some buttons work without an event handler and the others don't. I added two buttons to the form, one is firing the other is not! Why? I don't have time to find the cause at the moment, will spend some time on this on the weekend.

SPWeb fails to return the list

When working on large applications, we usually make mistakes and then spend time debugging the errors that occur because of the mistakes that we make during programming but there are some errors that occur even if you don't make any mistake. Have a look at the following code:
SPWeb web = Site.OpenWeb(SPContext.Current.Web.ID); string strList = SPContext.Current.Web.Url.Substring( .... substring processing ....);
SPList list = web.Lists[strList]; //This line gives error!
Do you see any problem with this code? I didn't notice any thing. It gave me the following error:
Value does not fall within the expected range.<BR/>Source: Microsoft.SharePoint<BR/>Stack trace: at Microsoft.SharePoint.SPListCollection.GetListByName(String strListName, Boolean bThrowException)
at Microsoft.SharePoint.SPListCollection.get_Item(String strListName)
The reason of the error turned out to be the list name. The list name had parentheses which resulted in the error. In small companies, you are the all in all when working on a project but in big companies or when working on large projects, there are several people involved in the project. The list was created by the SharePoint admin and I was getting the list name programmatically. I didn't know the list name had parentheses in it. When you load such a list in browser, SharePoint automatically removes parentheses from the list name and the list works fine but when you try to access the same list programmatically, SharePoint gives you an error. As you will notice, in the code above, I am extracting the list name from "SPContext.Current.Web.Url" and it returns the list name without parentheses in it while the actual list name has parentheses and hence you get an error. Even if you add parentheses to the list name (in your code), you still get an error but a different one. It's a SPException error and returns following message:
Action can not be completed.
Conclusion: Do not use parentheses in list name.

Wednesday, October 3, 2007

Invalid column name c2

SharePoint gives you this error when you try to search documents using the SPQuery object and you search by passing the document's Name. SPQuery object uses the internal field names so it's important to pass correct internal name for the correct field to be searched. By default, the "Name" field that is visible in the library has the internal name "LinkFilename" so when someone wants to search a document in the library using the "Name" field, obviously he uses the "LinkFilename" to search the document but strangely enough, it returns the following error:
"Invalid column name C2"
This error occurs in the sQL Server. SharePoint tries to search this field in the DB and returns an error when the field is not found. I haven't checked whether this field actually exists in the DB or not but we get an error. There are two more "Name" fields in the library. The internal names of the three "Name" fields are as following:
Name="LinkFilename" DisplayName="Name FieldType="Computed" -> default
Name="FileLeafRef" DisplayName="Name" FieldType="File"
Name="LinkFilenameNoMenu" DisplayName="Name" FieldType="Computed"
If you look at the definitions, you will notice that the FieldType of the two fields is "Computed" and for one field, it is "File". By default, it is the first field that is shown in the library. It has the FieldType "Computed". To search the document in the library using the "Name" field, you must use the second field that has the internal name "FileLeafRef". Although, this field is not visible in the library by default but it will return the document in the search. It's FieldType is "File" and therefore, you will have to pass the complete filename alongwith the extension in order for search to work and return the document. The third "Name" field also errors out. It is not necessary to make this field visible in the library to make the search work.
Sample query:
SPQuery query = new SPQuery();
query.Query = "<Where><Eq><FieldRef Name='FileLeafRef'></FieldRef><Value Type='Text'>" + itemName + "</Value></Eq></Where>";
                           
SPListItemCollection listitems = list.GetItems(query);
"itemName" is the parameter that contains the file's name (passed from the interface or the calling function). It will be the complete name (alongwith extension), for example, document1.doc.


Saturday, September 8, 2007

Populating multiselect list box in InfoPath 2007 web forms programmatically

Multi select list box that comes with InfoPath 2007 does not work in web forms so you have to create your own control for usage in web forms. The following article shows you how to create a multiselect list box for web forms:
Ok, you have created a multiselect list box and now you can add static values but what if you want to populate this list box programmatically. How will you do that? The following tip shows you how you can populate this list box programmatically:
Please read the article mentioned above before continuing because without reading that article first it won't make sense to you what I am talking.
I will use the same names (for controls) as mentioned in the Microsoft article so that it's easier for you to understand what's happening. 
For your convenience, I will list the control names here:
options: is the group name
option: is the repeating group
selected: is used for the checkbox and contains true/false value
text: is a text box and is used to store the text value
Create a navigator first to navigate the xml nodes.
XPathNavigator DOM = this.MainDataSource.CreateNavigator();

"arrayItems" is an array of items retrieved from the database. Write a function that returns an array containing the items that you want to show in the multi select list box. I have not included that function here. It's a straight forward thing and not related directly to what I am trying to explain.
We will get the items from the array and add them to the list box. We will not touch the checkbox right now. We will just add the text values to the text boxes. By default, there is one row in the multi select list box. You must create new rows dynamically. Check the array length. If the lenth is 10 items, create 10 new rows. Best way is to iterate through the array and create new rows and populate the rows with the items retrieved from the array.
if (arrayItems.Length > 0)
{
       XPathNavigator Item = DOM.SelectSingleNode("/my:myFields/my:options/my:option", this.NamespaceManager);
       XPathNavigator newItemNode = null;
       for (int itemIndex = 0; itemIndex < arrayItems.Length-1; itemIndex++)
       {
              if (Item != null)
              newItemNode = Item.Clone();
              XPathNavigator navText = newItemNode.SelectSingleNode("/my:myFields/my:options/my:option/my:text", this.NamespaceManager);
                  
              navText.SetValue(arrayItems[itemIndex].ToString());
           
              Item.InsertAfter(newItemNode);
              navText = null;
              newItemNode = null;
       }
              
       Item.DeleteSelf();
       Item = null;
              
}
DOM = null;
           
Ok, so here is what I do. I create a clone of the original row and add a value to the text box of this new row.
newItemNode = Item.Clone(); // create a clone
select the text box of the newly created (cloned) row:
XPathNavigator navText = newItemNode.SelectSingleNode("/my:myFields/my:options/my:option/my:text", this.NamespaceManager);
and set it's value with the item retrieved from the array:
navText.SetValue(arrayItems[itemIndex].ToString());

Likewise, if you want to check the checkboxes programmatically, set the value of the control to boolean true or false. True will check the box, and False will uncheck the box. For example, you can check the box like this:
XPathNavigator navCheck = newItemNode.SelectSingleNode("/my:myFields/my:options/my:option/my:selected", this.NamespaceManager); 
navCheck.SetValue("true");
That's it!

Using powershell to add a policy feature to the collection

Following is the script to add a policy to the feature collection. This script will add a policy to the Records Management's feature collection. 
[System.Reflection.Assembly]::LoadWithPartialName("Microsoft.Office.Policy")
[System.Reflection.Assembly]::LoadWithPartialName("Microsoft.Office.Server")
[System.Reflection.Assembly]::LoadWithPartialName("Microsoft.SharePoint.Portal")
[System.Reflection.Assembly]::LoadWithPartialName("Microsoft.SharePoint")
$Url = "http://server/marketing"
$site = new-Object Microsoft.SharePoint.SPSite($Url)
#add policy to the collection
$xml = [System.IO.File]::ReadAllText("C:My Documentsfeature.xml")
[Microsoft.Office.RecordsManagement.InformationPolicy.PolicyFeatureCollection]::Add($xml)
 Similarly, to delete the policy, use following script:
[Microsoft.Office.RecordsManagement.InformationPolicy.PolicyFeatureCollection]::Delete("MarketingPolicy")
feature.xml will contain the following:
<PolicyFeature
  id="MarketingPolicy" xmlns="urn:schemas-microsoft-com:office:server:policy">
 <Name>Marketing Policy</Name>
 <Description>Marketing Policy</Description>
 <Publisher>ABC</Publisher>
 <AssemblyName>MarketingPolicy,Version=1.0.0.0,Culture=neutral,PublicKeyToken=a0231d53df8a952</AssemblyName>
 <ClassName>Marketing</ClassName>
</PolicyFeature>
Add your own assembly's information in this file (feature.xml).
See following links if you want to learn more about policies, adding policies, records management, etc:
Some more links that you may be interested in (not related to policy feature installation): 
Installing and uninstalling features using stsadm.exe:
How to create a simple feature:

Thursday, September 6, 2007

Using caspol.exe to add assemblies to full trust assembly list

Code Access Security Policy Tool (Caspol.exe) can be used to modify security policy for different policy levels. You can use it to add an assembly to the full trust assembly list for a specific policy level. Security exception is common when you try to run your application from a network share. See following article for more details:
You also get stuck sometimes when you try to deploy your application to a local folder. See following article for details:
In this tip, I will show you how you can use caspol.exe to add your assembly to a full trust assembly list.
caspol.exe is located in the following directory:
LocalDrive:WindowsMicrosoft.NetFrameworkv2.0.50727
Use the following command to put an assembly to the trust: 
caspol.exe -u -addgroup All_Code -url "*"  FullTrust -name "Your Assembly Name"
Assembly name will be like "YourCompany.ApplicationName" (without extension)
Suppose, you are deploying your application on a remote machine using a script. How will you run the caspol.exe tool on the remote machine? One way is to create a batch file and run it programmatically on the remote machine after copying the assembly to that machine. Create a batch file and copy the following in the file:
CD
PATH=%windir%microsoft.netframeworkv2.0.50727
caspol.exe -polchgprompt off -u -addgroup All_Code -url "*"  FullTrust -name "MyAssembly"
caspol.exe -polchgprompt on
polchgprompt option enables or disables the prompt that is displayed whenever Caspol.exe is run using an option that would cause policy changes. addgroup adds a new code group to the code group hierarchy. For more details, see following article:
Now, call this batch file programmatically from your deployment application.
string tempFolder = Environment.GetEnvironmentVariable("Temp");
FileStream fyle = new FileStream(tempFolder + "file://errlog.txt",FileMode.Create,FileAccess.Write/);
StreamWriter sw = new StreamWriter(fyle);
sw.Write("Ready to run the batch file!");
System.Diagnostics.Process proc = new System.Diagnostics.Process();
proc.EnableRaisingEvents = false;
proc.StartInfo.FileName = Environment.CurrentDirectory + "\security.bat";
                  
proc.Start();
sw.Write("security.bat ran successfully!");
sw.Close();
Remember, this can be a unattended installation, so you  may want to log errors. You can log errors to the Windows log file. You can also create your own text file for logging errors, as shown in the code above. The code creates "errlog.txt" file in the Windows' Temp directory and then executes the batch file. This code does not show how to trap and log errors, you can simply use try ... catch blocks to write the errors in the text file.
Using this technique you can put assemblies to a list of full trust assemblies.

-SSA

Adding content to Word "content control" programmatically

Category: Word programming
Level: Advance 
Here is a small tip on how to add data to Word content control programmatically. If you don't know what are content controls, you can read about them at the following sites:
The articles above will give you a clear picture about content controls. The beauty of content controls is that these can be populated with data programmatically. Of course, this could be done in different ways. Following is one way of doing it:
object contentcontrolIndex;
               
contentcontrolIndex = 1; //index of content controls always start from 1, not from 0!!
               
Word.ContentControl contentcontrolSample = this.Application.ActiveDocument.ContentControls.get_Item(ref contentcontrolIndex);
contentcontrolSample.Range.InsertAfter("This is a test!"); 
"this" in third line points to the current open document. When trying this code, replace "this.Application" with your own Word reference. If you want to learn more about this topic, read the following article (VSTO 2005 SE Sample):
The code above assumes there is only one content control in the application. The index of the control will be 1. Using this technique, you can populate content controls with data retrieved from different data sources including databases and other documents.
-SSA


Adding content to Word "content control" programmatically

Category: Word programming
Level: Advance
Here is a small tip on how to add data to Word content control programmatically. If you don't know what are content controls, you can read about them at the following sites:
 http://blogs.msdn.com/microsoft_office_word/archive/2006/10/23/control-yourself.aspx
http://blogs.msdn.com/modonovan/archive/2006/05/23/604704.aspx
http://blogs.msdn.com/erikaehrli/archive/2006/08/11/word2007DataDocumentGenerationPart1.aspx
http://msdn2.microsoft.com/en-us/library/ms406053.aspx
The articles above will give you a clear picture about content controls. The beauty of content controls is that these can be populated with data programmatically. Of course, this could be done in different ways. Following is one way of doing it:

object contentcontrolIndex;
               
contentcontrolIndex = 1; //index of content controls always start from 1, not from 0!!
               
Word.ContentControl contentcontrolSample = this.Application.ActiveDocument.ContentControls.get_Item(ref contentcontrolIndex);

contentcontrolSample.Range.InsertAfter("This is a test!"); 

"this" in third line points to the current open document. When trying this code, replace "this.Application" with your own Word reference. If you want to learn more about this topic, read the following article (VSTO 2005 SE Sample):
http://www.microsoft.com/downloads/details.aspx?familyid=9331eaa4-fc4f-49e1-ac78-aa2f112d854e&displaylang=en
The code above assumes there is only one content control in the application. The index of the control will be 1. Using this technique, you can populate content controls with data retrieved from different data sources including databases and other documents.

-SSA

Tuesday, September 4, 2007

Exporting data from Access to SharePoint and Importing data into InfoPath from a SharePoint List

Category: Administration
Level: Beginner 
This beginner level tutorial will show you how you can export data from Access to SharePoint and then import data from a SharePoint list into InfoPath. Let me tell you that you can also create an InfoPath form that could access data in an external database including Access. Using a built-in wizard in InfoPath, creating such a form is very easy. You can display data from Access in the InfoPath form. You can also incorporate search feature with ease using the wizard. This tutorial is divided into parts. The first part shows how to export data to SharePoint from an Access database. 
Export data from Access to a SharePoint list.
Detailed Steps:
1.       Export Access data to a SharePoint list. Go to 'External Data' in Access and select 'SharePoint List' from the 'Export' section.
Well, honestly speaking that's the only step required. Using the wizard you can either select a pre-built SharePoint list or you can create a new one before exporting data.

Importing data from a SharePoint list into an InfoPath Form
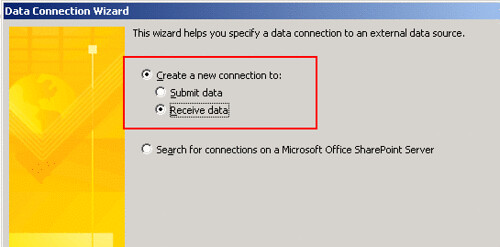
1.       Create a new data connection in InfoPath and select following options:
a.       Create a new connection > Receive data
     
b.      Select "SharePoint library or list" option.
c.       Enter the (SharePoint) list's path where you exported the Access data.
d.      Select your list from the list of lists and libraries.
e.       Select the field (or fields) that you want to show in InfoPath.
f.        Check 'Store a copy of the data in the form template'.
g.        Add a name for the data connection and check the "Automatically retrieve data when form is opened" option.
h.      Click "Finish".
Use following steps to populate a text box with data imported from MS Access:
1.       Add a text box in your form.
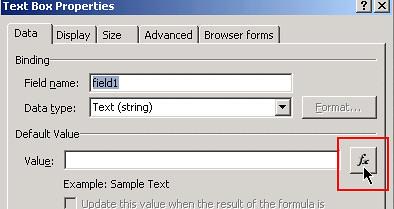
2.       Right click the text box and select "Text Box Properties" to open the properties page. Enter a default value for this field (Click the button (fx) shown on the right side of the "value" text box).
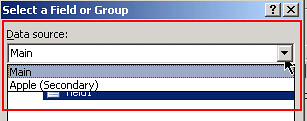
      3. Click 'Insert Field or Group.' button.
      4. Select secondary data source from the 'Data source' drop down.
      5. Expand all nodes until you see field names. Select the field that you want to retrieve value from.
      6. Click OK twice and that's it!
You can use more fields to display data from different columns of the Access table.

Monday, September 3, 2007

Fix "calling GetScopeID from a non-Office server binary" error

Scopes are usually used in search code. One of the very common errors when working with scopes in search code is as following:
"Calling GetScopeID from a non-Office server binary."
This error occurs when you instantiate the query object, for example: 
KeywordQuery kwQuery = new KeywordQuery(site);
To resolve this issue, include the correct namespace when defining the kwQuery object, for example:
Microsoft.Office.Server.Search.Query.KeywordQuery kwQuery = new Microsoft.Office.Server.Search.Query.KeywordQuery(site)
When you skip the namespace, SharePoint tries to call the GetScopeID() from an assembly different than the one it should be using. This especially happens when both of the following namespaces are included in your code:
using Microsoft.SharePoint.Search.Query;
using Microsoft.Office.Server;

Sunday, September 2, 2007

OneNote and SharePoint

OneNote and SharePoint
It will not be wrong to call OneNote an e-notebook. In OneNote, one can write down notes of all kind and share them with others easily. Users can easily manipulate information in OneNote. They can add, delete, edit information without any problem and good thing is they can share this information with others. There are different ways of sharing this information with people. Email used to be a popular method of sharing information but with the increase in the popularity of SharePoint, more and more people are turning toward the OneNote-SharePoint combination. There are some very good blogs that discuss OneNote in detail:
In this article, I will explore some sharing features of OneNote and see how SharePoint is used to share notes from OneNote.
Live Sharing
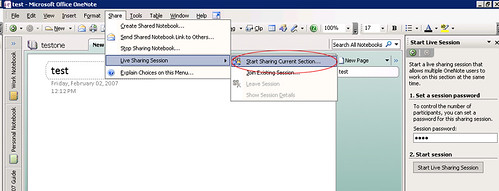
1. In the menu bar, select Share > Live Sharing Session > Start Sharing Current Section.

2. In the "Start Live Session" task pane, enter a session password and click Start Live Sharing Session button.
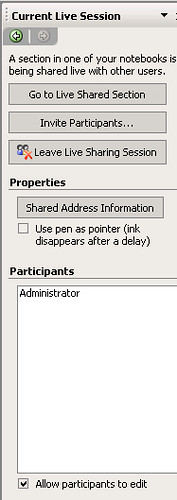
3. In the "Current Live Session" task pane, you will find following three options:
a. Go to Live Shared Section
b. Invite Participants
c. Leave Live Sharing Session


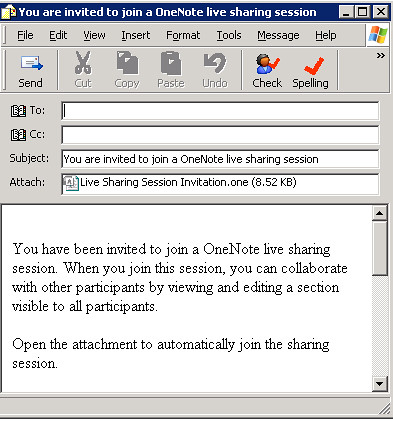
4. Click Invite Participants to invite more people to this live session. Clicking the Invite Participants button will open an email editor. Insert users in the To: field and click Send.

Shared Notebook
Ok, time to see SharePoint in action!
1. In the menu bar, select Share > Create Shared Notebook...

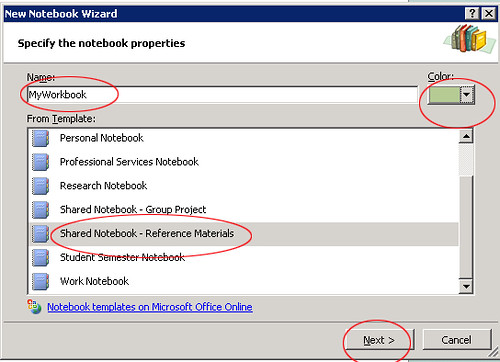
2. Enter a name for your shared notebook in the Name field and select a color of your choice. There are different templates available for you to select. I selected Shared Notebook - Reference Materials. Click Next to proceed.

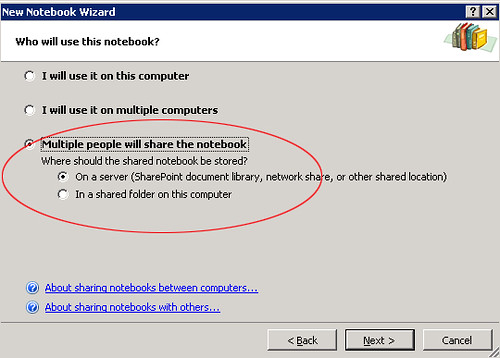
3. Select the third option Multiple people will share the notebook and select On a server ... in the other options.

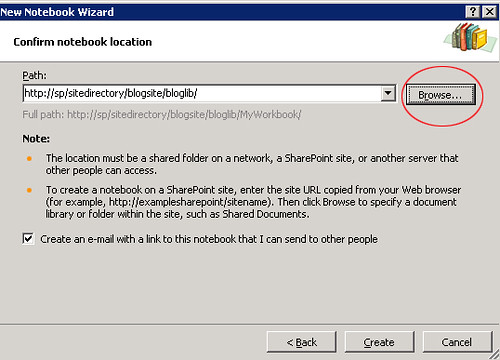
4. Click the Browse... button to select a destination path. It should be a document library in SharePoint. Check the checkbox shown at the bottom if you want to create an email to send to other people and finally, click Create.

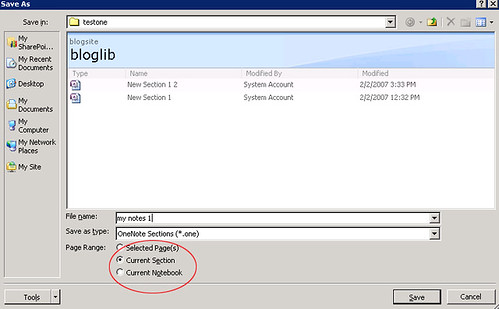
5. This will create a shared notebook in SharePoint. Now, to test sharing, create a note and type something in it and select File > Save As from the menu bar.

6. Enter a file name and select a page range. You have following options to save the note book:
a. Selected Pages.
b. Current Section
c. Current Notebook.

Select an option and click the Save button. This will save your note in SharePoint. If you open SharePoint, you will see your note saved in there. Click the link to the saved note in SharePoint and it will open the note in OneNote. Now, everyone in the document library will have access to the note. You can manage permissions in the document library. Contributors will be able to modify your saved notebook.
7. You can manage SharePoint document library right from within OneNote. Select Tools > Document Management from the menu bar.

8. This will open Document Management task pane on the right.

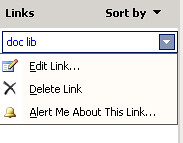
The first icon shows the members of the document library and number below the icon is the total number of members in the document library. The second icon shows the tasks. The third icon shows the number of items in the library and the number below the icons shows the number of items. The fourth option shows the links. Move mouse over one of the listed links, a drop down will appear, open it. You will see three options. You can edit the listed link or even delete it permanently and if you want to be notified about the changes in this link, select the third option. It will take you to the alerts setting page in SharePoint where you will be able to subscribe to the alert.

That's it. There are a couple of nice tips on Olya's blog:
1. Assigning Outlook tasks from OneNote shared notebooks
2. Enabling searching of OneNote content on SharePoint sites (My favorite!)
Published Friday, February 02, 2007 7:51 PM by ssa

Comment Notification

If you would like to receive an email when updates are made to this post, please register here
Subscribe to this post's comments using RSS

Comments


ssa said:

Bob Mixon has written an excellent post on OneNote and SharePoint. Here is the link to his blog:


-SSA
February 7, 2007 2:04 AM

Saturday, August 25, 2007

I am back!

Hi
This is just a test post. I am trying to open my wings and thinking about restarting blogging. I got so disappointed when this server crashed and I lost all my SharePoint posts that I couldn't muster enough confidence to publish any new posts. :)
There were about 200 posts on this blog. Unfortunately, I hadn't taken any backup as I was using this blog as a backup tool. Anyway, I have retrieved some posts from the internet cache and I will try to publish the content very soon. I have been quite inactive during the last 4-5 months. I changed gears and became a consultant and made my life miserable ;). Before becoming a consultant, I always had enough time to play with my SharePoint installation, explore things, write about SharePoint, discuss ideas with my blog readers, publish code and there was lot more to do but life has become very busy after becoming a consultant. It's a pretty fast paced world out there. I still explore new things, new ideas but unfortunately don't find time to publish anything. I may not be able to write full length articles any more but I promise I will try to post as many tips as I can frequently.
 And yeah, I forgot to mention, I became a MOSS MVP in April this year. Did I mention that before? Anyway, stay tuned!!
 Regards,

 SSA