Do you get this error when you try to shut down Windows?
Solution:
1. Kill explorer.exe process
2. Start explorer.exe process. You can start new process by going to File menu in Windows Task Manager. Select "New Task (Run...)" and enter "explorer.exe" and Ok to start this process.
Now your computer will shut down. This error occurs when you try to copy or move a file from your computer to another computer and cancel the process in the middle. In my case, I was trying to copy my VPC image to another machine but cancelled the process. Later when I tried to shut down Windows in my VPC, it threw this error. Killing explorer.exe resolved the issue.
A Practical Guide to SharePoint 2013

A Practical Guide to SharePoint 2013 - Book by Saifullah Shafiq
Showing posts with label document modifier. Show all posts
Showing posts with label document modifier. Show all posts
Wednesday, October 14, 2009


Wednesday, November 12, 2008
InfoPath Error: Cannot cast 'DataConnections[]' (which has an actual type of .....
Error:
(FileSubmitConnection)DataConnections["Submit"] Cannot cast 'DataConnections["Submit"]' (which has an actual type of 'Microsoft.Office.InfoPath.Server.DocumentLifetime.SubmitToHostConnectionHost') to 'Microsoft.Office.InfoPath.FileSubmitConnection' Microsoft.Office.InfoPath.FileSubmitConnection
Have you seen this error before? It occurs if you try to submit form to a host but you use data connection of type "FileSubmitConnection". Here is the code:
FileSubmitConnection connection = (FileSubmitConnection) (DataConnections[“Submit”]);
You can submit to the following locations:
1. Web service
2. Forms library
3. As an email message
4. To the hosting environment
The code above is meant for submitting to a forms library. In workflow forms, people submit task forms to a hosting environment and they forget to change the data connection type, that is when they get this error. It is important you use correct casting when submitting the form. To submit a form (task form) to hosting environment, you should use following code:
SubmitToHostConnection connection = (SubmitToHostConnection) (DataConnections[“Submit”]);
Sunday, June 10, 2007
What is the datatype of the Yes/No field?
Value type has to be provided when writing a query for the SPQuery object. How do you access a Yes/No field or let's put it in another way! What is the data type of the Yes/No field in SharePoint? The data type is "Boolean" and the value has to be provided as 1 or 0. Providing a value of Yes or No or True or False will not work. Ok, sometimes the query fails even if you provided the value as 1 or 0. You get a strange error. Following is the error message:
"One or more field types are not installed properly. Go to the list settings page to delete these fields"
To fix this error, you will have to use the internal name of the field in the spquery. Yes, internal names can be different from the names displayed in the site. For example, internal name for the field "My Field" can be "My_x0020_Field".
Here is the sample code:
SPQuery query = new SPQuery();
query.Query = "<Where><Eq>FieldRef Name='My_x0020_Field'></FieldRef><Value Type='Boolean'>1</Value></Eq></Where>";
This will search for records where "My Field" has the value of 1 (Yes).
Easiest way to find the internal name of the field is to open the "New" form in browser and then view it's source. Right-click any where in the "New" form to open the context menu and select "View Source". You will find the fields along with their internal names near the end of the source file.
-SSA
"One or more field types are not installed properly. Go to the list settings page to delete these fields"
To fix this error, you will have to use the internal name of the field in the spquery. Yes, internal names can be different from the names displayed in the site. For example, internal name for the field "My Field" can be "My_x0020_Field".
Here is the sample code:
SPQuery query = new SPQuery();
query.Query = "<Where><Eq>FieldRef Name='My_x0020_Field'></FieldRef><Value Type='Boolean'>1</Value></Eq></Where>";
This will search for records where "My Field" has the value of 1 (Yes).
Easiest way to find the internal name of the field is to open the "New" form in browser and then view it's source. Right-click any where in the "New" form to open the context menu and select "View Source". You will find the fields along with their internal names near the end of the source file.
-SSA
Thursday, March 8, 2007
Adding a field to the document library template
Update: This post has been retrieved from a web archive, there might be some dead links. Please send an email to share.point@yahoo.com if you find any dead links on this page. Thank you!
Reposted on: Aug 30, 2007
--
Note: Don't forget to make backup copies of the files you modify in this tip.
1. Open schema.xml file for the document library that is located in the following path:
LocalDrive:Program FilesCommon FilesMicrosoft Sharedweb server extensions12TEMPLATEFEATURESDocumentLibraryDocLib
2. Locate <Fields> tag and add following field inside the <Fields> tag:
<Field ID="{20487AC7-D872-4B10-ACB8-CF3002C29687}" Type="Text" Name="MyField" ShowInNewForm="FALSE" ShowInFileDlg="FALSE" DisplayName="$Resources:core,MyField;" Filterable="TRUE" Sortable="TRUE" Sealed="TRUE" SourceID="http://schemas.microsoft.com/sharepoint/v3" StaticName="MyField"><!-- _locID@DisplayName="camlid2" _locComment=" " -->
</Field>
</Field>
Field ID should be unique. Run Select NewID() in SQL Query Analyzer to get a new GUID and use it as the field ID.
3. Open core.en-US.resx file located in the following path:
LocalDrive:Program FilesCommon FilesMicrosoft Sharedweb server extensions12Resources
4. Locate following tag in the file:
<!-- shared resources -->
and add following lines in this section (shared resouces section)
<data name="MyField">
<value>My Demo Field</value>
</data>
<value>My Demo Field</value>
</data>
5. Save the changes and reset IIS. Next time when you will create a document library, this field will be a part of your document libray.
I once blogged about creating site definitions in SPS 2003. Things have changed a lot in version 2007 but this time we have lot of help available in the form of blogs, forums, etc. If you want to learn more about site definitions in 2007, read following excellent articles by Todd Baginski:
-SSA
Thursday, February 22, 2007
Colligo Reader Review
Colligo Reader Review
Colligo Reader provides read-only access to SharePoint content offline. Connect to a SharePoint site and download the documents to your machine and access them offline.

Usage is very easy. Download a site to your local machine (See figure below).
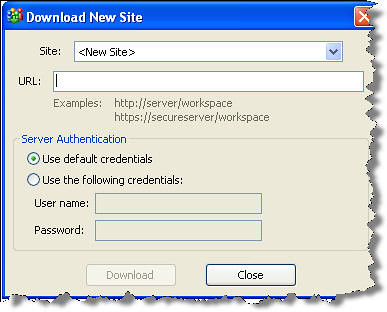
One can use the default credentials or you can log in using any other user name.
After downloading the site, you can synchronize the content any time you want.
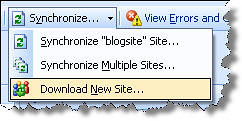
Another good feature is "Synchronizing Multiple Sites". You can synchronize multiple downloaded sites at a time. It is a one way synchronization, you can only download files. You can not upload files to the SharePoint sites.
By the way, Colligo Reader has exactly the same core functionality that WS-Downloader provides :). WS-Downloader is a free tool to download SharePoint libraries to the hard disk. All you need is a GUI to show the downloaded files and "Synchronize" button to update the downloaded content. It is also available as a web part and it is open source. You can download the source code here.
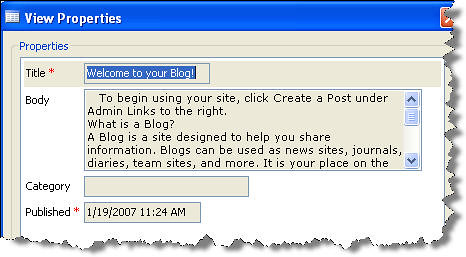
Biggest advantage of Colligo Reader is that you can download stuff from other lists as well and you can open the downloaded content in Colligo Reader, for example, blog posts downloaded from SharePoint open in Colligo Reader.
--------------------
Update:
Originally posted: Fri, Feb 23, 2007
Reposted: Aug 26, 2007
Some of the links might not work as this version was retrieved from a web archive. If you find any dead links, kindly send an email to share.point@yahoo.com with the URL of this page. Thank you!
-------------------------
Wednesday, February 7, 2007
WS-Downloader: Tool for downloading documents from SharePoint libraries
WS-Downloader
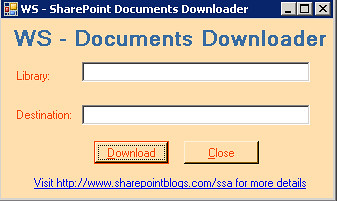
WS-Downloader is a small tool that downloads documents from SharePoint libraries. There is a room for improvement in the tool. Currently, it's in a very basic form having two text boxes, one for the document library path and the other for entering the destination path on the local computer.
Usage
Enter document library path in the first text box, for example, http://portal/sitedirectory/site1/doclib1.
Enter local path in the Destination box, for example, C:My DocumentsStore
Click the Download button to start downloading documents.
It will download all documents from the library to the local file system.
To Do
1. It currently works on the server machine. You will have to use it on the SharePoint server machine. To make it work remotely, I will write a web service which will make downloading documents remotely possible.
2. Instead of entering library path manually, there should be a drop down or a list box with check boxes for users to select the library.
3. It can not maintain the folder structure while downloading the files from the library. It will download the files from the root of the library as well as folders inside the library but the folder structure won't be copied to the file system. For example, if there are two files in the library and 2 files in the folder inside the library, the tool will download 4 files in total but without creating the folder on the file system.
Download
Click here to download the zip file. Zip file contains only the .exe. I created a setup package earlier but its size exceeded 5 MB and I knew it would be difficult for users to download this huge package, therefore, I didn't upload it.
WS-Downloader is a small tool that downloads documents from SharePoint libraries. There is a room for improvement in the tool. Currently, it's in a very basic form having two text boxes, one for the document library path and the other for entering the destination path on the local computer.
Usage
Enter document library path in the first text box, for example, http://portal/sitedirectory/site1/doclib1.
Enter local path in the Destination box, for example, C:My DocumentsStore
Click the Download button to start downloading documents.
It will download all documents from the library to the local file system.
To Do
1. It currently works on the server machine. You will have to use it on the SharePoint server machine. To make it work remotely, I will write a web service which will make downloading documents remotely possible.
2. Instead of entering library path manually, there should be a drop down or a list box with check boxes for users to select the library.
3. It can not maintain the folder structure while downloading the files from the library. It will download the files from the root of the library as well as folders inside the library but the folder structure won't be copied to the file system. For example, if there are two files in the library and 2 files in the folder inside the library, the tool will download 4 files in total but without creating the folder on the file system.
Download
Click here to download the zip file. Zip file contains only the .exe. I created a setup package earlier but its size exceeded 5 MB and I knew it would be difficult for users to download this huge package, therefore, I didn't upload it.
Thursday, November 9, 2006
Writing an event handler for a survey
Writing an event handler for a survey
Make sure event handlers are enabled on the site where your survey is.
1. To enable event handlers for your site, go to "SharePoint Central Administration".

2. Select "Application Management" tab and then select "Web application settings" in "SharePoint Web Application Management" section.

3. Select your web application from the drop down. Click "Change Web Application" and then select your web application from the form that opens.

4. Scroll down and locate the "Event Handlers" section and turn them on.

5. Now go back to your site. You are ready to write an event handler for your survey. I will create an event handler just for the demo purposes. There will be only one question in our survey:
Is MOSS 2007 an excellent product?
Answer to this question is either "Yes" or "No". Type is "Choice" and options are "Yes" and "No". Choices should be displayed as radio buttons.
6. Start a new "Class library" project in VS and select C# as the programming language. Project will contain just a few lines of code. I just want to show you how one can capture events in a handler and how the syntax differs from the SPS 2003 code. Following is the complete code for the handler:
using System;
using System.Collections.Generic;
using System.Text;
using Microsoft.SharePoint;
using System.Net.Mail;
namespace surveyhndlr
{
public class handler : SPItemEventReceiver
{
public override void ItemAdding(SPItemEventProperties properties)
{
SPList oSurvey = properties.OpenWeb().GetList("http://sp:81/SiteDirectory/site1/Lists/Survey2");
string userResponse =
oSurvey.Items[oSurvey.Items.Count - 1]["Is MOSS 2007 an excellent product?"].ToString();
string body = string.Empty;
if (userResponse == "Yes")
{
body = "Dear user, <BR> Thank you for voting in favor of MOSS 2007.";
}
else
{
body = "Dear user, <BR> Please install MOSS 2007 B2TR if you haven't already done so and then give it another try. B2TR will fix many issues that you are facing in Beta 2. ";
}
SmtpClient oSMTP = new SmtpClient();
oSMTP.Host = "mail.mysite.com";
oSMTP.Send("share.point@yahoo.com","share.point@yahoo.com","Thanks for responding to the survey",body);
}
}
}
using System.Collections.Generic;
using System.Text;
using Microsoft.SharePoint;
using System.Net.Mail;
namespace surveyhndlr
{
public class handler : SPItemEventReceiver
{
public override void ItemAdding(SPItemEventProperties properties)
{
SPList oSurvey = properties.OpenWeb().GetList("http://sp:81/SiteDirectory/site1/Lists/Survey2");
string userResponse =
oSurvey.Items[oSurvey.Items.Count - 1]["Is MOSS 2007 an excellent product?"].ToString();
string body = string.Empty;
if (userResponse == "Yes")
{
body = "Dear user, <BR> Thank you for voting in favor of MOSS 2007.";
}
else
{
body = "Dear user, <BR> Please install MOSS 2007 B2TR if you haven't already done so and then give it another try. B2TR will fix many issues that you are facing in Beta 2. ";
}
SmtpClient oSMTP = new SmtpClient();
oSMTP.Host = "mail.mysite.com";
oSMTP.Send("share.point@yahoo.com","share.point@yahoo.com","Thanks for responding to the survey",body);
}
}
}
Don't forget to include "System.Net.Mail" namespace. This will be used in sending emails from the code. We are using ItemAdding event that will capture the user response before the response is actually submitted. Open your survey using the following line:
SPList oSurvey = properties.OpenWeb().GetList("http://sp:81/SiteDirectory/site1/Lists/Survey2");
The following line will return the user's response:
string userResponse =
oSurvey.Items[oSurvey.Items.Count - 1]["Is MOSS 2007 an excellent product?"].ToString();
It doesn't matter what the user response is. He can select "Yes" or "No". In both cases, an email will be sent to the user. We will just change the content of the mail, that's it!
oSurvey.Items[oSurvey.Items.Count - 1]["Is MOSS 2007 an excellent product?"].ToString();
It doesn't matter what the user response is. He can select "Yes" or "No". In both cases, an email will be sent to the user. We will just change the content of the mail, that's it!
Define an SMTP object.
SmtpClient oSMTP = new SmtpClient();
You can change your mail server using the following line:
oSMTP.Host = "mail.mysite.com";
Following line will send the mail.
oSMTP.Send("share.point@yahoo.com","share.point@yahoo.com","Thanks for responding to the survey",body);
I have hard coded the email addresses but you can get user's email address using the SPContext object. For example, you can use following code to get currently logged in user's email address:
I have hard coded the email addresses but you can get user's email address using the SPContext object. For example, you can use following code to get currently logged in user's email address:
SPContext ctx = new SPContext();
string useremail = ctx.Web.CurrentUser.Email;
string useremail = ctx.Web.CurrentUser.Email;
7. Now, compile your code and strong name the assembly. Strong naming utility (sn.exe) can be found in the following folder:
C:Program FilesMicrosoft Visual Studio 8SDKv2.0Bin
Run the following command to strong name your assembly:
sn.exe -k key.snk
You can copy the sn.exe utility to the folder where your assembly is located. Resulting key will be written to the key.snk file.
8. Go to your project's properties (Right click project name in the solution explorer and select "Properties" from the menu) and select "Signing" from the menu that appears on the left. This will open a form.

Check "Sign the assembly" checkbox and choose the key file from the drop down (Click the "Browse..." button in the drop down to locate the key.snk file that you generated in the previous step).
9. Re-compile your assembly.
10. Place your assembly in the GAC. We will use ".NET Framework 2.0 Configuration" application, although there are other ways of adding the assembly to the GAC. You can use gacutil.exe tool as well. Anyway, Go to control panel, click "Administrative Tools" and select "Microsoft .NET Framework 2.0 Configuration".
11. Click "Manage the Assembly Cache" and then select "Add an Assembly to the Assembly Cache". Locate the assembly and click "Open".
12. Read the "Public Key Token" from the Assembly Cache. Select your newly added assembly in the assemblies list and note down the public key token that appears as the last column.
13. Your event handler has been placed in the GAC. Now it is the time to bind the event handler to the list. Unlike SPS 2003 where you could use interface to bind handlers, you will have to write few more lines of code because in MOSS 2007, you have to bind the event handlers programmatically. Create a new Windows Application in Visual Studio and paste following lines in the form's Load() event:
SPSite site = new SPSite("http://sp:81/SiteDirectory/site1");
SPWeb web = site.OpenWeb();
SPList survey = web.Lists["Survey2"];
string assemblyName = "surveyhndlr, Version=1.0.0.0, Culture=neutral, PublicKeyToken=a34245adab33a20a";
string className = "surveyhndlr.handler";
survey.EventReceivers.Add(SPEventReceiverType.ItemAdding, assemblyName, className);
MessageBox.Show("Done");
SPSite site = new SPSite("http://sp:81/SiteDirectory/site1");
SPWeb web = site.OpenWeb();
SPList survey = web.Lists["Survey2"];
string assemblyName = "surveyhndlr, Version=1.0.0.0, Culture=neutral, PublicKeyToken=a34245adab33a20a";
string className = "surveyhndlr.handler";
survey.EventReceivers.Add(SPEventReceiverType.ItemAdding, assemblyName, className);
MessageBox.Show("Done");
The public key token you noted down earlier will be used in this code. Define a variable named "assemblyName" of string type and include assembly's name, version, culture and publickeytoken. Define another variable called as "className" of string type and use the following line to add your handler to the EventReceivers list:
survey.EventReceivers.Add(SPEventReceiverType.ItemAdding, assemblyName, className);
14. That's all! Open the survey and respond to the question. Select "Yes" or "No", an email will be sent to the user, in this case, to you with a message specific to the user's response. You can do many things using event handlers. This is an excellent way of extending the "out of the box" functionality. In SPS 2003, you could use event handlers with document libraries only but in MOSS 2007, you can use event handlers with all lists. Users now have more power in their hands.
14. That's all! Open the survey and respond to the question. Select "Yes" or "No", an email will be sent to the user, in this case, to you with a message specific to the user's response. You can do many things using event handlers. This is an excellent way of extending the "out of the box" functionality. In SPS 2003, you could use event handlers with document libraries only but in MOSS 2007, you can use event handlers with all lists. Users now have more power in their hands.
Thursday, September 14, 2006
Text functions for "calculated" field
Q: Is it possible to get the first letter of a column in calculated field?
Use the Left function to get the first letter.
=LEFT(Column1,1) -> This will return the first character of column1
=LEFT(Column1,1) -> This will return the first character of column1
Instructions:
Suppose you want to get the first letter of "Title" field in document library.
1. Add a new column.
2. Give a name to the new column and select "Calculated" as the type.
3. Type the following formula in the formula box:
=Left(Title,1)
4. Keep the return data type as "Single line of text" and click "OK".
2. Give a name to the new column and select "Calculated" as the type.
3. Type the following formula in the formula box:
=Left(Title,1)
4. Keep the return data type as "Single line of text" and click "OK".
Wednesday, August 16, 2006
Creating your own document library template with your own set of fields
You manage a large document management system in your organization. Your organization has many departments. You create a site for each department and each site has a document library. You add some custom fields in your library but you don't want the dialog box to pop-up asking users to enter values for the custom fields whenever they insert a new document. You may have experienced this in your company. When you add custom fields in your document or form library, a dialog box pops up every time user tries to add a new document. Suppose, the number of custom fields exceeds 10. You don't want your users to be presented with a dialog box with more than 10 fields to be filled up every time they add a file. You need to add these fields in all the document libraries in your SharePoint Portal. What do you do? Go to each library, and add these fields? Not a good solution!! Wouldn't it be nice if all these fields get added to your document library template? This way when you will add a new document library to a site, all the custom fields will already be part of the document library and interestingly, you won't get that dialog box popping up each time a document is added to the library.

Let's create a document library template of our own with the following new fields:
1. Level
2. Workflow
3. Approver
Here are the steps to create a template of our own:
1. Go to following location: C:Program FilesCommon FilesMicrosoft Sharedweb server extensions60TEMPLATE1033STSLISTS
2. Copy "DOCLIB" folder and paste it in the same folder. Rename new folder to "MYDOCLIB"
3. Go to: C:Program FilesCommon FilesMicrosoft Sharedweb server extensions60TEMPLATE1033STSXML. This location contains ONET.XML file.
4. After taking back up of the original file, open ONET.XML and locate the following line:
Let's create a document library template of our own with the following new fields:
1. Level
2. Workflow
3. Approver
Here are the steps to create a template of our own:
1. Go to following location: C:Program FilesCommon FilesMicrosoft Sharedweb server extensions60TEMPLATE1033STSLISTS
2. Copy "DOCLIB" folder and paste it in the same folder. Rename new folder to "MYDOCLIB"
3. Go to: C:Program FilesCommon FilesMicrosoft Sharedweb server extensions60TEMPLATE1033STSXML. This location contains ONET.XML file.
4. After taking back up of the original file, open ONET.XML and locate the following line:
<ListTemplate Name="doclib" DisplayName="Document Library" Type="101" BaseType="1"
OnQuickLaunch="TRUE" SecurityBits="11" Description="Create a document library when you have a
collection of documents or other files that you want to share. Document libraries support features such as
sub-folders, file versioning, and check-in/check-out." Image="/_layouts/images/itdl.gif" DocumentTemplate="101">
</ListTemplate>
(Note: It should appear on a single line)
Copy and paste the following line underneath the above line:
<ListTemplate Name="mydoclib" DisplayName="My Document Library" Type="899" BaseType="1"
OnQuickLaunch="TRUE" SecurityBits="11" Description="This is a customized Document Library.
Create a document library when you have a collection of documents or other files that you want to share.
Document libraries support features such as sub-folders, file versioning, and check-in/check-out."
Image="/_layouts/images/itdl.gif" DocumentTemplate="101"></ListTemplate>
(Note: It should appear in a single line)
5. Open Schema.xml from the following path:

C:Program FilesCommon FilesMicrosoft Sharedweb server extensions60TEMPLATE1033STSLISTSMYDOCLIB

6. Take backup of the original file before making changes. Locate following code in the schema.xml:
<List xmlns:ows="Microsoft SharePoint" Name="Documents" Title="Shared Documents" Direction="0"
Url="Shared Documents" BaseType="1" >
<MetaData>
<Fields>
(Note: It should appear on a single line)
Inside <Fields> tag, you can include your own fields. Add following lines inside <Fields> and </Fields> tags:
<Field Type="Text" Name="Level" ShowInNewForm="FALSE" ShowInFileDlg="FALSE" DisplayName="Level"></Field>
<Field Type="Text" Name="WorkFlow" ShowInNewForm="FALSE" ShowInFileDlg="FALSE" DisplayName="WorkFlow"></Field>
<Field Type="Text" Name="Approver" ShowInNewForm="FALSE" ShowInFileDlg="FALSE" DisplayName="Approver"></Field>
Save schema.xml!
7. Restart IIS.
Now, go to "CREATE" page, you will see two document library templates. Select your newly added template and create a document library. This library will have additional fields by default. You can add as many fields as you like.

-SSA
Sunday, August 6, 2006
SharePoint, Document Library, and SQL Server
I recently published an article on developerfusion.co.uk. Here is the link:
http://www.developerfusion.co.uk/show/5613/
Document Libraries are collections of files that you can share with team members on a web based on Windows SharePoint services. Want to know more about Document Libraries?? Read more about Document Libraries on this site:
http://office.microsoft.com/en-au/assistance/ha011412871033.aspx
This link will show you how to create and use a document library. You can extend the functionality of these document libraries by using the "Event Handler Toolkit" that can be downloaded from the Microsoft site:
http://www.microsoft.com/downloads/details.aspx?familyid=4B2C2F1B-D74A-482A-903A-45BB44C5DEC4&displaylang=en
Read more on http://www.developerfusion.co.uk/show/5613/
Regards,
SSA
http://www.developerfusion.co.uk/show/5613/
Document Libraries are collections of files that you can share with team members on a web based on Windows SharePoint services. Want to know more about Document Libraries?? Read more about Document Libraries on this site:
http://office.microsoft.com/en-au/assistance/ha011412871033.aspx
This link will show you how to create and use a document library. You can extend the functionality of these document libraries by using the "Event Handler Toolkit" that can be downloaded from the Microsoft site:
http://www.microsoft.com/downloads/details.aspx?familyid=4B2C2F1B-D74A-482A-903A-45BB44C5DEC4&displaylang=en
Read more on http://www.developerfusion.co.uk/show/5613/
Regards,
SSA
Thursday, August 3, 2006
Changes in Internet Explorer will affect ActiveX
Microsoft has elected to make major changes in how Internet Explorer launches ActiveX controls. Instead of launching ActiveX controls automatically, the user will have to click on the control to activate it. Microsoft had made the Windows Server 2003 and Windows XP Internet Explorer patch available to the general public as a security update in the April patch cycle (which occurs on the second Tuesday of every month).
More about Patch MS06-013
-SSA
Friday, June 30, 2006
SharePoint Document Puller: Extract any Word document from your SharePoint portal and save it on your hard disk!
This is a small tool developed to extract documents from your SharePoint portal. Documents extracted will be saved to your hard disk. This utility will be of great help to the administrators who use SharePoint as document management system. I have worked with such systems. I have deployed enterprise level document management systems for large organizations and I know they have got hundreds of thousands of documents to store in SharePoint libraries. Searching for specific documents in such a large document management system is a headache, so that is where this tool will come in handy. Users can search for Word documents in SharePoint. Tool will return all word documents from all sites, subsites, libraries, etc. With a single click of a button, user can save the selected document to the hard disk. It's that simple.

I could have made this tool a complicated one with lots of other features but for the sake of simplicity, I have kept it small and simple. This version has two main features:
1. With a single click, you can find all Word documents in your SharePoint deployment.
2. You can save selected document to your hard disk.
2. You can save selected document to your hard disk.
Some features that I wanted to implement and might include in the next version:
1. Currently, application retrieves database settings from a text file and hence, it is important for users to modify this text file before being able to use the application. I wanted to include a couple of fields on the form itself so that users would not have to modify the text file. Furthermore, new users may find it difficult to locate the SharePoint database and add it's name to the connection string in the text file.
2. This application searches only Word files in SharePoint whereas it should have the capability to find all other types especially PDF, XLS, PPT, etc. This is not much work and only a couple of lines need to be included in the code. I promise I will do it in next release.
3. Application saves the Word file in the folder where the executable resides. Application should have allowed the user to select a location on the hard disk. This will be included in next release.
Here is what you need to do to run the executable:
1. Edit the db.txt file which is located in the same folder where the EXE resides. This file contains the db connection string. Modify the connection string in this file.
Data Source=sqlserver;Initial Catalog=myPortal1_SITE;User Id=sa;Password=abcd;
"Data source" is your sql server name. "Initial Catalog" contains the name of your portal server site database, for example, if your portal name is "myPortal" then most probably, your database name will be "myPortal1_SITE". Remember, there are three main databases associated with your portal:
a. myPortal1_PROF
b. myPortal1_SERV
c. myPortal1_SITE
b. myPortal1_SERV
c. myPortal1_SITE
We are concerned about the third one only, myPortal1_SITE. You also need to provide User Id and Password (if any) for your database. Modify the connection string and save the db.txt file.
The zip file attached contains only two files: SPDocPuller.exe and db.txt. I could have created an installer but that would have taken a lot of space unnecessarily. I assume you will be running this tool on the SharePoint box. The executable references following files, therefore these should be available on your machine:
Clicking the "Pull Document" button will save the file in the same folder from where you will run the executable file.
I will be looking forward to your comments and suggestions.
Thanks,
-SSA
Thursday, May 4, 2006
Creating your own document library with your own set of fields
Creating your own document library with your own set of fields
You manage a large document management system in your organization. Your organization has many departments. You create a site for each department and each site has a document library. You add some custom fields in your library but you don't want the dialog box to pop-up asking users to enter values for the custom fields whenever they insert a new document. You may have experienced this in your company. When you add custom fields in your document or form library, a dialog box pops up every time user tries to add a new document. Suppose, the number of custom fields exceeds 10. You don't want your users to be presented with a dialog box with more than 10 fields to be filled up every time they add a file. You need to add these fields in all the document libraries in your SharePoint Portal. What do you do? Go to each library, and add these fields? Not a good solution!! Wouldn't it be nice if all these fields get added to your document library template? This way when you will add a new document library to a site, all the custom fields will already be part of the document library and interestingly, you won't get that dialog box popping up each time a document is added to the library.

Let's create a document library template of our own with the following new fields:
1. Level
2. Workflow
3. Approver
2. Workflow
3. Approver
Here are the steps to create a template of our own:
1. Go to following location: C:Program FilesCommon FilesMicrosoft Sharedweb server extensions60TEMPLATE1033STSLISTS
2. Copy "DOCLIB" folder and paste it in the same folder. Rename new folder to "MYDOCLIB"
3. Go to: C:Program FilesCommon FilesMicrosoft Sharedweb server extensions60TEMPLATE1033STSXML. This location contains ONET.XML file.
4. After taking back up of the original file, open ONET.XML and locate the following line:
<ListTemplate Name="doclib" DisplayName="Document Library" Type="101" BaseType="1" OnQuickLaunch="TRUE" SecurityBits="11" Description="Create a document library when you have a collection of documents or other files that you want to share. Document libraries support features such as sub-folders, file versioning, and check-in/check-out." Image="/_layouts/images/itdl.gif" DocumentTemplate="101"></ListTemplate>
Copy and paste the following line underneath the above line:
<ListTemplate Name="mydoclib" DisplayName="My Document Library" Type="899" BaseType="1" OnQuickLaunch="TRUE" SecurityBits="11" Description="This is a customized Document Library. Create a document library when you have a collection of documents or other files that you want to share. Document libraries support features such as sub-folders, file versioning, and check-in/check-out." Image="/_layouts/images/itdl.gif" DocumentTemplate="101"></ListTemplate>
5. Open Schema.xml from the following path:
C:Program FilesCommon FilesMicrosoft Sharedweb server extensions60TEMPLATE1033STSLISTSMYDOCLIB
6. Take backup of the original file before making changes. Locate following code in the schema.xml:
<List xmlns:ows="Microsoft SharePoint" Name="Documents" Title="Shared Documents" Direction="0" Url="Shared Documents" BaseType="1" >
<MetaData>
<Fields>
...
<MetaData>
<Fields>
...
Inside <Fields> tag, you can include your own fields. Add following lines inside <Fields> and </Fields> tags:
<Field Type="Text" Name="Level" ShowInNewForm="FALSE" ShowInFileDlg="FALSE" DisplayName="Level"></Field>
<Field Type="Text" Name="WorkFlow" ShowInNewForm="FALSE" ShowInFileDlg="FALSE" DisplayName="WorkFlow"></Field>
<Field Type="Text" Name="Approver" ShowInNewForm="FALSE" ShowInFileDlg="FALSE" DisplayName="Approver"></Field>
<Field Type="Text" Name="WorkFlow" ShowInNewForm="FALSE" ShowInFileDlg="FALSE" DisplayName="WorkFlow"></Field>
<Field Type="Text" Name="Approver" ShowInNewForm="FALSE" ShowInFileDlg="FALSE" DisplayName="Approver"></Field>
Save schema.xml!
7. Restart IIS.
Now, go to "CREATE" page, you will see two document library templates. Select your newly added template and create a document library. This library will have additional fields by default. You can add as many fields as you like.
-SSA
Friday, April 21, 2006
SharePoint Document Puller
SharePoint Document Puller
This is a small tool developed to extract documents from your SharePoint portal. Documents extracted will be saved to your hard disk. This utility will be of great help to the administrators who use SharePoint as document management system. I have worked with such systems. I have deployed enterprise level document management systems for large organizations and I know they have got hundreds of thousands of documents to store in SharePoint libraries. Searching for specific documents in such a large document management system is a headache, so that is where this tool will come in handy. Users can search for Word documents in SharePoint. Tool will return all word documents from all sites, subsites, libraries, etc. With a single click of a button, user can save the selected document to the hard disk. It's that simple.

I could have made this tool a complicated one with lots of other features but for the sake of simplicity, I have kept it small and simple. This version has two main features:
1. With a single click, you can find all Word documents in your SharePoint deployment.
2. You can save selected document to your hard disk.
2. You can save selected document to your hard disk.
Some features that I wanted to implement and might include in the next version:
1. Currently, application retrieves database settings from a text file and hence, it is important for users to modify this text file before being able to use the application. I wanted to include a couple of fields on the form itself so that users would not have to modify the text file. Furthermore, new users may find it difficult to locate the SharePoint database and add it's name to the connection string in the text file.
2. This application searches only Word files in SharePoint whereas it should have the capability to find all other types especially PDF, XLS, PPT, etc. This is not much work and only a couple of lines need to be included in the code. I promise I will do it in next release.
3. Application saves the Word file in the folder where the executable resides. Application should have allowed the user to select a location on the hard disk. This will be included in next release.
Here is what you need to do to run the executable:
1. Edit the db.txt file which is located in the same folder where the EXE resides. This file contains the db connection string. Modify the connection string in this file.
Data Source=sqlserver;Initial Catalog=myPortal1_SITE;User Id=sa;Password=abcd;
"Data source" is your sql server name. "Initial Catalog" contains the name of your portal server site database, for example, if your portal name is "myPortal" then most probably, your database name will be "myPortal1_SITE". Remember, there are three main databases associated with your portal:
a. myPortal1_PROF
b. myPortal1_SERV
c. myPortal1_SITE
b. myPortal1_SERV
c. myPortal1_SITE
We are concerned about the third one only, myPortal1_SITE. You also need to provide User Id and Password (if any) for your database. Modify the connection string and save the db.txt file.
The zip file attached contains only two files: SPDocPuller.exe and db.txt. I could have created an installer but that would have taken a lot of space unnecessarily. I assume you will be running this tool on the SharePoint box. The executable references following files, therefore these should be available on your machine:
1. Microsoft.Office.Core
2. Microsoft.SharePoint.Portal
3. Microsoft.VisualBasic
4. Scripting
2. Microsoft.SharePoint.Portal
3. Microsoft.VisualBasic
4. Scripting
Clicking the "Pull Document" button will save the file in the same folder from where you will run the executable file.
I will be looking forward to your comments and suggestions.
Thanks,
-SSA
Monday, April 3, 2006
Setting custom properties in Word Template (Document Library)
Level: Beginner
Q: I want my document library template to have custom properties?
1. In your document library select "Modify settings and columns".
2. "Document Template" under "General Settings" shows template URL. Click "Edit Template" link at the end of the URL. This will open the template in MS Word.
3. Select File > Properties.
4. Select "Custom" tab.
5. You will find predefined properties in the drop down. You can also add a new property by typing in the name box, giving it a value and clicking the "Add" button.
6. Click "OK" and save the template.
1. In your document library select "Modify settings and columns".
2. "Document Template" under "General Settings" shows template URL. Click "Edit Template" link at the end of the URL. This will open the template in MS Word.
3. Select File > Properties.
4. Select "Custom" tab.
5. You will find predefined properties in the drop down. You can also add a new property by typing in the name box, giving it a value and clicking the "Add" button.
6. Click "OK" and save the template.
Now, all new documents created in the library will have custom properties set.
-SSA
Friday, March 3, 2006
Submitting to Portal Area does not show the document in portal area?
There are two things that you should take into consideration.
1. If you are submitting to a portal area and you have selected "Home" as the location then you must select your audience. Audience should be all portal users. If you do not select audience then your file will not show on the home page of the portal.
2. If you submit to a specific location in portal area then you must select the exact location. For example, if you submit to "Topics" area, your file will not be visible in this area if it has sub areas. If you want to see your file, then submit the file to the exact location including area + sub area, for example, submit file to Topics > Projects.
1. If you are submitting to a portal area and you have selected "Home" as the location then you must select your audience. Audience should be all portal users. If you do not select audience then your file will not show on the home page of the portal.
2. If you submit to a specific location in portal area then you must select the exact location. For example, if you submit to "Topics" area, your file will not be visible in this area if it has sub areas. If you want to see your file, then submit the file to the exact location including area + sub area, for example, submit file to Topics > Projects.
Saturday, February 4, 2006
How can we retrieve an older version of a document using .NET?
How can we retrieve an older version of a document using .NET?
spFile = EventWeb.GetFile( _FileName );
if (spFile.Versions.Count > 1)
{
//restore previous version
spFile.Versions.Restore(spFile.Versions.Count - 1);
}
if (spFile.Versions.Count > 1)
{
//restore previous version
spFile.Versions.Restore(spFile.Versions.Count - 1);
}
Similarly, you can delete the document version:
spFile.Versions.Delete(spFile.Versions.Count - 1);
Friday, February 3, 2006
Publish Your "MS Dynamics SL/Word Documents" to a SharePoint Site
I was reading this article on Microsoft which shows us how to publish Dynamic SL Documents to a SharePoint site.
You can follow the same steps to publish your word documents to a SharePoint site. There are other means to do this as well but just for the sake of experimenting, i thought it would be nice to see how things work. > When you install MS Office 2003, you get a new printer - the Microsoft Office Document Image Writer printer. > When you install Adobe, you get a new printer - Adobe Distiller. Why I mention Adobe is because you can publish your documents as PDFs using Adobe Distiller. 1. Map a drive to your SharePoint document library. 2. Open word document on your local drive and click Ctrl-P to open printer options. Change your printer to Microsoft Office Document Image Writer printer. 3. Click OK to print, the File Save As dialog box will open. Select your mapped drive, give a name to your file and click OK. This won't save your file as a Word document. It will save it in MDI format and clicking this file in SharePoint won't open it directly but you will be asked whether you want to open or save it. It will be opened in Microsoft Office Document Imaging. If you want to convert your document to PDF, select Adobe Distiller as your printer. Your documents will be saved as PDFs. Another thing that you may be interested in is you can decide what to print. You can print the whole document or you can just print the document properties. There is a drop down "Print What" in Print Options dialog box. Select "Document properties" to print document properties only. -SSA |
Saturday, September 3, 2005
Taking Backup of IIS 6.0
This may prove to be useful especially if you want to take back up of SharePoint virtual servers, application pools, etc.
To take backup of IIS 6.0, follow these steps: 1. Open IIS 2. Select server (Right Click) > All Tasks > Backup/Restore Configurations 3. Click "Create Backup" 4. Name your backup and click OK. You can encrypt your backup using a password. "Create Backup" and "Restore" buttons are placed side by side. To restore: 1. Open IIS 2. Select server (Right Click) > All Tasks > Backup/Restore Configurations 3. Click "Restore" to restore the metabase. -SSA |
Showing "Previous" link in document libraries
How can we show "Previous" link in our document libraries? I have been asked this question many times and i have answered it on newsgroup as well. Suppose, you have limited the number of records to be displayed on a single page of a view to 10 and total number of records exceeds 10. What will happen? Paging! Yes, a "Next" link will be added at the bottom of the view. You can move forward using the "Next" link but how would you go back? There is no "Previous" link. Users have to hit the browser's back button in order to go back and this annoys many site administrators. Well, here is one solution to show the "Previous" link along side "Next" link:
1. Open your list in Frontpage.
2. Open the page for the view for which you want to add the previous link, for example, open AllItems.aspx for "All Tasks" view or open duetoday.aspx
for "Due Today" view.
3.Right click list view to open the context menu. Select "Convert to XSLT Data View" from the context menu.
4. Save your list.
2. Open the page for the view for which you want to add the previous link, for example, open AllItems.aspx for "All Tasks" view or open duetoday.aspx
for "Due Today" view.
3.Right click list view to open the context menu. Select "Convert to XSLT Data View" from the context menu.
4. Save your list.
Preview modified view in SharePoint, you will see both "Next" and "Previous" links at the bottom of the list.
-SSA
Subscribe to:
Posts (Atom)
Comments
Stacy Draper said:
ssa said:
Congrats on getting the MVP award! (I just found out after visiting your new blog).
Regards,
SSA
" + title + " said:
Jerry said:
regards,
Jerry
ssa said:
Yes, I have blogged about "Uploading" a couple of times. I am also working on an uploading tool. Please search this blog for keywords like "upload" and "upload service" to see the *upload* related posts. And, yes i just re-visited your blog and found out that you recently became a dad! :) Congrats!!! and the pictures of your baby are really cute.
Regards,
SSA
Jerry said:
Thanks for the comment on my baby pic. Yea He is Cute.
Regards,
Jerry
ssa said:
Regards,
SSA
All About SharePoint said:
I released WS-Downloader tool last week. WS-Downloader is a small tool that downloads...