
This is a common scenario and considered to be the most complicated one. You change the name of the machine where SharePoint 2010 is installed and you break everything. Yes, you read it right. I am talking about the machine name change. So what are the steps involved in changing the machine name that has SharePoint 2010 installed?
1. First thing that I would suggest is that you use a local account for all the steps mentioned below. You can also use a domain account with administrator privileges but using a local account is preferable. If your machine is connected to the domain, that increases the headaches. I would recommend, disconnect it from the domain and then use local admin account to configure everything. Once everything is setup correctly and running, you can join the domain again. If you have already changed the name of the machine and are now facing issues, just rename it back to what it was before. It may not allow you to change the name back if you are logged in as local admin and still connected to the domain. So login with domain admin account, disconnect the machine from the domain and then log in again with local admin account. Now change the machine name back to what it was. Complete your configuration and then join the domain again but before you change the machine name there are a few steps that you have to take.
2. So, are we ready? OK. I am assuming that you have already changed the machine name and now you are looking for a fix (otherwise you would not be reading this post). If you have not made the change yet, that’s great. Make sure “Builtin\Administrators” group is added to the SQL Security this is because after you change the machine name you will have trouble logging in so it’s important that local admins have permissions in the SQL server.
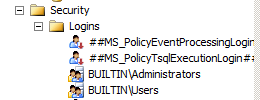
Figure: SQL Logins
Next, make sure that “Builtin\Administrators” are added to the “sysadmin” role.
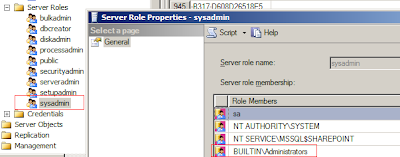
Figure: SQL Server Roles
Note: If you are not using local account to make changes, then make sure the domain account you are using is added in SQL logins and also in sysadmin role.
3. Now open “SharePoint 2010 Management Shell”. Make sure you use elevated privileges to run the shell otherwise the command that you are going to run below will fail.
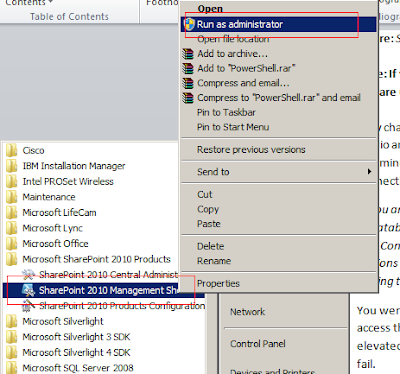
Figure: Run as administrator
4. Run following command in “SharePoint 2010 Management Shell”:
rename-spserver –identity “oldname” –name “newname”
“oldname” is the original machine name that your computer had and “newname” is the new name. Remember, you have changed the machine name, now goal is to replace old machine name with new name in SharePoint databases. The above command will make necessary changes in the databases.
You may get following errors when trying to run the above command:
Cannot access the local farm.
OR
Rename-SPServer : The farm is unavailable
If you get this error, run following command in management shell:
get-spshelladmin
See if the account you are using is listed in the results returned by this command. The result will look like as following:
Figure: get-spshelladmin
If your account is not listed, run following command to add it to the list:
add-spshelladmin “accountname”
Now you should be able to run the rename command as shown above. Note, you may get following error after running the command:
Rename-SPServer : Object reference not set to an instance of an object.
This may not necessarily mean that the action was unsuccessful. Even though command throws this error but server name is changed successfully. To verify, you can log in to central administration site and check there but there are a few more steps to follow before you can access central admin site.
TIP: You may get following error on trying to rename the server name:
The local farm is not accessible. Cmdlets with FeatureDependencyId are not registered.
Reason: You have already changed the machine name and now when you run the rename command, it does not find the local farm because name has changed. So change the machine name back to what it was originally and then run the rename command again.
5. Now change the machine name. After you have changed the name, open SQL management studio and try to connect to the database. If you are unable to connect, don’t worry. Wait for a few minutes. Machine name change takes some time to take effect. If you have succeeded in connecting to the database, proceed to the next step.
TIP:If you are confused about using local and domain accounts and are having trouble in connecting to the database and you have already changed the machine name, revert back the (machine name) change. Connect to the SQL Server and create an SA account. Make sure you give SA account permissions on the “master” database. Now change the machine name and if you have trouble connecting to SQL using “Windows Authentication”, use “SQL Authentication”.
6. You were not supposed to do anything in the previous step apart from ensuring that you could access the SQL server. Run “SharePoint 2010 Products Configuration Wizard”. If wizard fails, try powershell command. Open “SharePoint 2010 Management Shell” and run following command:
psconfig.exe -cmd upgrade -inplace b2b -wait –force

Figure: SharePoint 2010 Management Shell
Note: Run management shell with administrator privileges otherwise the upgrade may fail. To run it with admin privileges, right-click the “SharePoint 2010 Management Shell” command and select “Run as administrator”.
If it still fails, open the log file and see what’s causing the trouble. Upon failure, configuration wizard will create a log file and show you the exact path on screen. Just click that link to open the file. Just in case, if you are wondering, the log file location is as following:
System Drive:\Program Files\Common Files\Microsoft Shared\Web Server Extensions\14\LOGS
You will see something like this at the bottom of the file:
Last message from task upgrade is An exception of type Microsoft.SharePoint.Administration.SPUpdatedConcurrencyException was thrown. Additional exception information: An update conflict has occurred, and you must re-try this action.
Usually this error occurs when you don’t have correct permissions. Running wizard with admin privileges helps you avoid this problem but you never know, if it still occurs then follow the tips given below.
Tip to resolve concurrency exception
Visit following KB article. It has the solution to this problem.
KB article gives following cause and resolution:
Cause
This issue occurs because a lock exists on the SPFarm object. Therefore, the SharePoint Products and Technologies Configuration Wizard cannot update the databases.
Resolution
To resolve this issue, clear the Windows SharePoint Services configuration cache.
If you need exact steps to clear the cache, visit following KB article:
This KB article is for SharePoint 2007 but with minor changes you can make it work for 2010 as well. For example, there is no “Documents and Settings” folder in Windows Server 2008. It’s the “Users” folder on the system drive. In Windows Server 2008, the configuration cache is in the following location:
System Drive:\ProgramData\Microsoft\SharePoint\Config\GUID
Don’t delete the cache.ini file. Just clear it. Select all data in the file and delete it. Then run the wizard again. You will see success message upon successful completion.
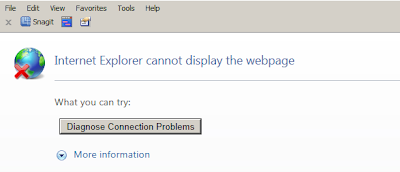
Figure: Page Not Found
If your site URL contains the machine name, replace that part with the new machine name and try again. Now you will see the following error:

Figure: An unexpected error has occurred.
You should be happy that you have reached this far. At least you see a familiar SharePoint error now. Next part is to fix the sites.
8. Now open central admin site. Please note that your old URL will not work. To open central admin, just replace the part before the port number with “localhost”. The site should open now. For example, if central admin URL was “http://serverA:13214”. Replace “serverA” with “localhost” so the URL will be “http://localhost:13214”.
9. Change Alternate Access Mappings. In central administration site, in “System Settings”, under “Farm Management”, click “Configure alternate access mappings”.
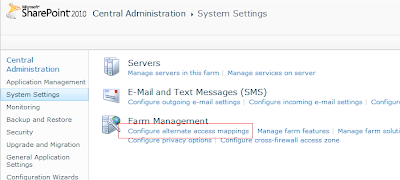
Figure: Alternate Access Mappings
10. Click “Edit Public URLs”. If you don’t see any URLs, change “Alternate Access Mapping Collection” from the drop down. Now change the URLs. Replace old server name with the new one. After this change, you will be able to access central admin site with the server name in the URL instead of using localhost.
11. Enable detailed error messages in web.config. This is important because if SharePoint site loading fails, you should be able to see a detailed error message. Of course, you can also check error logs for details but it is convenient to see error messages instantly when the problem occurs. To enable error messages, follow these steps:
By the way, by default you see following message when something goes wrong:
Server Error in “/” application.
This is not a helpful message. To enable detailed error message, do the following:
1. In your application’s web.config, locate “<CustomErrors ..." tag and set the mode to "Off". The tag will look like this after the change:
<customErrors mode="Off" />
2. Locate “<SafeModeMaxControls="200" CallStack=..." tag and set the value of "CallStack" attribute to "true". The tag will look like this after the change:
<SafeMode MaxControls="200" CallStack="true" DirectFileDependencies="10" TotalFileDependencies="50" AllowPageLevelTrace="false">
That’s it. If you still don’t see detailed error then go to the following path:
System Drive:\Program Files\Common Files\Microsoft Shared\Web Server Extensions\14\TEMPLATE\LAYOUTS
- Open web.config and set CustomErrors to “Off”.
Setting customErrors mode to Off is enough to show detailed messages but in case if it still does not work for you, do the following as well.
- In same web.config, setCallStack attribute to “true”. If you don’t find that attribute, add the following tag set under "<Configuration>" tag:
<SafeMode MaxControls="200" CallStack="true" DirectFileDependencies="10" TotalFileDependencies="50" AllowPageLevelTrace="false">
<PageParserPaths>
</PageParserPaths>
</SafeMode>
</SharePoint>
Now you should be able to see detailed error messages.
12. Now the last step! Existing sites may not load because of a problem with user profile service application. New sites that you create work perfectly fine. Obviously, one solution is to recreate your sites. That sounds easier but it’s not practical especially if you have many sites with customizations, data, users, etc. If you have few sites that were created without any heavy customizations, go ahead and recreate the sites otherwise stay with me to see how to resolve this issue. You see following (detailed) error when you try to load an existing site in browser.
Server Error in '/' Application.
Object reference not set to an instance of an object.
Description: An unhandled exception occurred during the execution of the current web request. Please review the stack trace for more information about the error and where it originated in the code.
Exception Details: System.NullReferenceException: Object reference not set to an instance of an object.
Source Error:
Exception Details: System.NullReferenceException: Object reference not set to an instance of an object.
Source Error:
An unhandled exception was generated during the execution of the current web request. Information regarding the origin and location of the exception can be identified using the exception stack trace below.
|
Stack Trace:
[NullReferenceException: Object reference not set to an instance of an object.]
Microsoft.Office.Server.Administration.UserProfileApplicationProxy.get_ApplicationProperties() +134
Microsoft.Office.Server.Administration.UserProfileApplicationProxy.get_PartitionIDs() +44
Microsoft.Office.Server.Administration.UserProfileApplicationProxy.IsAvailable(SPServiceContext serviceContext) +329
Microsoft.Office.Server.WebControls.MyLinksRibbon.get_PortalAvailable() +44
Microsoft.Office.Server.WebControls.MyLinksRibbon.EnsureMySiteUrls() +60
Microsoft.Office.Server.WebControls.MyLinksRibbon.get_PortalMySiteUrlAvailable() +15
Microsoft.Office.Server.WebControls.MyLinksRibbon.OnLoad(EventArgs e) +91
System.Web.UI.Control.LoadRecursive() +97
System.Web.UI.Control.LoadRecursive() +206
System.Web.UI.Control.LoadRecursive() +206
System.Web.UI.Control.LoadRecursive() +206
System.Web.UI.Control.LoadRecursive() +206
System.Web.UI.Control.LoadRecursive() +206
System.Web.UI.Page.ProcessRequestMain(Boolean includeStagesBeforeAsyncPoint, Boolean includeStagesAfterAsyncPoint) +2523
|
You get this error because the account name has also changed with the machine name change. For example, if your account name prior to machine name change was “machine1\admin”, now it would be “machine2\admin” (assuming new machine name is “machine2”). You have to give permissions to the new account name in User Profile Service Application. How do you do that? Continue reading!!!
13. In central administration site, click “Application Management”.
14. Click “Manage Service
Applications”.
15.
Click “User Profile Service
Application”. Do not click link, it will take you to a different page. Click
somewhere on the right side of the row to select/highlight the row then click
“Permissions” button in the ribbon. Also, note that this service application
may be named differently in your environment. This is the default name by the
way. If you have not changed it, then this is the one you need to modify. Also
note that there can be more than one User Profile Service Application. You have
to modify the one that is associated with your web application. To find out which User Profile Service
Application is being used by your web application, continue to next step.
16.
In “Application Management”, click
“Manage web applications”.
17.
Select your application.
18.
Click “Service Connections” button
in the ribbon
19.
Scroll down to locate the User
Profile Service Application. There can be multiple user profile service
applications listed here. In that case, you will modify each of them or remove
the one that is not needed. If you want to remove a service application, from
the top drop down in the dialog box, choose “[custom]”. That will enable the
check boxes. Then uncheck the one you want to remove and click OK.
20.
Now you know the service name. Go
back to “Manage Service Applications” page and select the service and click
“Permissions” button in the ribbon.
21.
Check if the account you are currently
logged in with is showing up in the users’ list. You would also get User
Profile error if this list shows a user that does not exist anymore.

Figure: Users in User Profile Service Application Permissions
There are two options to
fix the problem. One is to add the user that existed before (and is showing up
in the list) in the Active Directory. Second option is to remove the user from
this list. Depending on your situation, take the appropriate step. If the user
account that is listed here is not in use anymore then the best option is to
remove him/her from the list. Chances are that you are confronted with the same
common problem that everyone faces after the machine name change. I briefly
touched this issue above. The problem is that account name changes with the
machine name change. If your account was “machine1\admin” before the machine
name change, it became “machine2\admin” after the name change and the user list
we are discussing contains the old name that does not exist. User account
change is reflected in the Active Directory. If you go to Active Directory, you
will see the new account name (“machine2/admin” or simply “admin”) listed
there. Now the problem is you are still using that account and you may be
logged in with that account even when making these changes. Common sense tells
that by adding that the new user name problem will be resolved so you try to
add the new user name in the list and then you are confronted with another
problem. You get following error:

Figure: The specified user or domain group was not found
So before we attempt to
add the user in the list, let me show you how to remove the user if you opt to
go with the first option (of removing non-existing user). It’s simple! Select
the user and click “Remove” button. Just in case, if you get an error trying to
remove the user through the GUI, use the approach that I am going to show you
below for modifying the user.
22.
Problem occurs because User
Profile Service Application does not find the account name that is listed in
the “Permissions”. As mentioned in the previous step, we can fix the problem by
renaming the user account name but how do you do that, that is the question!
Answer is to change the user name directly in the database which is something I
would not recommend but if you are desperate to make things work (by hook or by
crook) then go ahead and follow the steps given below. Before we move forward,
let me tell you that there is another option that will fix the problem without
modifying the database directly and that is to create a new user profile
service application and associate it with the web application that throws
error. This is simple but may not be an option for you if you were using user
profile service heavily before changing the machine name. I will list the steps
anyway just in case you want to take this route.
23.
This step shows how to create new
user profile service and associate it with your web application. In Central
Administration > Application Management, click “Manage service applications” (under “Service
Applications”).
24.
Click “New” button in the ribbon
and select “User Profile Service Application”.
25.
Give a name to the new service.
You can use an existing application pool or create a new one for this service. You can keep all other default values OR you
can copy the options from the existing User Profile Service Application. Click
OK to save the changes.
26.
Now associate the new service
application with your web application. Go to “Manage web applications”. Select
the web application you want to change and click “Service Connections” in the
ribbon. You will see new service application listed there. Check the new one
and uncheck the one that has problem and click OK. Now open your SharePoint
site and voila! It loads!
27.
Now let’s discuss the other
option. The second option was to change the user account in the database. This
will allow you to use your existing User Profile Service Application. Open SQL
Server Management Studio. Open Query Editor. Run following SQL in the query
editor:
SELECT [Id] ,[Name] ,[Properties]
FROM [SharePoint_Config_3f7ab5eb-9bd0-4629-80be-3b618e32d519].[dbo].[Objects]
where [name] = 'User Profile Service Application'
FROM [SharePoint_Config_3f7ab5eb-9bd0-4629-80be-3b618e32d519].[dbo].[Objects]
where [name] = 'User Profile Service Application'
Change the database name
before running the query. The name will be different on your server. First part
of the name will be “SharePoint_Config_” but the GUID will be different. We are
querying the “Objects” table in the configuration database. Where clause allows
us to see only “User Profile Service Application” entries. There may be more
than one entry in the table. In first row, click the value in the “Properties”
column. Right-click and select “Copy”. Paste it in a notepad. Search for
attribute “m_SerializedAcl”. If you find it, look at the user list. It should
be same as the one you saw in GUI. If this is not the same list, continue with
other entries in the table. There will be entries where you will not even find
this attribute. There is another attribute called
“m_SerializedAdministrationAcl”. That is different. We are only concerned with
“m_SerializedAcl”. Once you have found the correct entry, note down the Id from
the “Id” column. We will use it in the update query next.
This is how the tag
containing “m_SerializedAcl” attribute looks like:
<sFld type="String" name="m_SerializedAcl">
This tag contains all the
user accounts. Locate the one that is causing the trouble and modify it. For
example, if the account name (causing the problem) was “machine1/admin”. Change
it to “machine2/admin”. Remember “machine2” represents your new machine name.
Now copy the whole text in the notepad. Enter following update query in the
query editor:
update [SharePoint_Config_3f7ab5eb-9bd0-4629-80be-3b618e32d519].[dbo].[Objects] set Properties='Paste updated TEXT copied from Notepad here' where Id='772ACCBD-3DF1-430F-82A6-5DB47598B14F'
We are updating the
“Objects” table. Replace database name in the query before running it. Also
change “Id” in the “where” clause. This is the same Id that you noted down when
you found the entry (to be modified) in the table. We will update the value in
the “Properties” field with the modified text copied from the Notepad. Run the
query and you are all set. Open the SharePoint site and it should load fine
now.
If you have questions or
feedback or if you simply want to share your experiences, please use the
comments box for this article. Thanks!
ReplyDeleteI am very pleased to find this blog. I want to thank for your time for this wonderful read!!! Keep Sharing, I'll surely be looking for more.
Thanks for the post. Is this article applicable only if SharePoint and SQL Server are in the same machine??? What if SharePoint and SQL are in two different servers?
ReplyDelete