| Creating a Custom Web Service for SharePoint
Category: Microsoft Office SharePoint Server 2007, Windows SharePoint Services 3.0 There are a couple of Microsoft articles available on the internet that walk you through the creation process. Here are the links: Walkthrough: Creating a Custom Web Service (Windows SharePoint Services 3.0) Writing Custom Web Services for SharePoint Products and Technologies (SharePoint Portal Server 2003)
If you are an experienced SharePoint developer, then the articles mentioned above should be enough to get you started but if you are a developer who is new to SharePoint development and you are looking to create your first web service for SharePoint then go ahead, read this article. This article will guide you through the process of creating a custom web service for SharePoint. This web service will work with new versions of SharePoint, Office SharePoint Server 2007 and Windows SharePoint Service 3.0. We will create a simple service that will upload documents to SharePoint. We will call it UploadService. Remember, there are steps in the Microsoft articles that are confusing especially for the beginners, I have taken care of that as well. I have tried to include as much information as possible including screenshots and code snippets to make the job easier for the developer. I have used Microsoft articles as a base for this article. There are some mistakes in the Microsoft articles that have been corrected in this article.
Basic Steps for Creating a Web Service
You can download the sample application (web service) from gotdotnet.com. Here is the link: http://www.gotdotnet.com/Community/UserSamples/Details.aspx?SampleGuid=c032a25e-ddfe-476e-b946-a95c4827a283 Alternate download location Download size is 361 KB.
The zip file contains the web service and its related files. It also contains an installer to help you install the service easily on your server. Unzip the file to your hard disk. It will create a "WSUploadService" folder. You can unzip the file anywhere on your hard disk. There is no restriction on unzipping it to a particular folder. Run "UploadServiceCopier.exe" to install the service. Installer will ask you to select a SharePoint site where this service should be installed. Select your site from the drop down and keep the folder name as "bin" (second field: textbox) and click "Next".
 To uninstall, run the "UploadServiceCopier.exe" again. It will give you the following message: "Service is already installed. Do you want to uninstall it?" Select "Yes" and then select "Remove WSUploadService" and click "Finish" to uninstall the service. Uninstall will remove all copied files from your hard disk.  Please run "UploadServiceCopier.exe" to install/uninstall the service. Do not run "setup.exe" directly as it will not install the service correctly. Creating a Custom Web Service 1. The first step is to create an ASP.NET web service project in Visual Studio 2005. If you don't find a web service project template in visual studio, that means that you are still running an old version of Visual Studio 2005, the one without the service pack. You will have to download and install the Visual Studio 2005 Service Pack 1 Beta from the Microsoft. Here is the link: http://www.microsoft.com/downloads/details.aspx?familyid=8D702463-674B-4978-9E22-C989130F6553&displaylang=en It's a 371.9 MB download and let me tell you in advance that the installation is very slow and takes a lot of time. On the File menu, click New Project. 2. In the Project Types box, select Visual C#. 3. In the Templates box, select ASP.NET Web Service Application. 4. In the Name box, type UploadService. In the Location box, type the following path: C:WebService You can also click the browse button to browse the folders and select the destination folder. This is the path where the project will be stored. In the Solution Name box, type UploadService and check Create directory for solution checkbox. 5. Click OK. 6. In the Solution Explorer, right-click Service1.asmx and rename the file Files.asmx and then right click Files.asmx and click View Code. 7. Add a reference to the assembly for Microsoft Office SharePoint Server 2007 (Microsoft.SharePoint.dll). This assembly is located in the following directory: C:Program FilesCommon FilesMicrosoft Sharedweb server extensions12ISAPI Please note that if you are developing on a machine that does not have SharePoint installed then you can copy the required files from the SharePoint machine to your development machine. 8. Make sure following using directives are included at the top:
12. Open Files.asmx markup page. In Solution Explorer, right-click Files.asmx and select View Markup. You will notice that the markup page has following line:
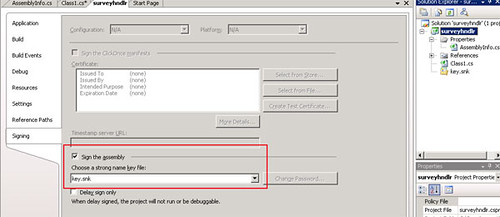
14. In the Create Strong Name Key dialog box, provide a file name for the key, deselect Protect my key file with a password, and click OK.
16. As we are developing this web service on a machine that does not host SharePoint, therefore, we need to create a virtual directory in IIS. Click Start, point to Administrative Tools (You may have to go to the Control Panel first to select Administrative Tools), and then click Internet Information Services (IIS) Manager.
18. Click Next and enter an alias in the text box, for example, for this service you can enter UploadService. 19. Click Next and then click Browse... button to browse to the project folder (containing the .asmx file) and click Next. 20. Click Next again and then click Finish. Generating and Modifying Static Discovery and WSDL Files 21. Use Disco.exe to generate .disco and .wsdl files. This command line utility is located in the following directory: C:Program FilesMicrosoft Visual Studio 8SDKv2.0Bin Open command prompt and type the following line and press Enter: Disco http://localhost/uploadservice/Files.asmx Make sure you have entered the correct path in the command above otherwise you will get an error. If you created a virtual directory on a port other than the port 80, then you must mention the port number in the path (For example, http://localhost:8080/uploadservice/Files.asmx). This will generate the .disco and .wsdl files. 22. To register namespaces of the Windows SharePoint Services object model, open both the .disco and .wsdl files and replace the opening XML processing instruction -- <?xml version="1.0" encoding="utf-8"?> -- with instructions such as the following:
Deploying web service on the SharePoint server Copy the Web service files to the _vti_bin virtual directory 26. Copy the web service files to the _vti_bin directory of the SharePoint server. Web service files that are to be copied are as following: Files.asmx Filesdisco.aspx Fileswsdl.aspx The _vti_bin virtual directory maps physically to the Local_Drive:Program FilesCommon FilesMicrosoft SharedWeb Server Extensions12ISAPI directory, which contains the default Web service files used in Windows SharePoint Services. To include the Web service in the list of web services on the server 27. In Notepad, open the spsdisco.aspx file. spsdisco.aspx is located in the following directory (on the SharePoint server): Local_Drive:Program FilesCommon FilesMicrosoft Sharedweb server extensions12ISAPI28. Add the following lines to the end of the file within the discovery element and save the file:
29. I have seen blogs and forums where people have recommended to copy the assembly to the following folder: Local_Drive:program filescommon filesmicrosoft sharedweb server extensions12isapi Some people say it should be copied to the following folder: Local_Drive:Inetpubwwwroot in bin folder is not there by default and has to be created but safest place to copy the assembly is the bin folder of the virtual directory of the web application where you intend to use the web service. Following path contains the virtual directories of web applications that you have created on your SharePoint server. Local_Drive:InetpubwwwrootwssVirtualDirectories For example, if you want to use the web service in web application at port 81, then you should copy the assembly to the following folder: Local_Drive:InetpubwwwrootwssVirtualDirectories81 in Similarly, if you want to use the web service in web application at port 17316, then you should copy the assembly to the following folder: Local_Drive:InetpubwwwrootwssVirtualDirectories17316 in I am not saying that you can not copy the assembly to the _vti_bin folder or wwwroot folder, of course you can but I have often seen people struggling with the service deployment. People often ask me where they should copy the assembly and what is the best place to put the assembly in. I tested my web service by putting the assembly file in all the recommended places and I found that bin folder of the virtual directory of the web application is the safest place where your web service is guaranteed to work. Copy the assembly to the bin folder of the virtual directory of the web application of your choice. You will have to create the bin folder yourself. It is not there by default. Adding web service to the GAC 30. You must add your assembly in the GAC on your SharePoint server. This is necessary otherwise you will get permissions error on the server. There are three ways to avoid this permissions error. One way is to add the assembly in the GAC. Second way is to change the trust level to medium in the web.config file and the third is to create a custom trust policy of your own. There is an article on Microsoft site that has all the details of Code Access Security (CAS) and it also shows how to create a custom policy file. Here is the link to that article if you are interested in exploring this topic: http://msdn2.microsoft.com/en-us/library/ms916855.aspx Unfortunately, this is an old version and works only with SharePoint 2003. I am not sure if Microsoft has already released an updated version of this article or not. I intend to write an updated version of this article (at least the custom policy file part) for Office SharePoint Server 2007 and Windows SharePoint Services 3.0. To add your assembly to the Global Assembly Cache (GAC), you can either drag and drop the assembly into the %windows%assembly directory using 2 instances of Windows Explorer, or use the command line utility gacutil.exe that is installed with the .NET Framework SDK 2.0. This utility is located in the following folder: C:Program FilesMicrosoft Visual Studio 8SDKv2.0Bin To use gacutil.exe to copy the class library DLL into the GAC
After copying the Web services files to the _vti_bin directory, the next step is to create a Windows Application to consume the Web service. 31. Create a new C# Windows Application in Visual Studio 2005. 32. In Solution Explorer, right-click References, and then click Add Web Reference. 33. In the address bar of the Add Web Reference browser, type the URL for the site to which to apply the service, as follows, and then press ENTER: http://localhost/_vti_bin/Files.asmx?wsdl If you installed the service on another port, for example, port 17316, then the url would be: http://localhost:17316/_vti_bin/Files.asmx?wsdl You can also browse all web services available on the server. Files.asmx will be listed in the web services available on the server. There will be multiple entries, each entry representing the service available for a different web application. Therefore, if you want to upload documents to a site on port 80, then you should select Files.asmx for port 80. 34. Include following using directives at the top: using System.Net; using System.IO; 35. Add following code to your application:
36. Finally, before testing the service, make sure the current user has privileges to upload documents in the destination document library. The user should have "Contributor" rights in the document library otherwise, you will get "401: Unauthorized" error. Run the application to test the service. Frequently Asked Questions Q: I get "Could not create type" error message. What could be the reason? Make sure your .asmx file has correct class name definition. Open your .asmx file and if class name is myFiles, change it to myService.myFiles! <%@ WebService Language="C#" Class="myService.myFiles" %> (Correct) <%@ WebService Language="C#" Class="myFiles" %> (Incorrect) It's better that you use correct format in the first place but you can change the .asmx file after deployment as well. Go to C:Program FilesCommon FilesMicrosoft Sharedweb server extensions12ISAPI folder and open your .asmx file in notepad (or any editor of your choice) and make the changes as mentioned above. Q: I get "Server did not recognize the value of HTTP Header SOAPAction: ..." error? This error occurs if you do not use correct web service namespace. Following three lines should be included in your code, just before the class defintion: [WebService(Namespace = "http://tempuri.org/")] [WebServiceBinding(ConformsTo = WsiProfiles.BasicProfile1_1)] [ToolboxItem(false)] This error can occur even if you omit the trailing slash of http://tempuri.org/, http://tempuri.org will result in an error. Q: I get "File not found." error? This happens when SharePoint fails to find the assembly file. Make sure you have added the assembly in the correct bin folder. Also, make sure you have added the assembly in the GAC. Q: I get "Unauthorized" error? Make sure the user who is trying to use the web service has "Contributor" rights in the destination site or library. Also, make sure following lines are added to your client application: oUploader.PreAuthenticate = true; oUploader.Credentials = CredentialCache.DefaultCredentials; Q: I get "SQL Server might not be started" error. I have double checked, my SQL Server is running. Why am i getting the error? There could be several reasons for this. If you modified the web.config file, reverse the changes you made to the config file and then try again. The error has nothing to do with the SQL Server. Q: I do not see my web service when i click "Web services on the local machine" in Add Web Reference? Did you make changes in the spsdisco.aspx file? To include your web service in the list of web services on the SharePoint server, you must add reference to your web service in the spsdisco.aspx file (within the discovery element). Q: Is it necessary to include the code in the code-behind? No! You can write code in the myFiles.asmx (markup page) and delete the myFiles.asmx.cs file. Here is the myFiles.asmx code listing: <%@ WebService Language="C#" Class="myService.myFiles" %> using System; using System.Data; using System.Web; using System.Collections; using System.Web.Services; using System.Web.Services.Protocols; using System.ComponentModel; using Microsoft.SharePoint; using Microsoft.SharePoint.WebControls; using System.Net; namespace myService { /// <summary> /// Summary description for Service1 /// </summary> [WebService(Namespace = "http://tempuri.org/")] [WebServiceBinding(ConformsTo = WsiProfiles.BasicProfile1_1)] [ToolboxItem(false)] public class myFiles : System.Web.Services.WebService { //[WebMethod] //public string HelloWorld() //{ // return "Hello World"; //} [WebMethod] public string UploadDocument(string fileName, byte[] fileContents, string pathFolder) { if (fileContents == null) { return "Null Attachment"; } try { int iStartIndex = pathFolder.LastIndexOf("/"); string sitePath = pathFolder.Remove(iStartIndex); string folderName = pathFolder.Substring(iStartIndex + 1); SPSite site = new SPSite(sitePath); SPWeb web = site.OpenWeb(); SPFolder folder = web.GetFolder(folderName); string fileURL = fileName; folder.Files.Add(fileURL, fileContents); if (folder.Files[fileURL].CheckedOutBy.Name != "") { folder.Files[fileURL].CheckIn("File Checked In"); } return "File added successfully!"; } catch (System.Exception ex) { return "Error: " + ex.Source + " - " + ex.Message; } } } } |
A Practical Guide to SharePoint 2013

A Practical Guide to SharePoint 2013 - Book by Saifullah Shafiq
Tuesday, December 19, 2006
Creating a custom web service for SharePoint
Subscribe to:
Post Comments (Atom)
Comments
ssa said:
All About SharePoint said:
Kanwal said:
You are now part of the Sharepoint BUZZ
Visit http://www.sharepointbuzz.com/
Mike Walsh's WSS and more said:
ssa said:
prakash said:
decatec said:
jcoyne said:
Olga said:
Suerte!
jcoyne said:
I appreciate the advice but I have tried installing the dll both ways and it did not make a difference.
ssa said:
Olga said:
I forgot reset it. Thank you.
ssa said:
All About SharePoint said:
MOSS 2007 and Code Access Security
Download Sample Custom Policy File
Have you ever written...